
1.1 Start a New Project
ArcGIS Pro organizes GIS work in projects, which are folders containing files for the map, datasets and analysis tools for that map, and other resources specific to a particular GIS goal. Work in ArcGIS Pro always begins by either opening an existing project or starting a new one. Since you are starting your map from scratch, you will need to start by creating a new project.
Section Outcomes
In this section, you will:
- create a new ArcGIS Pro project.
 Intention: Create a new ArcGIS Pro project.
1. Open ArcGIS Pro by finding and clicking on its entry in the Windows start menu or Windows search bar.
2. A Sign In window will open. Sign in using your ArcGIS Online Organization account username and password.
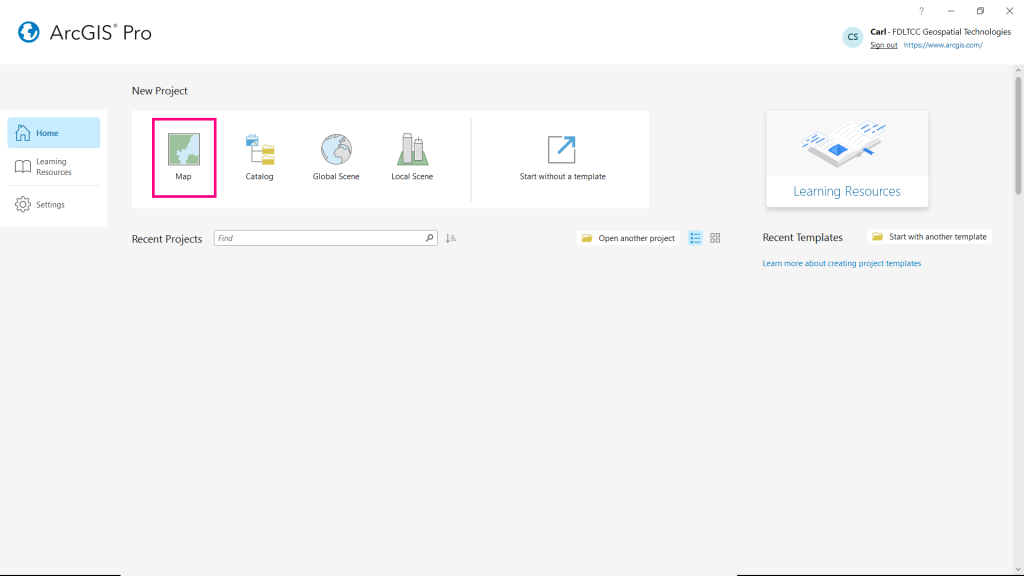
3. Under “New”, click the “Map” template (Figure 1.1).
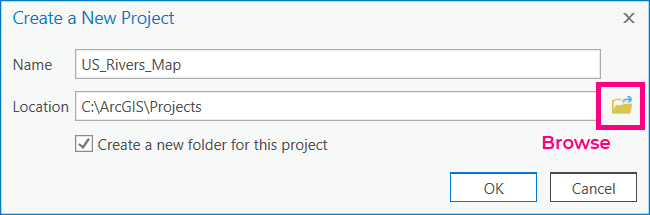
4. In the “Create a New Project” pop-up window (Figure 1.2), replace the generic project name (“MyProject”) with a meaningful name for your project. Your name should not use spaces or special characters. Do not hit the OK button yet.
A note on spaces in filenames: Adding spaces to the names of files is common practice when working in Microsoft Windows, but computer technologists consider it a bad one. Linux-based file systems and some programs cannot handle files with spaces in their names. GIS data files cannot have spaces in their names, or they will not work. It is a good idea to get used to naming files without using spaces. There are two generally recommended alternatives:
- use an _ (underscore) character instead of a space, as in “My_Project”, or
- use CamelCase, wherein you simply capitalize the first letter of each word with no spaces between words, as in “MyProject”.
5. In the “Create a New Project” pop-up window, to the right of “Location”, click the Browse button, which looks like a folder icon. Choose a location in which to save your project, then click “OK”. The file path where the project will be stored should appear next to “Location”.
6. Make sure the box next to “Create a new folder for this project” is checked. Before clicking OK, answer Teachback 2 (below).
Teachback 2
- What did you decide to name your new project? Does this name fit the goal for your map? (If not, consider revising the name to make sure it does).
- Where are you saving your project files? Give the Location file path. How would you access them using Windows Explorer?
7. Click “OK” to create the project.
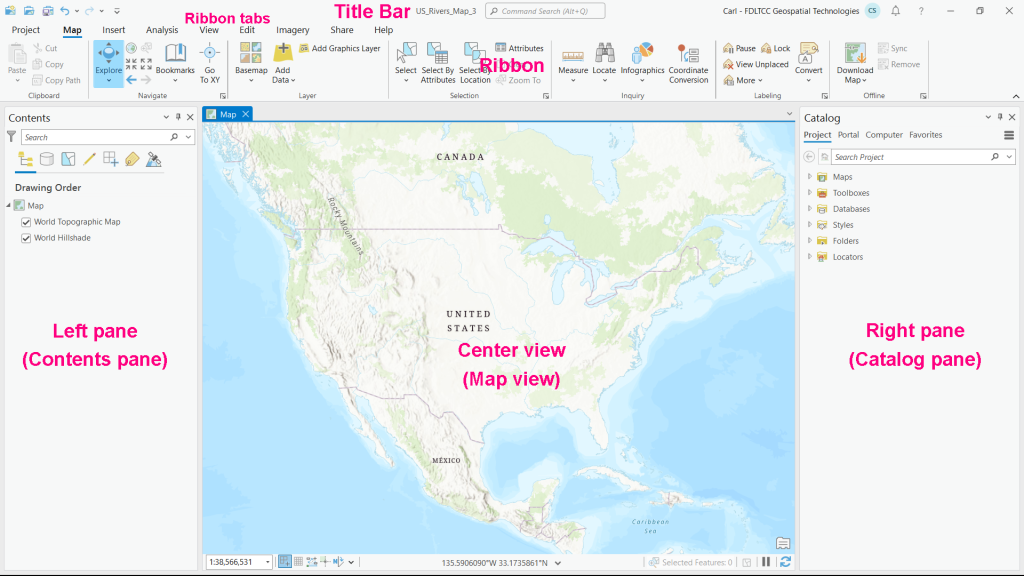
The ArcGIS Pro workspace (Figure 1.3) has five basic components:
- Title bar: The very top of the workspace displays the title of the project in the center. To the left of the title are shortcut buttons to create a new project, open an existing project, save the current project, undo an action, and redo an action. To the right is the signed in user and organization, a notifications menu, a help button that will open the ArcGIS Pro online documentation in a browser, and your typical Windows display buttons to minimize, maximize/restore, and close the program.
- Ribbon: Most of the controls and tools can be accessed through the ribbon interface. The ArcGIS Pro ribbon is modeled on the ribbon interface in Microsoft Office programs, and works the same way. Each ribbon tab (Map, Insert, etc.) contains different tools, organized into tool groups. Some groups have a small button in the lower-right corner that expands the group, giving you more flexible options in the right pane or a separate window. The tabs will change and additional tabs will appear depending on what window is active in the center view and what data layers are selected in the left pane. The ribbon’s overall length will vary depending on the size of your computer monitor, and some tools may be hidden if your screen is narrower.
- Left pane: The left-hand side of the workspace is one of two “pane” areas. By default, it holds the Contents pane when you first start the program. The Contents pane lists the datasets (map layers and tables) and objects (text and drawing elements) that are linked to the active center view window. Each item in the Contents pane has a checkbox that allows you to make it visible or invisible in the center view. The search bar in the pane allows you to search for a specific item, and the buttons below it modify how the items are displayed. Some other tool panes will also open here. If multiple left pane tools are open at the same time, tabs will appear along the bottom of the pane allowing you to toggle between them.
- Center view: The largest part of the workspace is used to display maps, scenes, layouts, tables, and charts. Each window in the center view gets its own tab, allowing you to toggle between windows. The view can also be split vertically into two windows, each displaying a different item. This happens by default when you open the attribute table for a layer shown on the map (we will look at attribute tables later in the chapter).
- Right pane: The right-hand side of the workspace is where most of the tools and functions of ArcGIS Pro that require user input open. The default tool displayed there is the Catalog pane, which allows you to navigate the project’s file system to add items to the active map and Contents pane (you can also open a Catalog window in the center view). Like the Catalog pane, many right pane tools have tabs and menus within them; sometimes each of the pane tabs has other tabs within it! The tool panes are organized so that the options requiring the least complex decision-making are displayed first, with more fine-tuning controls available through the other tabs. As with the left pane, if multiple tools are open in the right pane, each tool will have its own tab along the bottom of the pane.
Another important feature of the ArcGIS Pro interface to be aware of is that if you click and drag on the title bar or tab of any window, you can separate it from its moorings in one of the panes or the center view and move it to an independent position. You can also dock windows in one of the panes, a new pane next to an existing pane, or the center, top center, or bottom center position by dragging the window until your mouse is over the icon for the desired position and it lights up. This really gives you a lot of control over how the interface is organized. However, if you are sharing a computer with other peers or colleagues, you may want to avoid rearranging things out of kindness to them!
Teachback 3
Explore the ArcGIS Pro workspace and answer the following questions:
- What happens to the Map window if you uncheck the checkbox next to the name of the basemap in the Contents pane?
- How does the ribbon change if you click on and highlight the basemap name?
- Choose one tool group from the ribbon to expand, and describe what happens.
- If you have made changes and want to quickly save the project, what are two ways you can do it?

As Figure 1.4 shows, your new ArcGIS Pro project is not contained in a single file, but has its own folder with multiple subfolders and files! To make sure you know what kinds of files you are looking at, it is a good idea to click on the “View” menu in Windows Explorer and make sure the “Show → File name extensions” option is checked. Otherwise, you will just see each file’s icon and root name. Don’t rely on the icons to tell you what kinds of files you see; they can be deceiving! The file extension (the letters to the right of the dot) defines the file type and is used by both programs and people to interpret the file.
For a new ArcGIS Pro project, the .aprx file contains the project workspace—the views, layer styles, links, and settings as of the last time the project was saved. It does not contain any GIS data; the layers in the Contents window merely link to data that is saved somewhere else. This is an important point that will be explained further in Section 1.3.
The .tbx file contains custom tools that are created for the project, and the .gdb folder is a miniature database that holds project datasets. You don’t really need to worry about these or the other two folders right now; their purposes will become clearer later on. However, know that as you build out your project, you may end up adding other files and folders to your project folder and its subfolders. This is a one-stop space where you should keep all of the resources that you create for your project (though not necessarily everything you use in it, as will be covered in Section 1.3).
Teachback 4
- Why is it important to be able to see file name extensions in Windows Explorer?
- Minimize (don’t close) your project workspace and navigate to your project folder in Windows Explorer. What happens when you double-click the .aprx file?
- What is different about the title bar in your answer to question 2, and what does this mean?
One final note to end this section: when you are working in ArcGIS Pro, save early, save often! The program eats up your computer’s processing power and may be prone to crashing, especially if you are running it on a laptop or older desktop machine. Although there is a document recovery feature that can help after a crash, it’s always better to make sure your work is saved whenever you accomplish something. Any time you add or change something in your project, use one of the methods from your answer to Teachback 3, question 5 to quickly save it. That way, if the program crashes, you can pick back up where you left off and won’t lose your precious work!
Further Resources
Additional information about ArcGIS Pro projects and the program workspace is available on the ArcGIS Pro Help website Projects pages.
