
2.3 Geocode Point Features from Addresses
Geographic information comes in many forms. One common way we locate features on the Earth without using a GPS receiver or known latitude and longitude coordinates is using street addresses. You have probably used a map service such as Google Maps to search for an address and find routing directions to it. When performed on many addresses at the same time, this kind of location search is called geocoding.
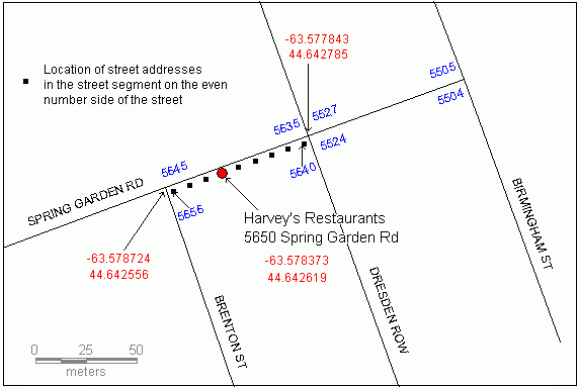
Geocoding works by searching a collection of geographic datasets for features that match components of the address. A geocoding locator first searches for the largest area included in the address (usually a state or region), then searches within that area for a matching municipality or postal delivery zone, then for a matching street, matching block, matching side of the street, and finally, a matching house number. If individual house numbers are not included in the locator’s data, it may interpolate distance between the nearest two block numbers to determine where to place the location (Figure 2.10).
A geocoding locator can be created in ArcGIS Pro using your own reference data, or you can use a commercial geocoding web service with reference data covering the entire world. Creating your own locator requires a large reference dataset and is not covered in this workbook. If you would like to try building a locator from example data and your ArcGIS Online account has access to Esri Training courses, the Mapping Addresses and Places web course includes this component.
The fastest option for most geocoding jobs is to use a geocoding web service. Service providers typically charge a user fee. ArcGIS Pro gives you access to the ArcGIS Online World Geocoding Service. The Locate tool uses this service to find the location of a single address, and does not cost anything extra. However, you must pay in credits to geocode multiple addresses using the service.
 This costs credits! Using the ArcGIS Online World Geocoding Service costs you or your organization 4 credits per 100 addresses geocoded. For more on the way ArcGIS uses credits, see this reference article.
Section Outcomes
In this section, you will:
- Format a table with address data for geocoding,
- Use the ArcGIS World Geocoding Service to geocode table addresses, and
- Check geocoding results and rematch addresses if necessary.
 Format a table with address data for geocoding
Geocoding requires a table with an address and attribute information for each location to be geocoded. It is good practice to always look over a non-spatial table in spreadsheet software before trying to import it into ArcGIS Pro. For geocoding, you will get the best results if each location’s address is split into separate fields (columns) for each address component. If you are geocoding using your own locator, this is required; for the World Geocoding Service, it is optional, but may result in more accurate matches. The directions below assume you are using Microsoft Excel, but other spreadsheet programs, such as LibreOffice Calc and Google Sheets, contain equivalent tools.
1. Open a table containing addresses in Microsoft Excel (or another spreadsheet program).
2. Examine the spreadsheet to ensure the following criteria are met, and edit it to meet them if necessary:
1. There is a single header row at the top of the table.
2. Column headers are 10 characters or fewer, do not begin with a number, and contain no spaces or special characters.
3. Each row below the header row represents data for one unique geographic point feature.
3. Click the letter at the top of the column to the right of the address column to select that column.
4. In the Home ribbon tab, click the “Insert” button.
5. Repeat Step 4 until you have two empty columns to the right of the address column: one for the city, and one for the state and zip code.
6. In the Data ribbon tab, click the “Text to Columns” button.
7. In Step 1 of the Text to Columns Wizard window, leave “Delimited” selected, and click “Next”.
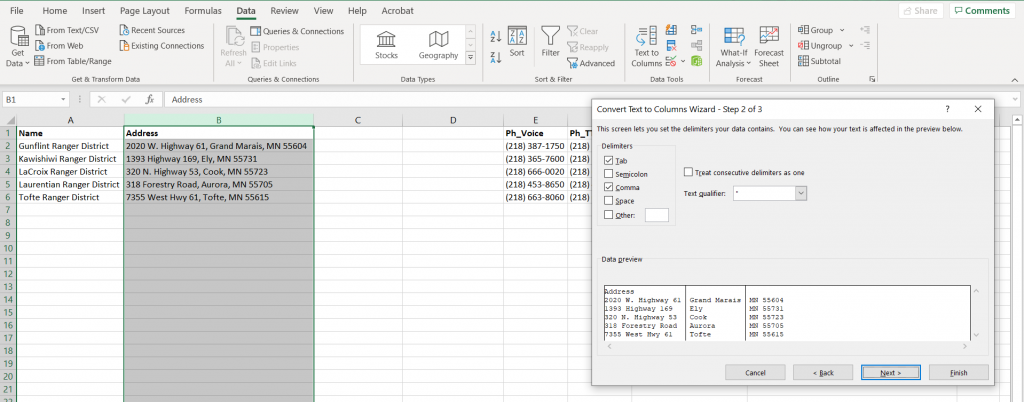
8. In Step 2, under “Delimiters”, check “Comma”, then click the “Finish” button (Figure 2.11).
9. Insert two new columns to the right of the column containing the state and zip code.
10. Use the Text to Columns tool with “Space” as a selected delimiter to split the state and zip code into two separate columns.
12. Right-click the letter above the empty column, then click “Delete” to delete the column.
13. Add column headers for the other new columns that conform with the criteria in Step 2.2.
14. Select the column containing the city names (the City column).
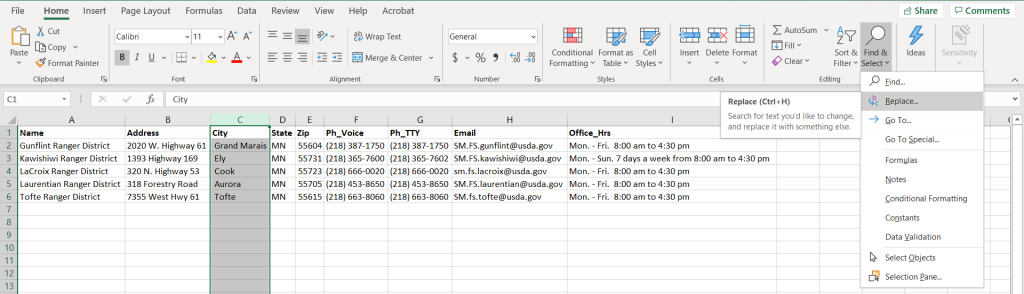
15. In the Home ribbon tab, click “Find & Select”, then “Replace…” (Figure 2.12).
16. In the Replace tab of the Find and Replace window, after “Find what:”, type a single space, then click the “Replace All” button.
17. Click on the header of the City column, then use the down arrow key on your keyboard to check each city name in the column. In the formula bar, re-add spaces to individual city names that have multiple words as appropriate.
18. Save and close the table.
Teachback 5
- What are the components of a street address?
- If you had a paper street map of an unfamiliar city, how would you use it to find the location of an address in that city?
Use the ArcGIS World Geocoding Service to geocode table addresses
Once the table is prepared, it can be geocoded in ArcGIS Pro using the Geocode Table wizard. The wizard walks you step-by-step through setting the parameters of the Geocode Addresses tool. You can skip the wizard and go straight to the tool if you prefer.
19. Add the address table to your ArcGIS Pro project.
20. In the Contents pane, right-click the table name, then click “Geocode Table”.
21. Read through the steps in the Geocode Table pane, then click “Start”.
22. Follow the steps of the geocoding wizard, which should be self-explanatory. Here are pointers for each step if you need them:
Step 1: From the dropdown menu, select, “More than one field”, then click “Next”.
Step 2: From the “Input Locator” dropdown, select “ArcGIS World Geocoding Service”.
Step 3: The “Address or Place”, “City”, “State”, and “Zip” locator fields should be automatically matched to the columns in the spreadsheet containing each attribute. If not, choose the name from each dropdown of the field that holds the corresponding values.
Step 4: Under “Output”, browse to the project geodatabase and enter a name to the output feature class. Keep “Add output to map after completion” checked, and change the “Preferred Location Type” to “Address Location”.
Step 5 (Optional): Select the country or countries that the addresses are located in, or leave the boxes unchecked if the data spans many countries.
Step 6 (Optional): If all of the locations in the table fit one of the listed location categories, select it; otherwise, leave all the boxes unchecked.
23. After completing the wizard, at the bottom of the Geocode Table pane, click “Run”.
![]() Teachback 6 – Perception and Interpretation
Teachback 6 – Perception and Interpretation
Check geocoding results and rematch addresses if necessary
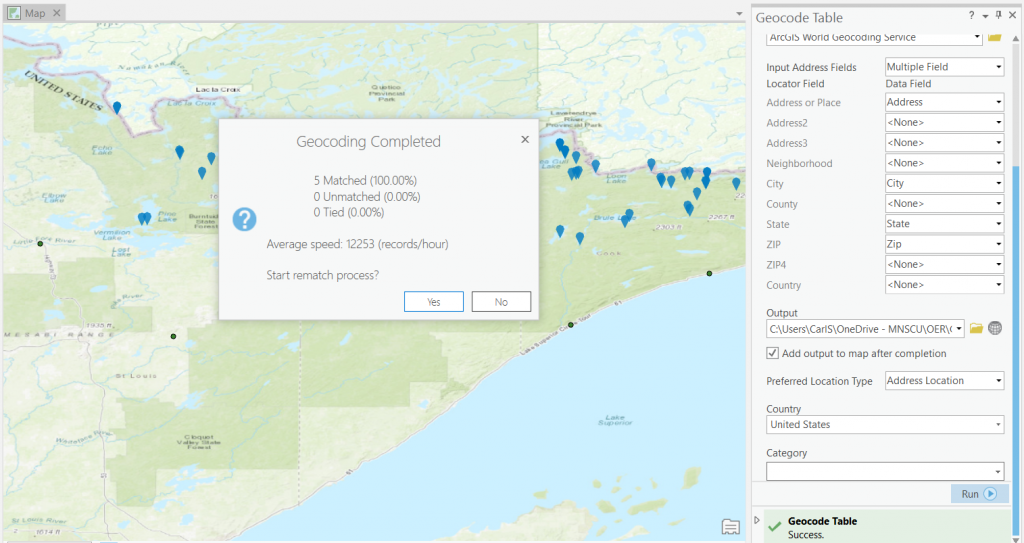
Even if none of your addresses were unmatched or tied, it is usually a good idea to check the locations that were geocoded for each address to ensure their accuracy and adjust them if necessary. The rematch process allows you to fix any errors and find the right locations for places that the locator was unsure of.
24. In the “Geocoding Completed” window, click “Yes”. If you previously clicked “No” and closed the window, you can right-click on the geocoded point layer in the Contents pane, then click “Data→Rematch Addresses…” to start the rematch process.
25. In the Map ribbon tab, change the basemap to “Imagery with Labels”.
26. Check the information in the upper half of the Rematch Addresses pane against the location of the highlighted letter marker on the map and the address shown with a marker in the lower part of the Rematch Addresses pane.
1. If there are multiple addresses listed in the lower part of the pane, you can select a different address by clicking it in the pane, then clicking the green checkmark (“Match”).
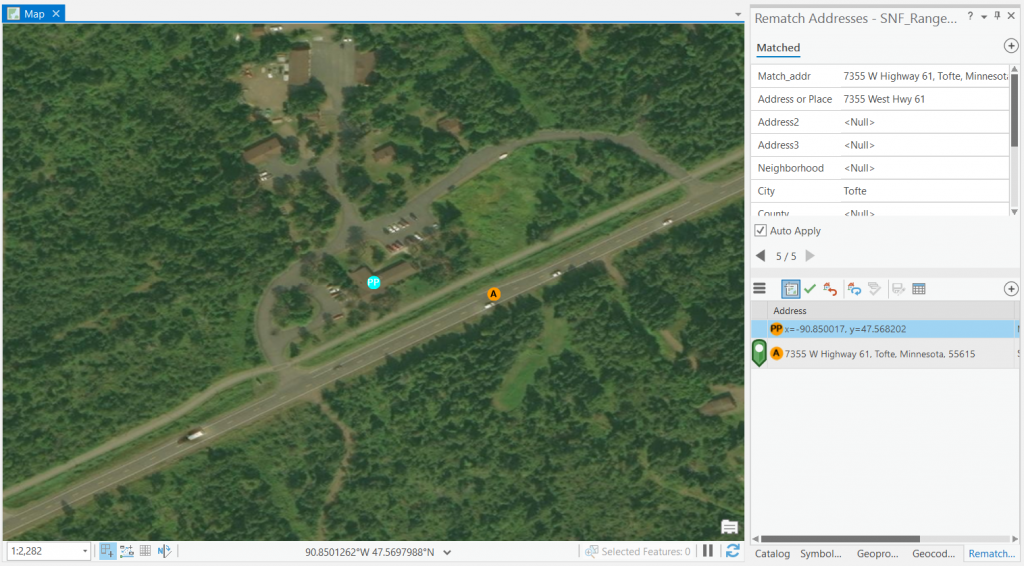
2. If you wish to adjust the exact placement of the marker, you can click the “Pick From Map” button (to the left of the “Match” button) if it is not already active, then click on the map where you want the marker to appear. A new marker with the letters “PP” will appear where you click on the map, and a listing for it will appear in the lower part of the Rematch Addresses pane. With your new location highlighted, click the “Match” button to match the feature to that location (Figure 2.14).
27. In the middle of the Rematch Addresses pane, click the black right arrow to advance to the next feature.
28. Check each matched feature for accuracy. If “Unmatched” and “Tied” tabs appear at the top of the Rematch Addresses pane, advance through the features listed under those tabs and match them to the correct locations on the map.
29. When finished checking and matching features, close the Rematch Addresses pane.
30. Symbolize the new feature layer as desired, and save the project.
![]() Teachback 7 – Perception, Interpretation, and Evaluation
Teachback 7 – Perception, Interpretation, and Evaluation
- How many of your addresses needed their positions manually adjusted on the map?
- What else, if anything, did you do to fix unmatched and tied addresses?
Further Resources
The process of converting street addresses into geographic coordinates that can be placed on a GIS map
A software tool or service used for geocoding that includes reference data and rules for searching it
Estimation of a value based on surrounding values
