
1.10 Share Your Map Online
In the last section, you printed the map and exported map images that could be shared with others. Thus, if you completed Section 1.9, you accomplished the chapter goal (“create and share a basic GIS map”). The last two sections of this chapter each take the sharing component of that goal a step further. This penultimate section focuses on turning your map into an online interactive map, while the final section covers exporting your entire project for easy transfer between storage locations.
Print and static maps are still very useful, but interactive web maps are becoming more and more ubiquitous. Web maps enable anyone to explore GIS datasets without having to use GIS software. ArcGIS Pro gives you the power to instantly publish your map to ArcGIS Online, Esri’s web platform, thus sharing the information it conveys with the entire world. Only a little more setup than you have already done is required to convert your map to a web-enabled form.
Section Outcomes
In this section, you will:
- duplicate the map again,
- reset the map projection and basemap,
- upload the map to ArcGIS Online, and
- view and link to the map online.
 Duplicate the map again
Just as you copied your intended-for-print map to create a new version for your screen layout, you need to do so again to create a version that you can redesign as an interactive web map.
1. Repeat the process in Section 1.9, Steps 17-19 to create a copy of your Screen Map.
2. Rename the new map “Web Map” and open it in the Center View.
Reset the map projection and basemap
All maps published to ArcGIS Online must include a tiled basemap, and must use the same map projection as the basemap. All basemaps that come packaged with the software use the Web Mercator projection, so your map must also use this projection. You will not be able to upload your map unless you include a basemap and set its projection to Web Mercator first.
3. With the Web Map view active, in the Map ribbon tab, select a basemap that works well with your map symbols. If the basemap you choose has a reference layer, turn the reference layer off to avoid it interfering with the map labels.
4. In the Contents pane, right-click on “Web Map”, then click “Properties”.
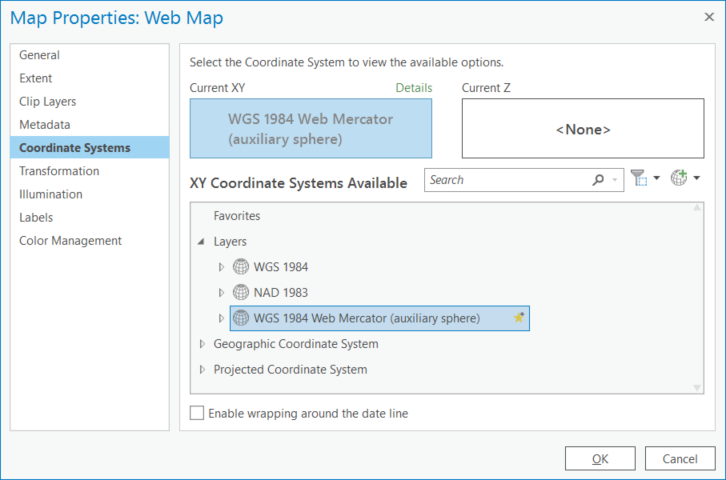
5. In the Coordinate Systems tab of the Map Properties window, under “XY Coordinate Systems Available”, expand “Layers”.
6. Under “Layers”, click on “WGS 1984 Web Mercator (auxiliary sphere)”, then click the “OK” button (Figure 1.51).
7. Save the project.
Teachback 35
- What other coordinate systems are listed under “Layers” in the Map Properties window? Expand each of these to see which layers use them. What map layers use each of the coordinate systems?
- Do any of the other layers’ coordinate systems include a projection? If you selected one of them, what projection would the map use? (Hint: review the introduction text in Section 1.6).
Upload the map to ArcGIS Online
With the basemap and Web Mercator projection in place, your map is now configured for web use. All that remains is to upload it. ArcGIS Online requires you to add a description of the map and keywords to enable users to search for it, and to specify who has access to it—just you, your organization’s members, or everyone.
8. Click on the Share ribbon tab.
9. In the Share As group of the Share ribbon tab, click the “Web Map” button.
10. In the Share As Web Map pane, under “Name”, give your map a name that is similar to the title you used for your printed map (Figure 1.52).
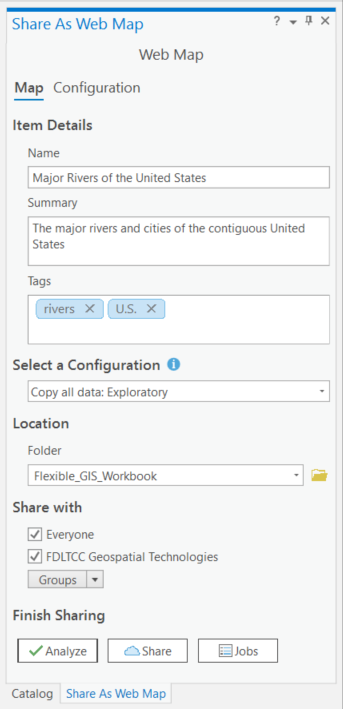
11. Under “Summary”, write a brief description of the information your map depicts.
12. Under “Tags”, add one or more words or very short phrases that describe your map. After typing each word or phrase, hit the Enter or Tab key on your keyboard to add it as a tag.
13. Under “Select a Configuration”, leave the dropdown set to “Copy all data: Exploratory”. This will create a clickable web map but will not allow others to edit it.
14. Under “Location”, change the dropdown to your root folder (your ArcGIS Online account email address) or create a new folder to house your web map.
15. Under “Share with”, check the checkboxes for all entities you wish to have access to your map. If you want your map to be public, make sure the checkbox for “Everyone” is checked.
16. Under “Finish Sharing”, click the “Analyze” button.
17. Under “Finish Sharing”, click the “Share” button.
View and link to the map online
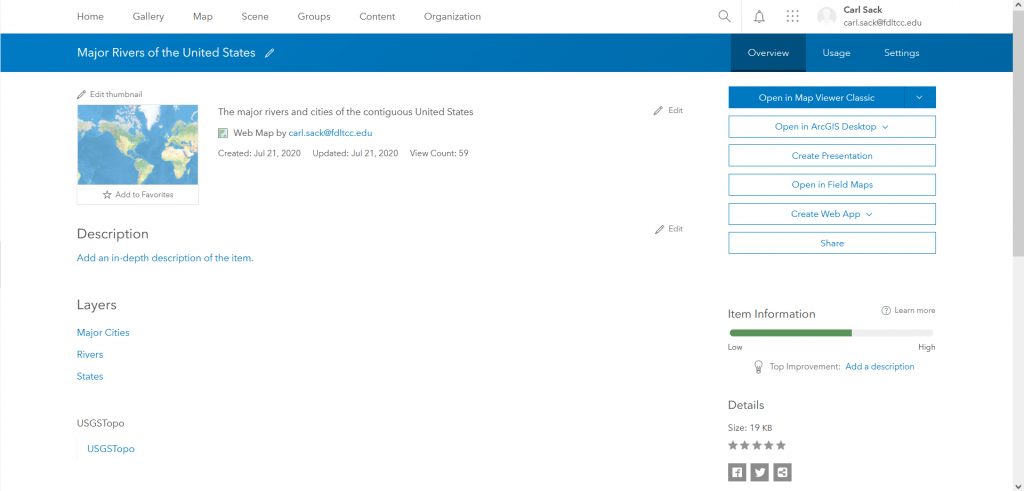
Once your web map has been uploaded to ArcGIS Online, you can access it anytime by pointing a browser to arcgis.com, signing in, and viewing the Content page for your ArcGIS Online account. The link that appears at the bottom of the Save As Web Map pane after uploading the map provides a shortcut. Through ArcGIS Online, you can view the web map, use it in other web pages and apps, and share it with anyone who has internet access.
18. At the bottom of the Share As Web Map pane, click “Manage the web map”.
19. If your ArcGIS Online username does not appear in the upper-right corner of the item page, click the “Sign In” button in that corner and sign in using your ArcGIS Online username and password.
20. Above the blue title bar at the top of the page, click the “Content” tab.
21. In the content table, under “Title”, click the name of your web map to reopen its item page.
22. On the right side of the web map’s item page, click the blue “Open in Map Viewer Classic” button.
23. Zoom and pan the map and click on features to see the pop-ups attached to them.
24. In the Details Pane on the left side of the page, switch between the “About”, “Content”, and “Legend” tabs and note what each tab contains (Figure 1.54). Also experiment with the buttons along the toolbar above the pane and map.

25. On the toolbar above the map, click the “Share” button.
26. Click the “Done” button to close the Share window.
![]() Teachback 36 – Evaluation
Teachback 36 – Evaluation
- What are the major similarities and differences between your printed map and web map?
- When is it best to create:
- a web map?
- a printed map?
- a static map image?
What’s a web app?
A web app (short for web application) is a website that provides users with a variety of interactive tools. Your basic web map allows users to zoom, pan, and retrieve information about features on it. Adding the map to an app can greatly increase its functionality by enabling more user interactions—such as editing, search, and filter—and dynamic widgets like charts and tables. ArcGIS Online apps also give you greater control over the design of the web page surrounding your map.
ArcGIS Online continues to build out its suite of app development options. As of late 2021, these options include (Figure 1.55):
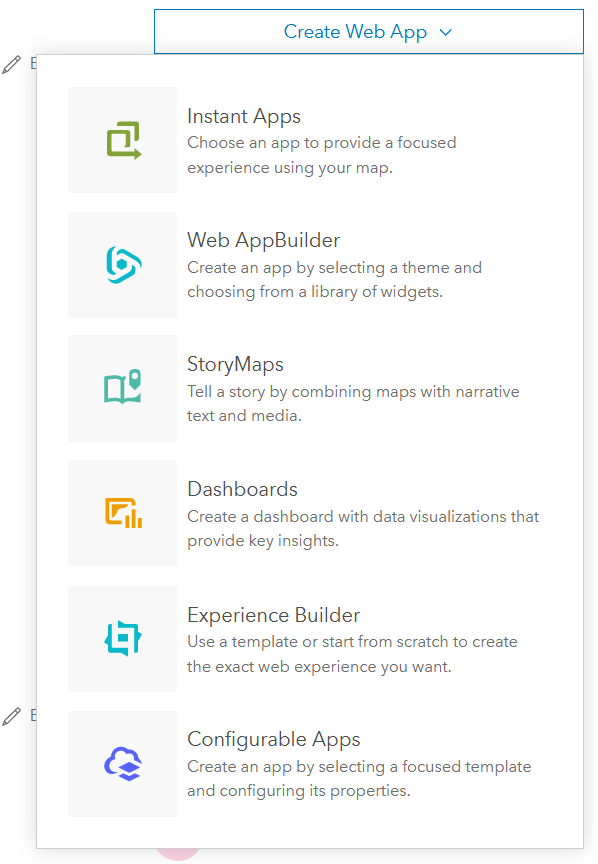
- Instant Apps: a library of lightly configurable templates oriented toward specific map-sharing goals
- Web AppBuilder: an app-building app that allows you to build your own highly customized app by selecting design styles and adding widgets from a large library of available tools
- StoryMaps: creates sequenced web pages designed for telling stories that include web maps, great for multimedia journalism or essays
- Dashboards: apps with data visualizations (charts, graphs, etc.) that can provide further insights using the information on the map
- Experience Builder: a highly configurable set of templates for designing map-based web pages with page and map navigation widgets
- Configurable Apps: a larger library of templates including newer Instant Apps, older Story Maps configurations, and others
While all of these graphic app builders are powerful tools, more advanced GIS analysts may opt to build an app from scratch using the ArcGIS API for JavaScript (API stands for Application Programming Interface). This toolset allows web GIS developers the most freedom to customize their apps. Using the API requires coding in the computer languages of HTML, CSS, and JavaScript, and is beyond the scope of this workbook.
Web maps and apps are just some of the myriad features included in ArcGIS Online, which is both a digital ecosystem and a powerful software platform in its own right. For further resources on ArcGIS Online, check out Esri’s extensive documentation and the Esri Press workbook Getting to Know Web GIS by Pinde Fu.
Further Resources
Additional information about sharing web maps is available on the ArcGIS Pro Help website “Share a web map” page.
An interactive website that provides its users with tools to manipulate components of the site
Application Programming Interface; a code library used to access the objects and methods of a particular software application or service
HyperText Markup Language; the standard markup language used to create web pages
Cascading StyleSheets; the standard web language used to style web pages
The standard web language used to program interactions in web pages
