
1.3 Add Data to the Map
Now that you know how to manipulate the map, it’s time to begin modifying the map toward the goal you specified in Teachback 1. The first step is to add your own geospatial data to the map. Esri’s basemaps are great for providing geographic context, but you can’t modify them beyond selecting between the premade options, and they do not print well. To make your own map, you must first bring data into the project, then symbolize it to convey the insight you want your map’s users to gain.
Geospatial data are digital representations of geographic features. The real world is too complex to perfectly capture in a computer system, so map makers use the process of map abstraction to select and represent specific information about geographic phenomena that may prove useful. The most common ways to represent discrete features in GIS are as points, lines, or polygons. You can think of each of these as a different geometric dimension—points have zero dimensions (they are simply a pair of coordinates), lines are one-dimensional (they have only length), and polygons are two-dimensional (they have both length and width). Data representing discrete objects is called vector data. A GIS vector dataset typically consists of features that all pertain to one theme (such as roads, lakes, cities, etc.) at one dimensionality (i.e., all points, all lines, or all polygons).
Continuous geographic features, such as temperature or elevation, have no hard edges. Such features are not represented in GIS as sets of objects, but rather as raster data composed of a pixel grid, like a digital image. Chapter 2 will introduce raster data; for this chapter, we will stick with points, lines, and polygons. For further discussion of how maps represent the world, see Section 2.3 in the Campbell and Shin text.
Section Outcomes
In this section, you will:
- extract and store geospatial data,
- add point data to the map using the Catalog pane,
- add line data to the map using the Add Data button, and
- add polygon data using the method of your choice
 Extract and store geospatial data
Before you load data into an ArcGIS Pro project, it needs to be stored somewhere on your computer. You should create a folder called “data” or “gis_data” somewhere it will be easy to find in your file system. This may be close to the root of the hard drive (C:\), or in a cloud file storage system like OneDrive or Dropbox. You may also need to extract the data from a Zip archive file (.zip) before it can be read by ArcGIS Pro.
The action sequence below assumes you have received data in a Zip file from your instructor, but the same steps apply for each dataset if you download the data yourself. It also assumes you might reuse the data for other projects. If you will only use the data for this project, you may wish to store it in the project folder that was created by ArcGIS Pro instead of a data folder in the drive root.
1. Download the data you need for your map from the location specified by your instructor (or from online repositories given in Appendix A).
2. Open the Downloads folder in Windows Explorer.
3. Click on the Zip file you downloaded, then click the Extract tab (Figure 1.12).
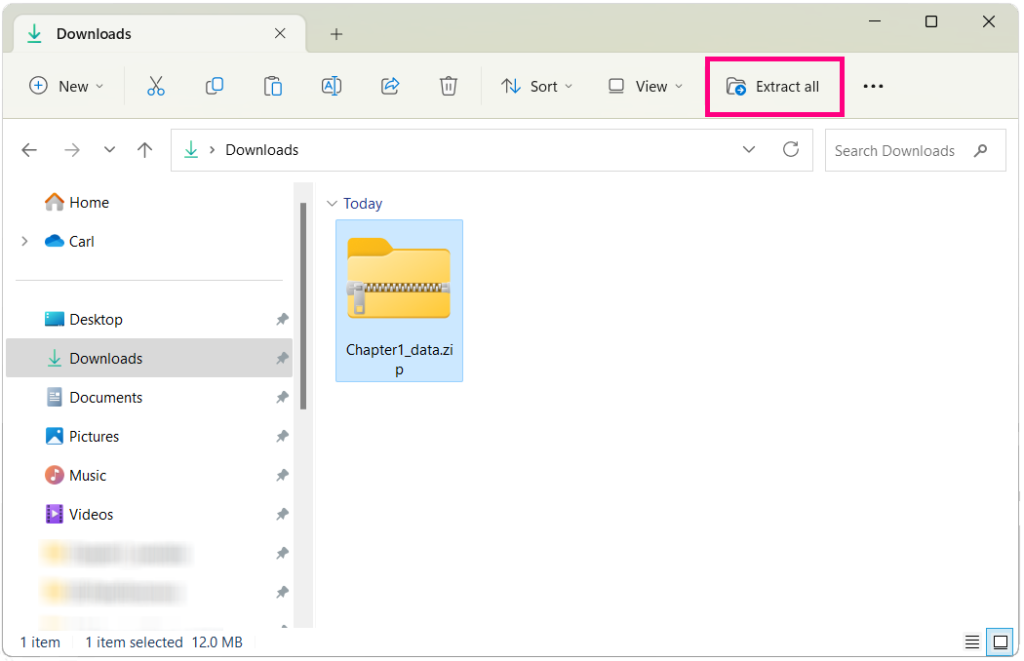
4. Click the “Extract All” button.
5. Click the “Browse” button and navigate to a root folder where you want to keep your data. This may be the C:\ drive, a network drive, or a cloud storage backup folder like OneDrive or Dropbox.
6. If necessary, click the “New folder” button to create a new “data” or “gis_data” folder (Figure 1.13).
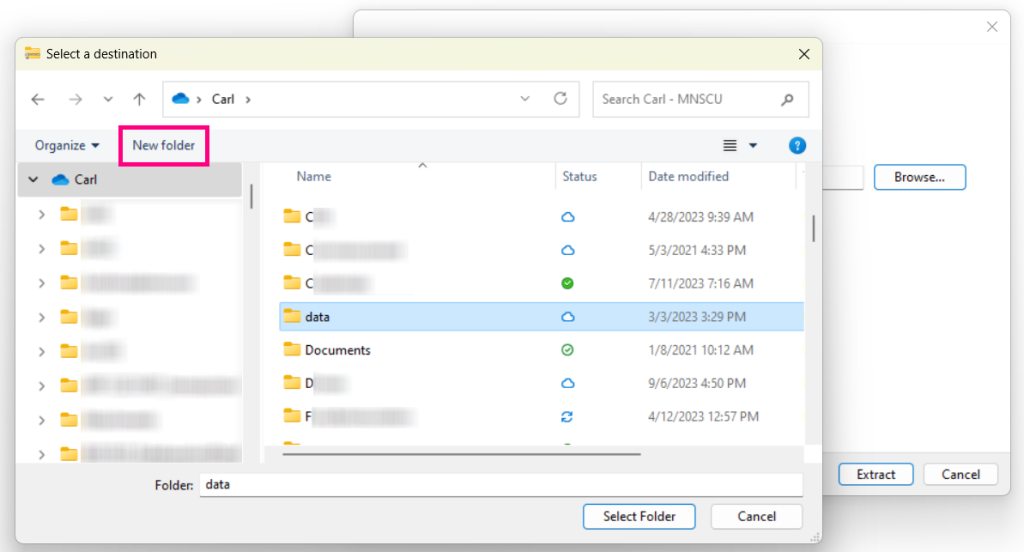
7. Click on your data folder, then click the “Select Folder” button.
8. Make sure the checkbox for “Show extracted files when complete” is checked, then click the “Extract” button.
Teachback 11
Since ArcGIS Pro created a folder to store the contents of your map project, you could store your data in that folder instead of creating a new data folder in the root drive. Under what circumstances do you think it would be best to store data in the project folder, and when is it better to store the data in the root data folder? (Hint: See the paragraph immediately above the Action Sequence).
Should I store my data in the cloud?
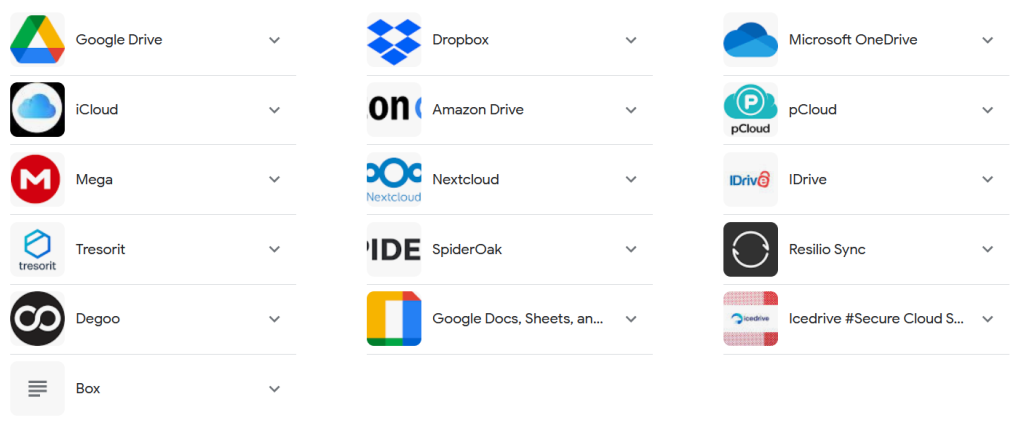
Cloud file storage is a great way to back up your data and always have it available when you need it. If you are a student, your school's computing resources may include a subscription to a cloud storage service like the ones shown above. You can also purchase storage space with these services on your own.
For GIS data, you want to make sure you use a desktop app for the service that syncs files between your local hard drive and the cloud, as you will need read and write access to local copies of the files (not just the ability to download and upload files using a web portal). Be aware that GIS files can be quite large, so you need to make sure you have enough cloud storage space! On the other hand, if you (like me) have more available space in cloud storage than on your local hard drive, you can set the cloud storage app to remove files that are used infrequently from your hard drive and make them available again on an as-needed basis.
Add point data to the map using the Catalog pane.
Once your data is extracted, you can add it to your ArcGIS Pro project. Adding data to the map using the Catalog pane is fairly straightforward, except that you must manually enable access to the folder holding your data by adding a Folder Connection.
9. Open or expand your map project in ArcGIS Pro.
10. Switch the right pane to the Catalog pane if it is not already open. If you do not see the Catalog pane or a tab at the bottom of the pane for it, click the View ribbon tab, then click the “Catalog pane” button.
If you accidentally click the “Catalog Window” button, it will open the Catalog in the center view. This view of the Catalog works the same way as the Catalog pane, but is less conveniently located for adding data to the map.
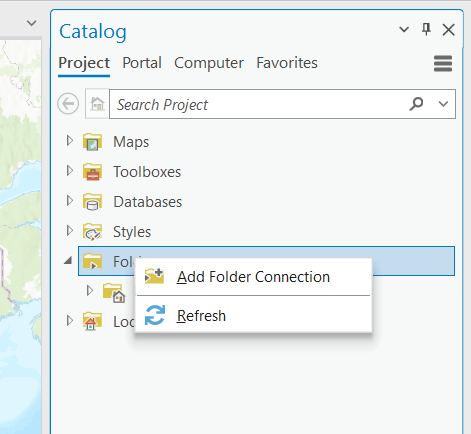
11. In the Catalog pane, expand the Folders item.
12. Right-click the Folders item, then click “Add Folder Connection” (Figure 1.14)
13. Navigate to your data folder, then click the “OK” button.
14. Expand the item for your data folder in the Catalog pane, and expand any subfolders until you see an item for the shapefile containing your point data (it will have an icon with points on the left with a filename ending in a .shp extension). If you hover your mouse over the filename, additional information will appear (Figure 1.15).
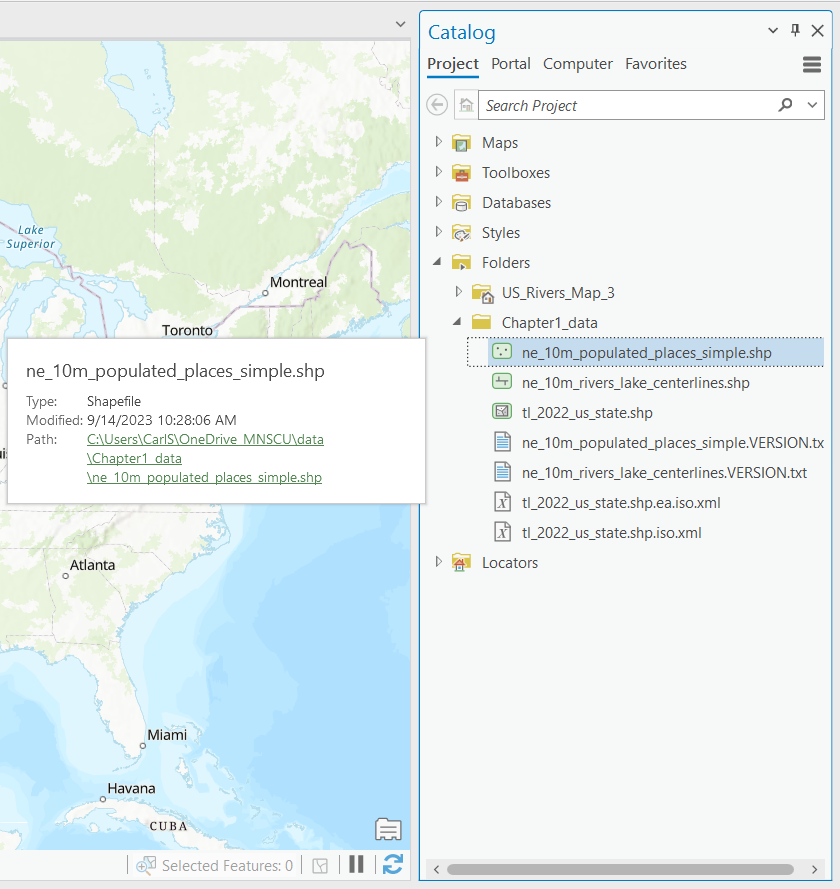
Dataset icons: The ArcGIS Pro Catalog uses icons to indicate the type and dimensionality of datasets. The three icons for your geographic datasets will look like this:
- Point shapefile:

- Line shapefile:

- Polygon shapefile:

15. Click and drag the point dataset onto the map until the cursor looks like an arrow with a small + sign under it, then let go of the mouse button to drop the data onto the map.
16. Save the project.
![]() Teachback 12 - Perception and Interpretation
Teachback 12 - Perception and Interpretation
- What is the filename of the shapefile that you added to the map?
- What data does the shapefile contain?
- How is the data displayed on the map?
Add line data to the map using the Add Data button.
ArcGIS Pro provides multiple ways to do pretty much every GIS operation. The next set of steps walks you through a second way to add data to the map. The results are the same as dropping the data in from the Catalog pane, so which method you choose in the future depends only on your personal preference.
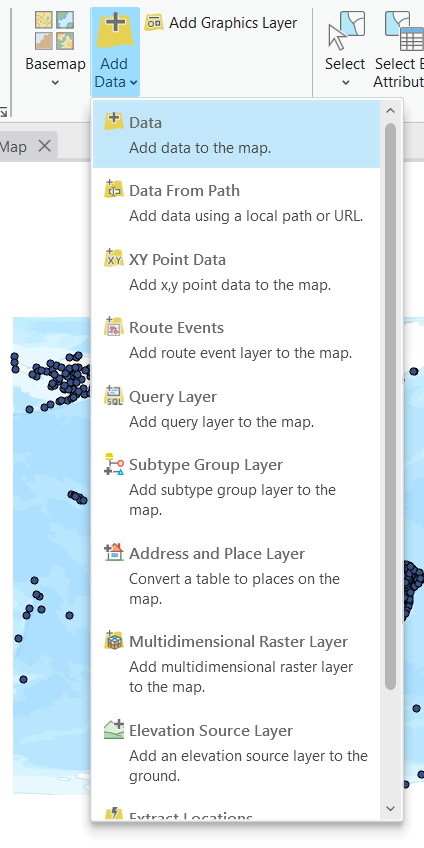
17. From the Layer group in the Map ribbon tab, click the “Add Data” button, or click the “Add Data” dropdown arrow and then click “Data” (Figure 1.16).
18. In the Add Data window file tree, under “Project”, click the “Folders” item (expand “Project” if you don’t see it). In the main part of the window, you should see the project folder and your data folder, which you connected in Steps 12 and 13. If your line dataset is in a different folder, navigate to it under the “Computer” item at the bottom of the file tree.
19. In the main part of the Add Data window, double-click your data folder to enter it, and enter any subfolders that your line dataset is inside of.
20. Once you find your line shapefile, click on it once, then click the “OK” button.
21. Save the project.
Add polygon data to the map.
22. Use the method of your choice to add your polygon data to the map.
23. Save the project.
![]() Teachback 13 - Evaluation
Teachback 13 - Evaluation
Each of the three datasets constitutes a layer of geographic information on the map (See Section 1.3 of the Campbell and Shin text to review the idea of layers in GIS).
- On your map, which layer is shown on top, which is in the middle, and which is on the bottom?
- What is the order of layers shown in the Contents pane?
- What happens if you uncheck a layer in the Contents pane?
Hey! Where are my layers?!
It is important to understand that ArcGIS Pro map files (.aprx files) do not embed the datasets used in a project. When you add data to your map, ArcGIS Pro simply creates links to the data wherever it currently exists on your computer or network; it does not create any new data. This can cause problems if you copy or move the .aprx file, or store the data in a location that you only have access to on one machine (such as its hard drive) and try to open your project on a different one.
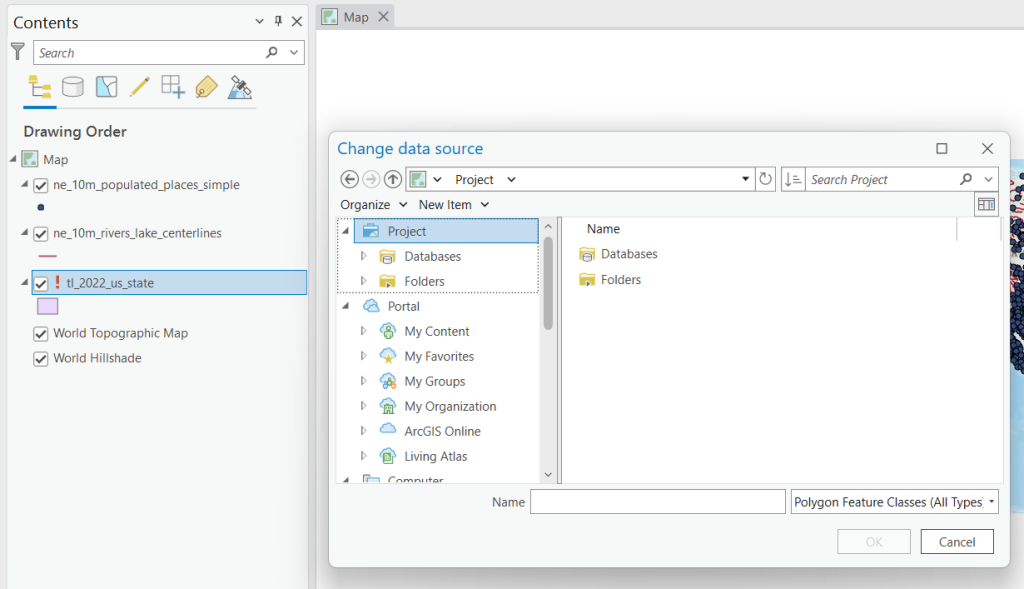
If you open your project from a location where you do not have access to one or more of the project datasets, you will not see the affected layers on the map, and each will be listed in the Contents pane with a large red exclamation point between its checkbox and its filename (Figure 1.17). If you click on the exclamation point, a Change data source window will open that will allow you to find and reconnect to the missing dataset. If the dataset is not available on the machine you are using, you will need to download and extract it again before you can restore the link and move on.
Practice: You can intentionally break a dataset link to simulate losing access to the data and practice what you would do to recover it. Make sure your project is saved, then close ArcGIS Pro. Open your data folder in Windows Explorer, create a new subfolder, and move everything that was in your data folder into the new subfolder (select all files, then drag and drop or cut and paste). Then reopen your ArcGIS Pro project and try reconnecting one of the broken dataset links. When you are finished practicing, close the project without saving and move your data back to where it belongs in the data folder.
Further Resources
Additional information about using the Catalog and Add Data button is available on the ArcGIS Pro Help website "Catalog pane, catalog view, and browse dialog box" page.
Digital representation of geographic facts and features
The process of converting real-world geographic phenomena into digital and visual representations
Having well-specified boundaries and individual instances
Data containing individual objects, most commonly represented in GIS as points, lines, polygons, and 3D objects
The number of geometric dimensions in a vector data object
Having no hard boundaries
Data represented as a continuous field or grid of cells (pixels)
A geographic file format for spaghetti-model vector features that consists of between 3 and 12 separate files per feature collection
