
1.11 Package Your GIS Project
The previous two sections introduced various ways to share your map with others. What if you need to share not just the map, but the entire ArcGIS Pro project? Perhaps your instructor or boss wants you to hand over the completed project for inspection or evaluation. Perhaps you need to transfer the entire project to a different computer drive or machine to keep working on it elsewhere.
Recall from Sections 1.1 and 1.3 that the .aprx file stored in your project folder only contains reference to the map layers, along with the symbolization and labels applied to those layers. It does not store the layers themselves. This bears reiterating—simply transferring the .aprx file for your project will not transfer the underlying datasets used in the project. Reopening the file after such a transfer results in a blank map and red exclamation points for each layer in the Contents pane, indicating that the layers’ data was not found.
Fortunately, ArcGIS Pro provides a simple way to combine all of the resources needed to effectively transfer the project or a component of it—a package. A package is very similar to a ZIP archive file, but is created by ArcGIS Pro to keep the necessary project components well organized. A project package contains all components of the project—all maps, data, layouts, tools, and anything else utilized in the project, even if those resources were added from an external folder. Several other types of packages exist to enable independently transferring smaller components of the project, such as just a map or layer.
Section Outcomes
In this section, you will:
- create a project package and
- open the project from its package.
 Create a project package
1. Find the ribbon button that allows you to create a project package and click it.
2. In the Package Project pane, under “Start Packaging”, choose “Save package to file” (Figure 1.56).
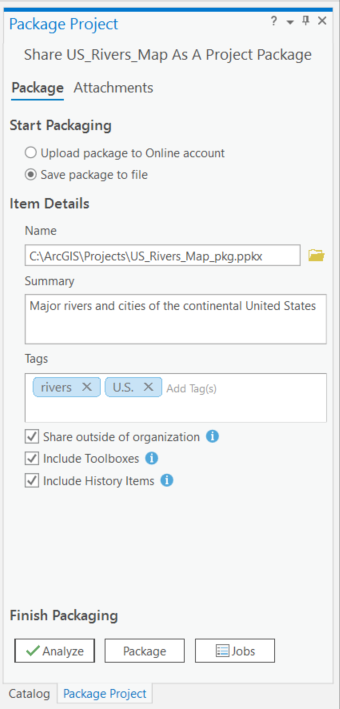
3. Under “Item Details”, use the browse button to select a location to save the package to, and name your package file similarly to—but not quite the same as—your project.
4. Add a brief Summary and Tags for the project package.
5. Under the “Tags” field, check all three checkboxes. Hover over the “i” symbol next to each one to view information about what is included in the package when that checkbox is checked.
6. Under “Finish Packaging”, click the “Analyze” button.
7. If any errors appear in the Messages tab of the Package Project pane, fix them.
8. Under “Finish Packaging”, click “Package”.
9. Once packaging is complete, click the “Manage the package” link at the bottom of the pane, or manually open the folder that you saved the package to in Windows Explorer.
Open the project from its package
10. In Windows Explorer, double-click on the project package (.ppkx) file.
11. In the Catalog pane, expand the “Folders” item and its subfolders.
12. Under “Folders”, hover the cursor over the project folder to view its location.
![]() Teachback 37 – Perception and Interpretation
Teachback 37 – Perception and Interpretation
- After you open the project package, where are the extracted project’s components stored? Give the file path to the project folder.
- How is the extracted project folder structured? How is its structure different from the original project folder?
13. Save and close both ArcGIS Pro projects.
Further Resources
Additional information about project packages and other package types is available on the ArcGIS Pro Help website “Share a package” pages.
Teachback 38 – Chapter Reflection
- Write a reflection essay describing what you learned from completing the work in this chapter. Explain:
- What was your original chapter goal from Teachback 1?
- What did it take for you to accomplish this goal?
- What were some key “aha!” moments you experienced while working on the project?
- What were some barriers or misconceptions you struggled to overcome?
- What else, if anything, would you like to accomplish with your map?
- How did thinking through the Seven Stages of Action influence your work?
- What were the biggest takeaways you will remember when working on future GIS projects?
- If possible, share your essay with a classmate or colleague who also completed the chapter and discuss your experiences with the project.
An ArcGIS Pro archive file containing all components of a project, map, layer, or other item
