
Word Chapter 2: Formatting Documents
- Defining font and text attributes
- Setting paragraph alignment and hyphenation
- Utilizing the Format Painter
- Indenting paragraphs
- Setting tabs and tab stops
- Creating and formatting tables
- Inserting headers and footers
- Setting page orientation and margins
- Creating and inserting citations and bibliographies
- Printing and saving files in alternative file formats
Defining Font and Text Attributes
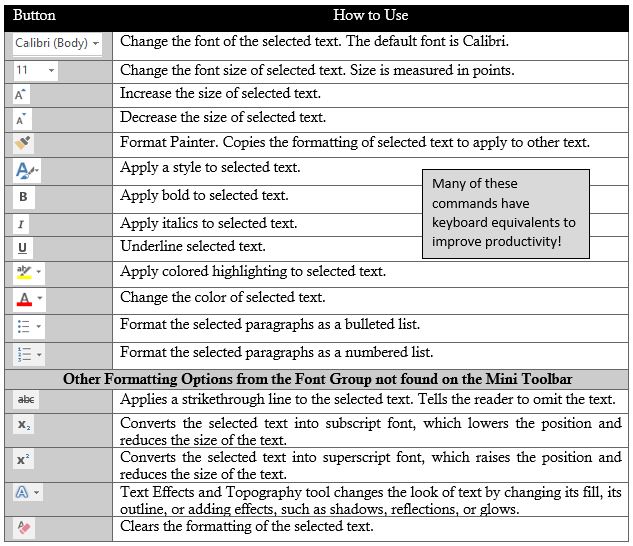
The way text appears on the screen or a page is referred to its format. Formatting text can enhance the appearance of a document, create visual impact, and help illustrate a document’s structure. Font, size, and style define a character’s format. A font is a complete set of characters with the same typeface or design. Dozens of fonts are available in the Font drop down list. Users can easily format text with fonts, colors, styles, and other formats by selecting the text and clicking various commands in the Font or  Paragraph group on the Home tab. The Mini toolbar, appears faintly above text when you first select it, and includes the most commonly used formatting commands. The table below describes the functions of each button on the mini toolbar.
Here are a couple of best practices when utilizing fonts. First, avoid using too many fonts in the same document. More than two or three fonts in the same document becomes distracting. Secondly, legibility and readability should be primary considerations. This should factor in the reader’s characteristics, and the purpose of the document. For example, while the default size for a font is 11pt, a larger size font (i.e. 14pt) might be more appropriate for an older aged reader. A pt (or point) is the equal to 1/72 of an inch. Headings and titles deserve larger font sizes. However, it is also good practice to limit the quantity of font sizes used in a single document. Lastly, consider using common fonts for professional and business documents. Calibri, Arial, Verdana and Times New Roman are ranked highly by Monster.com as preferable fonts for résumés, whereas Comic Sans is not recommended. Note that Calibri is only available on Windows operating systems, whereas Arial, Verdana and Times New Roman are some of the cross-platform available fonts.
Setting Paragraph Alignment and Hyphenation
Paragraph alignment determines how the edges of each paragraph aligns with the left and right margins. Alignment settings apply to all text within a paragraph. Remember that a paragraph is created each time the user presses the Enter key. To display the hidden characters, including paragraph marks, press the ![]() symbol in the Paragraph group of the Home tab. Press the button again to hide the formatting marks.
symbol in the Paragraph group of the Home tab. Press the button again to hide the formatting marks.
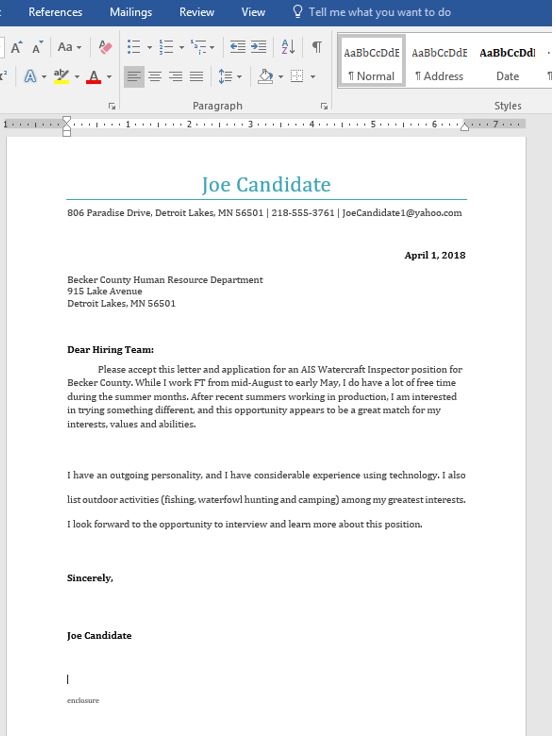
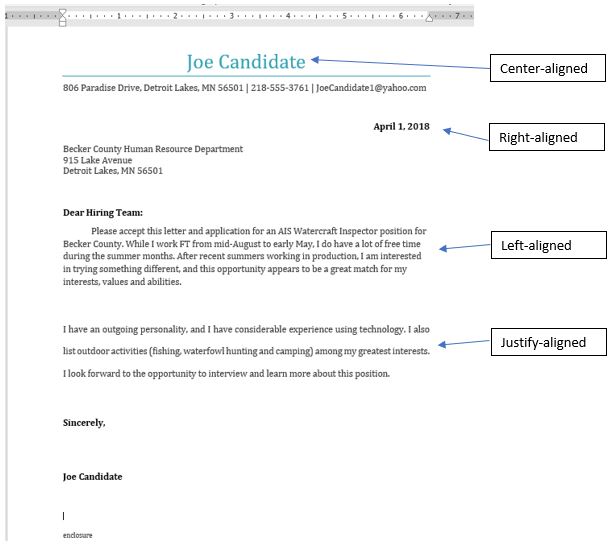
- Left-aligned text is the default paragraph format. The left edge of the paragraph is flush, and the right edge is jagged. This option is typical for letters and reports.
- Centered text is equally distant from the left and right margins. Common uses are titles and headings.
- Right-aligned text is flush with the right edge, and the left edge is jagged. Typical uses are dates or headers and footers.
- Justified-aligned text spreads the text evenly between the left and right margins, leaving both edges flush, unless the final line has limited characters. This option is common for newspaper columns and textbooks.
Hyphenation can improve the overall readability of certain documents. Hyphenation is the process of adding hyphens to words at the beginning of lines so the hyphenated part will fit at the end of the previous line. The hyphens are inserted between syllables in a word. Word can automatically hyphenate your document for you, or you can use 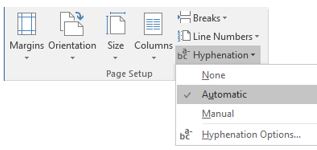 the hyphenation tool to manually hyphenate your document. Users can customize their hyphenation settings via the Hyphenation Options dialog window. Use caution when manually inserting hyphens, because the hyphen will always remain even if editing moves the word to the middle of a line, and results in the word no longer needing hyphenating.
Utilizing the Format Painter
The Format Painter tool allows the user to copy a format from selected text and apply the format to other selections. For example, if you have inserted text in Word, and have it formatted using a specific font type, color, and font size, you could copy that formatting to another section of text by using the Format Painter tool. Select the text or place your cursor in the paragraph that contains your source formatting, then click the Format Painter tool ![]() from the Home tab’s Clipboard group. The cursor will change to include a paintbrush
from the Home tab’s Clipboard group. The cursor will change to include a paintbrush![]() , which indicates that the user can now select the destination text that should receive the source formatting. If multiple areas of text need the same formatting, the user should double-click the Format Painter tool to be able to apply the formatting to multiple selections, until the user presses the Esc key. The Format Painter tool works similarly in Excel and PowerPoint too.
, which indicates that the user can now select the destination text that should receive the source formatting. If multiple areas of text need the same formatting, the user should double-click the Format Painter tool to be able to apply the formatting to multiple selections, until the user presses the Esc key. The Format Painter tool works similarly in Excel and PowerPoint too.
Indenting Paragraphs
Indenting a paragraph results in moving the editable insertion point from the left or right margins. Users can indent the left or right edge of a paragraph, just the first line, or all lines except the first line. Paragraphs are indented relative to the page’s margins, and indenting a paragraph doesn’t affect the paragraph’s alignment. The default indents are 0 inches, meaning that lines of text extend from the left margin to the right margin. Indenting paragraphs can be performed by pressing the Decrease Indent or Increase Indent buttons on the Paragraph tab of the Home tab. Alternatively, to make precise changes to the Left and/or Right Indents or Paragraph Before/After Spacing, utilize the Paragraph group of the Layout tab. Indents are measured in inches and Spacing is measured in point, much like font sizes.
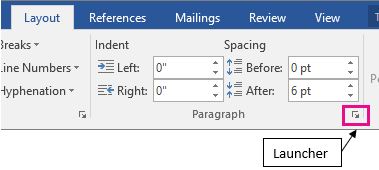
A semi-block letter style requires the first line of each paragraph to be indented from the left margin, which is known as a first-line indent. Precise indent definitions can be specified in the Paragraph dialog window which can be opened by clicking the Launcher button in the Paragraph group. Alternatively, indents can also be set by dragging the markers on the ruler:

A first-line indent requires the user to drag the marker on the ruler to the position where the first line of the paragraph should begin. Typically, this is the .5” mark, which can also be accomplished by pressing the Tab key to indent the first line to the default .5” tab stop. A hanging indent occurs when the subsequent lines of a paragraph are indented more than the first. Hanging indents are often used when manually creating citations in a bibliography. To create a hanging indent, drag the marker on the ruler to the right. When citing long quotations in a research paper, users typically use both a left and right indent to offset the quotation, as shown below.

Setting Tabs and Tab Stops
Tabs allow users to align text vertically at a specific location in a document. A tab stop is a point on the horizontal ruler that indicates the location at which to align text. A tab stop is a location where the insertion point will stop when the user presses the ![]() key. Tab stops can be used to help align text to create columns of data. Custom defined tab stops are displayed on the ruler above the document. A set of default tab stops are located every half inch, but they do not appear on the ruler. When a new tab stop is defined, Word automatically removes the default tab stops to the left. Using tabs, users can align text to the left, right, or center of a tab stop, or text can be aligned at a decimal point. Word stores paragraph formatting, such as tab stops, in the paragraph marks at the end of a paragraph. Therefore, when the user pressing the ENTER key, tab stops are copied to the next paragraph. The same tab stops can then be used in sequential paragraphs to create columns of text. Tabs can be set by clicking on the horizontal ruler, or by using the Tabs dialog window. The following icons represent different tab stops on the horizontal ruler:
key. Tab stops can be used to help align text to create columns of data. Custom defined tab stops are displayed on the ruler above the document. A set of default tab stops are located every half inch, but they do not appear on the ruler. When a new tab stop is defined, Word automatically removes the default tab stops to the left. Using tabs, users can align text to the left, right, or center of a tab stop, or text can be aligned at a decimal point. Word stores paragraph formatting, such as tab stops, in the paragraph marks at the end of a paragraph. Therefore, when the user pressing the ENTER key, tab stops are copied to the next paragraph. The same tab stops can then be used in sequential paragraphs to create columns of text. Tabs can be set by clicking on the horizontal ruler, or by using the Tabs dialog window. The following icons represent different tab stops on the horizontal ruler:
![]()
Each type of tab stop is used in the example shown below. Note the markers on the ruler:
The default tab stop is Left, but tab stops can easily be switched by multi-clicking the tab selector ![]() on the horizontal ruler. Existing tab stops on the ruler can be dragged to a new position if needed. To remove a tab stop, drag the tab stop off the ruler and release the mouse. The text will realign itself to the existing tab stops. Once the tab stops are in set, newly inserted text will align to the stops when the tab key is pressed. Alternatively, some users prefer to enter text with tabs, but without tab stops, and then apply the tab stops to the existing text.
on the horizontal ruler. Existing tab stops on the ruler can be dragged to a new position if needed. To remove a tab stop, drag the tab stop off the ruler and release the mouse. The text will realign itself to the existing tab stops. Once the tab stops are in set, newly inserted text will align to the stops when the tab key is pressed. Alternatively, some users prefer to enter text with tabs, but without tab stops, and then apply the tab stops to the existing text.
The Tabs dialog window is useful for adding new, and editing existing tab stops. The
window can be opened by double-clicking an existing tab stop or by clicking the Tabs… button in the Paragraph Dialog window, which is opened from the Paragraph Launcher button. The Tabs window is useful for precise position definitions, and it is the only option for adding Leaders to tab stops. A tab leader is a character that is repeated to fill the space spanned by a tab. The dotted leader is very commonly used on menus to make it easier to associate the menu description with its correlating price. The Tabs window is also a convenient way to clear one or all tab stops in a document.
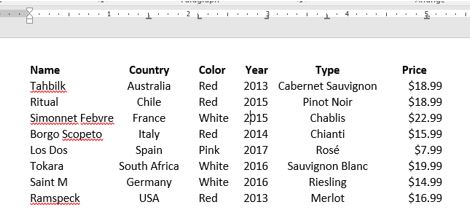
Practice 3: Wine Prices – Part 1
- Open the data file Wines unformatted.docx from your data files.
- Insert two blank paragraphs at the beginning of the document.
- Select the text Name in the first paragraph. Apply the Arial font, size 12, bold and red text color.
- Use the Format Painter tool to apply the same formatting from Name to Country, Color, Year, Type and Price. Hint: Double-click the Format Painter after placing the cursor in Name, and then click each the headings. Click the Format Painter tool again to turn it off.
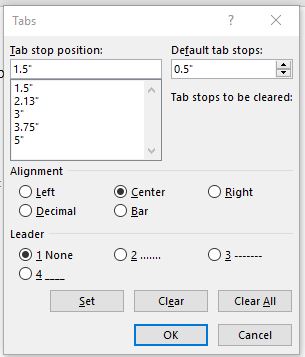
- Select the text starting with Name through $16.99. Click the Paragraph Launcher button and then click the Tabs… button to open the Tabs dialog window.
- Set the following five tab stops:
- Center tab stop at the 1.5” position. (Type 1.5 in the Tab stop position field, then click Center, then click Set.)
- Left tab stop at the 2.15” position.
- Right tab stop at the 3” position.
- Center tab stop at the 3.75” position.
- Decimal tab stop at the 6” position. Add a dotted leader before clicking Set. Then click OK.
- A slight error may be noticeable. If you enable the Show/Hide
 , you should notice that there are two tabs between Country and Color. Remove one of the tabs. This should align the data into neat columns.
 - Select the same block of text as step 5. Remove the 8 pt of paragraph spacing After each paragraph via the Layout tab.
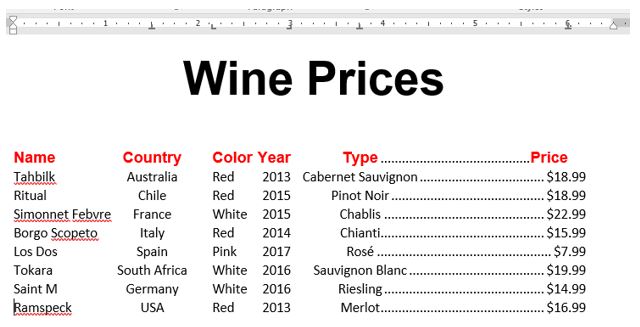
- At the top of the document enter the text: Wine Prices. Center-align the paragraph, and make the font 36pt and bold.
- Save the file with a new name: Tab formatted Wine Prices.docx.
Your file should look like this:
Creating and Formatting Tables
A table is a great way to organize information within a document. A table is a grid of cells arranged in rows and columns. Tables can be used to organize any type of content, whether you’re working with text, graphics or numerical data. Unlike tabs, table cells can have headers (in bold), as well as borders or boundaries, which make the information easier to read. A table typically includes headings that identify each column or row that contains data. The following is a 5×3 table, which means it has five columns and three rows.

To create an empty table, click Table from the Insert tab, and move the cursor over the grid to select the number of cells for the table. Click the grid to create the table and 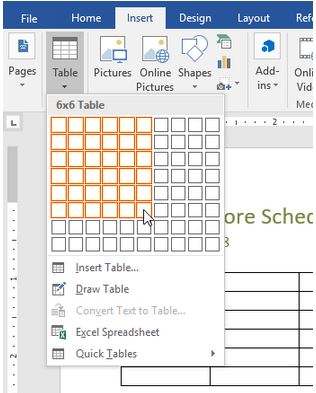 then type text into the individual cells. Word automatically adjusts the column widths to be equal so that the table fills the space between the left and right margins. To manually adjust the width or height of a cell, drag the border. Press the Tab key to move from cell to cell. If the insertion point is in the last cell, pressing the Tab key will automatically add a new row.
If the number of rows and columns you create turns out to be different than what is needed, you can easily add or delete rows and columns via the Table Tools Contextual tab. The Layout side of this contextual tab will also allow the user to change cell size, merge & split cells, sort table data, change text alignment, and modify table properties.

The Table Tools Design tab offers additional functionality to modify Word tables. Design elements include defining Table Style Options, like Header and/or Total Rows, selecting from a gallery of Table Styles, as well as adding shading and borders. You can easily insert and delete table rows and columns via this tab as well.

It is possible to create a table from text that already exists. However, the data must be 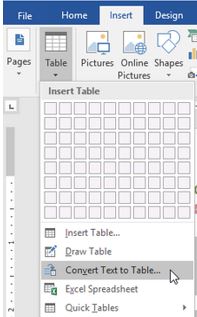 consistently separated, field-by-field, using a delimiter. A delimiter can be tabs, paragraphs, commas or some other user-defined character which is used to separate each field. With the cursor residing inside the existing source data, select the Convert Text to Table… option from the Table tab of
 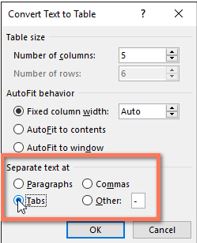 the Insert ribbon.
Clicking an option from a menu that ends with the ellipsis notation (…) indicates that a dialog window will appear. The Convert Text to Table dialog window allows the user to define the table size, AutoFit behavior, and the delimiter.
The contents of the rows in a table can be sorted based on a column. Users can sort in alphabetic (text), numerical (numbers), or chronological (dates) order using either Ascending (A → Z) or Descending (Z → A) manner. Clicking the Sort button on the Table Tools Layout tab will open the Sort dialog window.
The Sort by options will be the column headers, or Column 1, Column 2, etc. if there is No header row. The first sort selection is known as the primary sort, followed by the secondary, and tertiary sort options. The Type drop-down list will offer the choices of Text, Number or Date, depending on the existing table data. Make sure to choose either Ascending or Descending for each sort level.
Inserting Headers and Footers
A header is the area at the top of a page, and a footer is the area at the bottom of a page. Headers and footers consist of one or more lines of text, page numbers, graphics, and other fields, such as the file name, document title, current date and/or time, or
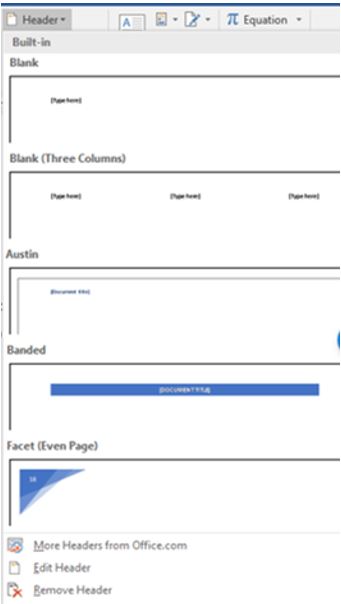
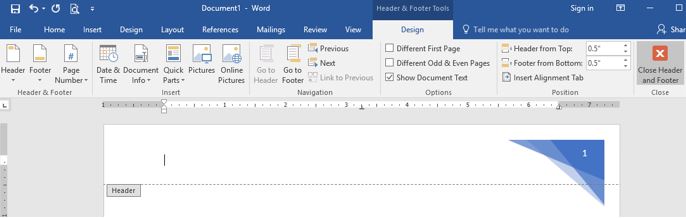
author’s name. To create a header or footer, click either the Header or Footer drop down list from the Insert ribbon.
A gallery of built-in designs is displayed. Clicking a built-in design makes the header or footer the active area of the document, while the body of the document fades to the background. A header or footer has three sections: left, center, and right. The user can either type text into existing placeholders, or insert fields from the Header & Footer Tools Design contextual tab, which only appears when the cursor is placed in either the header or footer.
To return to the body of the document, double-click in the document body, or click the Close Header and Footer button on the Header & Footer Tools Design tab. Double-click in the header or footer area to make it active and allow for editing.
The header or footer is printed on each page of the document. To specify a different header and footers for the first page, select the Different First Page checkbox on the Options group of the Header & Footer Tools
Design tab. Any existing header or footer will automatically be removed. A different first page is common in long documents to prevent the cover page from including the headers and footers contained in the rest of the document. A cover page usually does not include any header or footer data.
One of the most common purposes of headers and footers is to include page numbers. 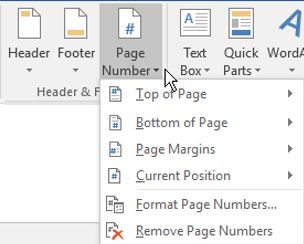 Page numbers are helpful in documents that have more than one page. To add a page number at the current location in an existing header or footer, click Page Number > Current Position, and then choose a style from the gallery of choices. Scroll through the list of style options in the gallery to find one you like. You can select a plain number style, or a Page X of Y style to get a more defined starting and ending number (Page 1 of 7) format. Experiment to find the style that best meets your needs.
An inserted page number can be further formatted as needed. Number formatting and different starting page numbers can be defined in the Page Number Format dialog 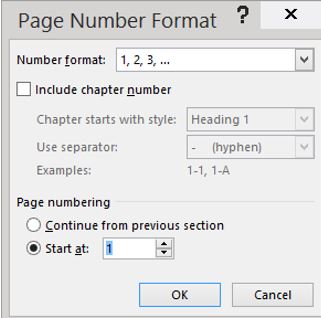 window, which is opened when the user selects Format Page Numbers…. from the Page Number drop down list. Number formats include Arabic, alphabet, and roman numeral formats.
The Page numbering options allow a user to restarting the page numbers at a user-defined number. This can be useful to recognize unnumbered pages that precede the main part of the document.
In the Position group, you can control the amount of space allotted to the header and footer. By default, each is 1/2-inch tall. Users can change these values in the Header from Top and Footer from Bottom list boxes. Manipulating these selections will affect the printable area of the document’s margins.
It is a “best practice” to add page numbers before adding other header and footer fields, because any existing text will be replaced by adding page numbers using the Insert > Page Number process. Alternatively, users can add page numbering to existing header and footer text through the Quick Parts feature, which is not explained in this text. Other than page numbers, headers and footers often contain the document’s author, date and/or title. Each of these fields help identify the document, particularly when the document is printed and compared with other similar documents.
Setting Page Orientation and Margins
The page setup of a document includes settings such as margins, orientation, and other pagination settings. These settings can be applied to the entire document, or specific sections, which can be created by inserting section breaks (not explained in this text). The Page Setup group found under the Layout tab contains these selections.
Page orientation refers to how a rectangular page is arranged for viewing. The 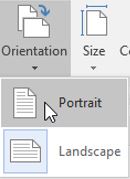 orientation of a Word document can be either portrait or landscape. Portrait orientation is taller than it is wide (vertically), and landscape orientation is wider than it is tall (horizontally). The default orientation is portrait.
Choosing a page orientation needs to consider the paper size 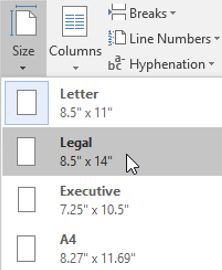 selected for the document. The standard paper size in North America is called Letter, which has the dimensions of 8.5” x 11”. Legal documents are 14” instead of 11”, which means when printed in portrait orientation, legal documents are three inches longer (and a pain to fit in a standard folder!). The standard paper size in Europe is known as A4. Its dimensions are 210mm x 297mm, which is closer to the Legal size, than the Letter size. Many posters and tables are often printed on Tabloid sized paper, which is 11” x 17”. However, since a lot of home printers cannot accommodate this size of paper, many users choose to change their orientation to landscape, which changes the printable width to 11”, and the printable height to 8.5”. If adjusting the orientation doesn’t solve the layout challenges of the document, consider adjusting the margins!
Margins are the white space surrounding the text on a page. Margins can be specified for the top, bottom, left and right edges of a document. The default margins are 1” each,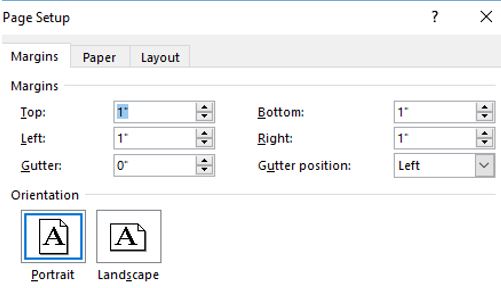 but margins can easily be adjusted from the pre-set choices in the Margins drop-down list, or by manually adjustments in the Page Setup window, which can be opened by clicking the launcher button in the Page Setup group in the Layout tab. Narrow margins leave more room for more data, while wider margins decrease the amount of printable space. Similarly, larger top and bottom margins decrease the available space. If adjusting orientation and margins aren’t enough to resolve page formatting, consider using page breaks.
Pagination is how a document is divided into pages. Word automatically determines how much text will fit on a page based on the amount of text and the document formatting. As new data is added to a page, Word creates automatic page breaks, also known as soft page breaks. To force data to a new page, a user can insert a manual (hard) page break. Inserting a page break moves the text after the insertion point to the next page. To insert a page break, press Ctrl + Enter or click Page Break from the Insert tab. To remove manual page breaks, utilize the Show/Hide button to display formatting marks, such as the Page Break mark: ![]()
To remove a hard page break, place the insertion point to the left of the page break and press the Delete key. Word will re-paginate itself, and move data to the previous page.
Creating and Inserting Citations & Bibliographies
Many college courses require students to write research papers. While conducting the appropriate research may be the main objective of the assignment, collecting the research is often not as challenging as documenting the sources of the research. Part of the challenge associated with properly documented sources is understanding the format of the required style guide assigned by the instructor. A style guide is a set of standards for creating documents, and citing of sources. A citation, or a reference, is a formal acknowledgement to a published or unpublished source. The purpose of using citations is to give credit to the author of the original research, and avoid plagiarism. Plagiarism occurs when a user presents the data of another author as if it were their own. The major writing style guides include MLA, APA, CSE, and Chicago. Each style has unique requirements for handling citations.
A typical requirement of a research paper is the production of a bibliography, a Works Cited or References page. A bibliography is an alphabetic list of the sources used to produce a scholarly work. Each style guide has different requirements for what data is needed to be listed for each source. The bibliography helps the reader identify the source of the writer’s research. Manually creating a bibliography can be a tedious and inexact process, and updating a manually-generated bibliography will likely induce heartburn. However, by carefully entering sources into Word, a bibliography can be accurately generated and re-generated with ease.
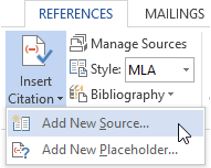 Before a user can create a bibliography, they must create at least one citation and source in the document. Whenever a source is referenced in a document, the user should create a citation to give the original author credit. To add a citation, place the cursor in the desired location (follow the style guide), and click Insert Citation from the References tab, then choose Add New Source…
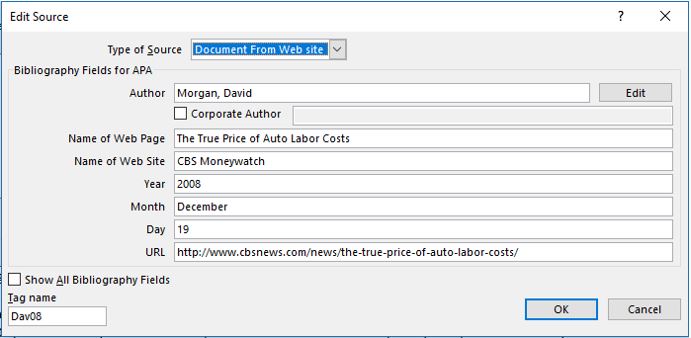
The Create/Edit Source dialog window will appear where the user can enter as much information regarding the source as possible. The first field, Type of Source, will dictate which bibliography fields are needed for the source depending on the specific style 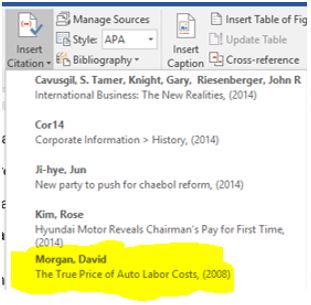 guide. After entering the publication details, and clicking OK, the citation will appear in the document, and the source will be saved.
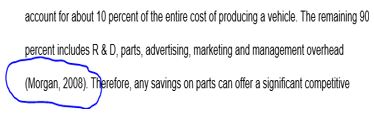
Types of sources can include books, a web site, an article in a periodical, a sound recording, and many more. Often, a single source can be cited numerous times in a report. Users can easily add the citation again by clicking the 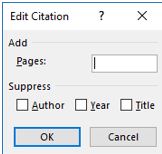 Insert Citation drop down button from the References tab, and selecting the source from the drop-down menu. A citation can be edited to add page numbers. Open the citation’s inline drop-down menu and choose Edit Source. Certain fields can even be suppressed.
After completing the paper, adding all the sources for the document, and completing the summary, adding the bibliography or works cited is extremely easy! Typically, a bibliography will reside on its own page. Therefore, create a manual page break, and then on the References tab, in the Citations & Bibliography group, choose the Bibliography option and choose from the pre-designed formats to insert the Bibliography or Works Cited into the document.
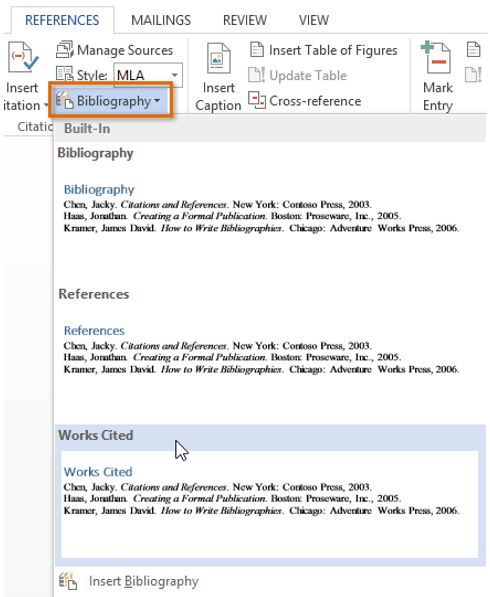
The bibliography appears and the sources are formatted to match the selected style guide. If the user ends up adding more sources to the document, they can easily update the bibliography by clicking it and selecting Update Citations and Bibliography.
Printing and Saving Files in Alternative File Formats
Before printing a document, it is a good idea to preview the document and specify which pages should print. The preview might help the user discover some layout issues that can be addressed before wasting ink/toner and paper. The Print Preview window can be accessed in Backstage view by clicking File > Print. It is also a popular idea to add the Print Preview command to the Quick Access toolbar if it doesn’t already exist.
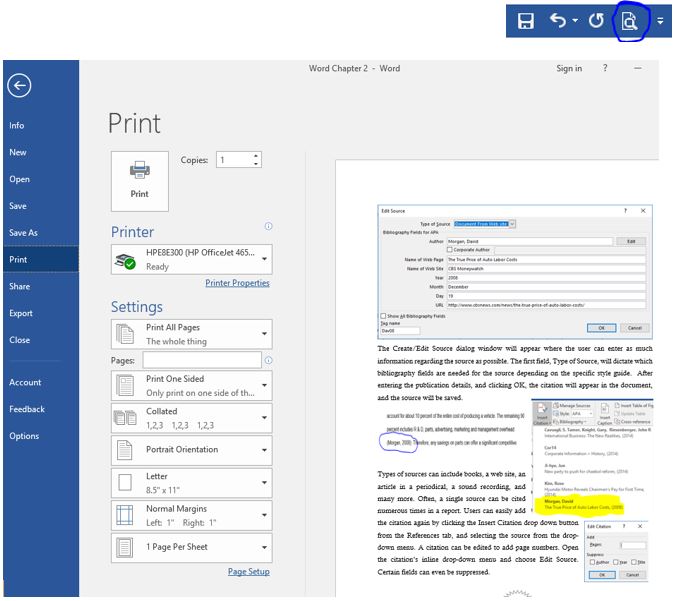
Numerous options can be defined in Backstage view, such as which printer, how many copies, which pages, etc. Once these decisions are made, pressing the big Print button in the top left of the window, will send the data to the selected printer. The back button ![]() will exit Print Preview.
will exit Print Preview.
If printing a hard copy is not desired, saving the file is the obvious alternative. The way that the user saves a document and the format that they save it in depends on how they plan to use the document. While choosing Save from the File menu will resave the file in its existing format, choosing the Save As command (F12) provides numerous alternatives.
The first option available by using the Save As dialog window, is the ability to choose an alternative storage destination versus the existing location. Alternate storage destinations include a different file folder on the user’s hard drive, a portable file storage location, such a USB drive device, or a cloud-based storage location. OneDrive is Microsoft’s cloud-based storage option, but other cloud-based solutions, such as Dropbox, exist as well. Cloud computing requires Internet-connectivity to access the current versions of the files. An alternative file format is another option to consider from the Save As window. Choosing the drop-down list to the left of the Save button displays a list of alternative file formats.
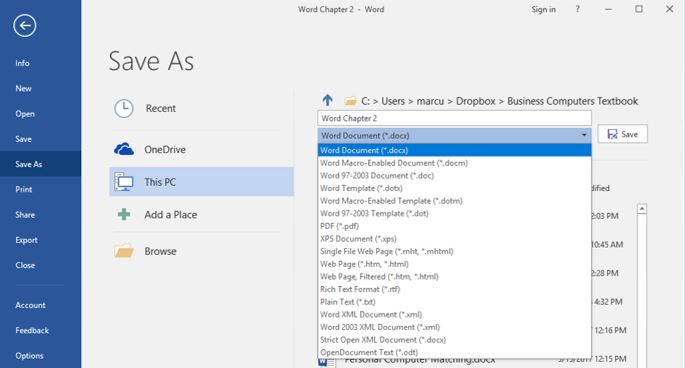
One of the most common alternative file formats is a PDF (Portable Document Format) file. PDFs are popular formats to share with non-Microsoft Office users, commercial printers, and users for whom the document is not to be edited. The PDF format looks the same on most computers, has a smaller file size, and preserves most formatting characteristics of the source document. The only software that is required to read or print a PDF file is Adobe Reader, which is available as a free download from Adobe’s web site. While prevention of editing was a key feature of PDF files, the current version of Word can actually edit PDF files, however, the edits are traceable.
The other common file format is saving a file to be viewed on a web site or simply in a web browser. Saving a file as a Single File Web Page is the optimal approach to allow users to open the document using a web browser. The file extension of a single file web page is .MHT. Other occasionally used file formats include: .XPS, .ODT, and RTF.
Practice 4: The Solar System – Part 3
- Open the recently edited data file The Solar System2.docx from your data files.
- Create a 2 x 9 table at the end of page 2.
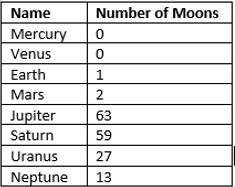
- Add and format data to table as shown to the right.
- Add a new column to the table to the left of the Name column. The header should be Proximity to the Sun. The data should be 1, 2, 3 …. 8.
- Sort the table in descending order by Number of Moons.
- Apply the Grid Table 4 – Accent 4 table style to the table.
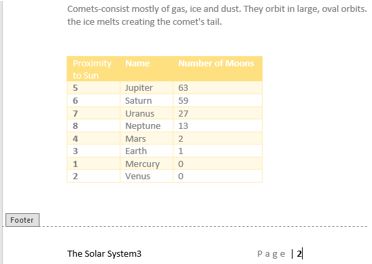
- Add the file name field to the left side of the footer, and the Accent Bar 2 page number to the center section of the footer. Refer to the illustration at right for steps 4-8.
- Change the paper size to Legal.
- Insert a page break before the paragraph beginning with The Dwarf Planets.
- Change the margins to the Office 2003 defaults.
- Add a new citation source
 following the period at the end of the paragraph regarding the Sun on page 1. The source details should be a web page (The Sun) on a web site (Nine Planets). Use today’s date for the Year, Month, Day, and the URL: nineplanets.org/sol.html. Mark the Corporate Author checkbox.
 - Add a Works Cited at the bottom of page 2.

- Save the file with a new name. i.e. The Solar System3. Save another version of the file in PDF format.
