
Access Chapter 1 – Database Basics
- What is a Database?
- The Four Main Objects in a Database
- Database Design
- Creating a Table
- Primary and Foreign Keys
- Table Relationships
- Entering and Editing Records
- Creating Forms
What is a Database?
A database is a collection of related data that is organized so that it can be easily access, managed and updated. Databases can store details about people, products, orders, or anything else. Data can be defined as facts and statistics about people, objects, events and ideas. Organizations interpret, process and analyze data to turn the data into useful information. This information is used to make better decision-making.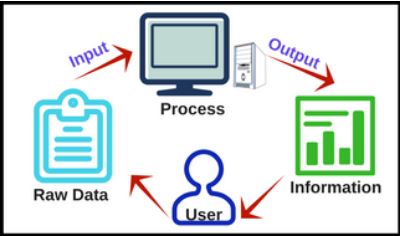
In the past, many databases were paper-based. Paper records were stored in files within file cabinets. File cabinets still exist today, in large part due to the fears associated with the insecurity of electronic records being compromised. The individual documents (records) are categorized into different folders (tables) to streamline user access. However, this process is labor-intensive, susceptible to errors, and an office eyesore!
Databases are used for two major purposes: for processing transactions and analytical research. Transactional databases track daily operations. This data can be extracted into other software programs for further manipulation, summation and classification. This allows users to perform analytical research and prepare reports to help create strategic information.
Computerized databases organize data into rows, columns and tables, and is indexed to make it easier to find things quickly. Data gets updated, expanded and deleted as new data is added. Automated processes quickly manipulate the data, and data accuracy is enhanced through automated rules. The advancements in database software technologies have contributed to the Information Age that currently exists. The growth of the filing cabinet market cannot compare to the growth of electronic data contained in private and public networks, and web sites throughout the Internet!
While a spreadsheet can function as a database, with it’s utilization of columns and rows, the flat-file structure creates redundancies and inconsistencies which limit the ability to find and understand the data. In contrast, a relational database uses a tabular structure so that data can be easily reorganized and accessed in a number of different ways. Relational databases are made up of a set of tables with data that fits into predefined categories (fields). Each table has at least one data category (field) in a column, and each row has a certain data instance for the categories (fields) which are defined in the columns.
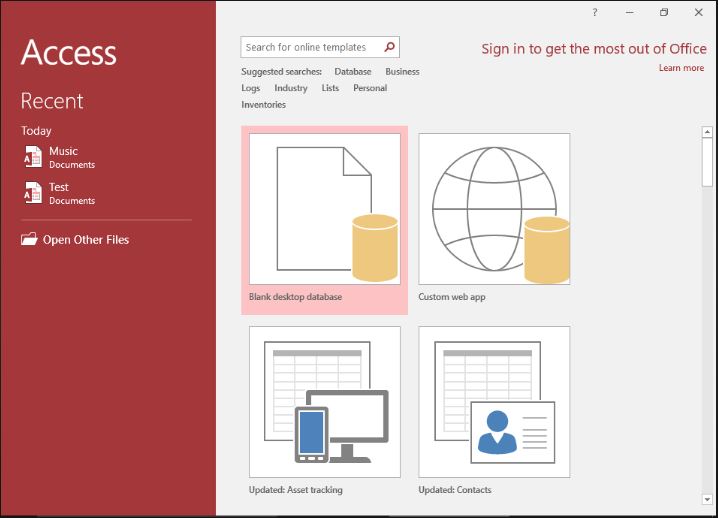
Microsoft’s relational database software program available in Office 365 is called Access. Access only functions with Windows operating systems (not available on a Mac O/S), and is not available in all Office versions. Access is a tool to organize, store, and manipulate data, in order to report on the data stored in tables. The power of a database comes from the ability to link tables together to provide data processing efficiencies for large sets of data. Access’ integration with the other Microsoft Office programs makes it a very popular and economical relational database solution.
The Four Main Objects in a Database
While Microsoft Access is made up of seven components, this text will focus on the main objects: tables, forms, queries and reports. Together, these objects allow users to enter,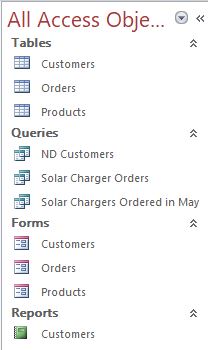 store, analyze and compile data in various ways. When an Access database is opened, the objects are illustrated in the Navigation Pane on the left side of the window. The standard view in the Navigation Pane displays all objects in the database organized by object type. The Navigation Pane is used to run, open, and manage the objects of a database. Double-clicking an object will open the object in a document window.
A table is the database object that stores data organized in an arrangement of columns and rows. Each row is a record and each column is a field within each record. A record is all of the data pertaining to a person, place, thing or event. Each record will have one or more fields and every database must have at least one table. A relational database must have more than one table.
The other three objects are typically based off of the tables, so take the time to set up the tables correctly, the first time! A form object is typically used for entering new records into a table, or edit/deleting/display existing records in a table. Forms are the primary interface that most users of a database enter and display data. A query object retrieves specific data from other database objects and then displays only the data that the user specifies. Queries are the equivalent of asking questions about the data. The report object summarizes the records from a table or query into an easy-to-read format suitable for printing or exporting to other software programs.
Access objects have several views. Each view gives users different perspectives and offer different functionality. The two most important views are Datasheet view and Design view. Datasheet view displays a table in a datasheet where fields are in columns and records are in rows. This view is useful for comparing records and is often used when sorting or filtering data. This view is also practical for printing data since many of the records can fit

on a single sheet of paper. Records can be added in datasheet view, but forms are a more typical object for data entry. Nonetheless, the asterisk (*) that appears to the left of the row below the last record indicates where a new record will appear. The grey box to the left of each record is a record selector. Clicking a record selector will make the record active. Right-clicking the record selector will allow users to delete the selector record or add a new record to the table. Design view allows users to setup and edit the fields in an object.
Database Design
A properly designed database will divide data into tables to eliminate duplicate information (also known as data redundancy). Redundancy occurs when data is repeated several times in a database. Redundant data is bad, because it wastes space and increases the likelihood of errors and inconsistencies. A good database prevents redundant data when, for example, customer data (ID, Name, Address, etc) is stored in one table and then other tables store just the customer ID to refer to the customers. Another important design consideration to maintain is data accuracy. A common motto when performing data entry is “garbage in, garbage out”. The correctness and completeness of information is important if the user wants to rely on their data. If your database contains incorrect information, any reports that pull information from the database will also contain incorrect information. As a result, any decisions you make that are based on those reports will then be misinformed.
Creating a new database involves determining the database schema, which is a description of the data and the organization of the data into tables. Designing a schema consists of the following steps:
- Determine the purpose of the database and which data to include in the database. It is a good idea to write down the purpose of the database on paper — its purpose, how you expect to use it, and who will use it.
- Divide information into related groups to create tables and then give each table a descriptive name. Data should be grouped to ensure there is little to no redundancy. Each table must have data related to at least one other table through a table relationship.
- Describe the fields and determine the primary key for each table.
Creating a Table
As previously stated, a database cannot exist without at least one table. Therefore, when a 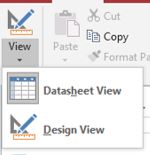 new database is created in Access, the first object that opens is a table in datasheet view. Switching the view to Design View allows the user to make many design decisions in a much more intuitive view. Many users like to use Datasheet View to paste data copied from Excel. However, setting up the fields in Design View makes it easier to define each field’s properties and data type.
Design View doesn’t display any data. Therefore, there’s more space available to display other settings. In Design View, you can see the data type listed next to each field. When a user clicks on a field (in the top frame), the bottom frame displays the properties for that field. The user can then change these properties as desired.
Creating a table in Design View allows the user to define advanced settings, like data types and properties, for each field in the table. However, the first step is defining the field names. Here are a few guidelines when creating field names:
-
-
- Names can include numbers, UPPER and lowercase letters, and any combination. Avoid special characters (exclamation points, periods, brackets, quotes, etc.)
- No leading spaces. Spaces between words is acceptable, but not common practice, because:
- Make the names as short as possible without excessive abbreviation. Formatting column widths for displaying in printouts can be challenging with excessively long field names. For example, Order # or Order Number are better than Customer Order Number.
- Ensure the names are unique per table. If a table has fields for Customer ID and Product ID, neither field should be named simply ID. Likewise with the word Name. It is too generic and needs an prefix identifier.
- Break data into multiple fields. For example, instead of one field for Customer Name, create fields for First Name and Last Name. This will allow sorting and filtering on single fields. Another example would be separating an address into multiple fields for Street Address, City, State/Province and Zip/Postal Code.
-
Every field has a data type. A field’s data type indicates the kind of data that the field stores, such as large amounts of text or attached files. A field’s data type determines what other properties the field has including its size and formatting options. Field data types are defined in the table design grid, where as field properties are defined in the Field Properties pane in the bottom of the Table Design View window. Data types include:
| Data type | Description | Size |
|---|---|---|
| Short Text | Use for text or combinations of text and numbers (i.e. Phone Numbers). | Up to 255 characters |
| Long Text | Use for larger amounts of alphanumeric data, including sentences and paragraphs. Note: You cannot sort a memo field. However, they are searchable. | Up to 1 GB |
| Number | Numeric values. | 4 bytes |
| Large Number | Numeric values. Stores a non-monetary, numeric value and is compatible with the SQL_BIGINT data type in ODBC. Use this data type to efficiently calculate large numbers. | 8 bytes |
| Currency | Use for monetary data. Holds up to 15 digits of whole dollars, plus 4 decimal places. Tip: You can choose which country’s currency to use. | 8 bytes |
| AutoNumber | Unique value generated by Access for each new record, usually starting at 1. | 4 bytes |
| Date/Time | Use for dates and times. | 8 bytes |
| Yes/No | A logical field can be displayed as Yes/No, True/False, or On/Off. In code, use the constants True and False (equivalent to -1 and 0). Note: Null values are not allowed in Yes/No fields. | 1 byte |
| Ole Object | Can store pictures, audio, video, or other BLOBs (Binary Large OBjects). | Up to 2 GB |
| Hyperlink | Contain links to documents or other files, e-mail addresses, or web pages. | Up to 8 bytes |
| Attachment | Attach pictures, documents, etc. Can contain an unlimited number of characters per record. Access will compress the file. | Up to 2 GB |
| Calculated | Use to create an expression that uses data from one or more fields. You can designate different result data types from the expression. | Dependent on the data type of the result type property |
| Lookup Wizard | When selecting this entry, a wizard starts to help define either a simple or complex lookup field. A simple lookup field uses the contents of another table or a value list to validate the contents of a single value per row. A complex lookup field allows you to store multiple values of the same data type in each row. | Dependent on the data type of the lookup field |
After creating a field and setting its data type, users can set additional field properties. The field’s data type determines which other properties that can be set. The field size is the number of characters or the type of number it can store. For Number and Currency fields, the Field Size property is especially important, because it determines the range of field values. For example, a one-bit Number field can store only integers ranging from 0 to 255. In the Field Properties pane, on the General tab, enter the new field size in the Field Size property. Users can choose from the following values:
-
-
- Byte — For integers that range from 0 to 255. Storage requirement is a single byte.
- Integer — For integers that range from -32,768 to +32,767. Storage requirement is two bytes.
- Long Integer — For integers that range from -2,147,483,648 to +2,147,483,647. Storage requirement is four bytes.
- Single — For numeric floating point values that range from -3.4 x 1038 to +3.4 x 1038 and up to seven significant digits. Storage requirement is four bytes.
- Double — For numeric floating point values that range from -1.797 x 10308 to +1.797 x 10308 and up to 15 significant digits. Storage requirement is eight bytes.
- Replication ID — For storing a GUID that is required for replication. Storage requirement is 16 bytes.
- Decimal — For numeric values that range from -9.999… x 1027 to +9.999… x 1027. Storage requirement is 12 bytes.
-
Numeric and date/time fields can have a specified format to define how the data is displayed. Short text, long text, and hyperlink fields usually have no format. Predefined numeric field formats include:
-
-
- General Number – (Default) Display the number as entered.
- Currency – Use the thousand separator; follow the settings specified in the regional settings of Windows for negative amounts, decimal and currency symbols, and decimal places.
- Euro – Use the euro symbol (
 ), regardless of the currency symbol specified in the regional settings of Windows.
 - Fixed – Display at least one digit; follow the settings specified in the regional settings of Windows for negative amounts, decimal and currency symbols, and decimal places.
- Standard – Use the thousand separator; follow the settings specified in the regional settings of Windows for negative amounts, decimal symbols, and decimal places.
- Percent – Multiply the value by 100 and append a percent sign (%); follow the settings specified in the regional settings of Windows for negative amounts, decimal symbols, and decimal places.
- Scientific – Use standard scientific notation.
-
When it comes to date/time fields, Access automatically displays the date and time in the General Date and Long Time formats. The dates appear as, mm/dd/yyyy in the U.S. and as, dd/mm/yyyy outside the U.S. where mm is the month, dd is the day, and yyyy is the year. The time is displayed as, hh:mm:ss AM/PM, where hh is the hour, mm is minutes, and ss is seconds. Here are some other predefined formats for date/time fields:
-
-
- Long Date – Displays only date values, as specified by the Long Date format in your Windows regional settings. i.e. Monday, May 13, 2018.
- Medium Date – Displays the date as dd/mmm/yy, but uses the date separator specified in your Windows regional settings. i.e. 13-May-2018.
- Short Date – Displays date values, as specified by the Short Date format in your Windows regional settings. i.e. 5/13/2018.
- Medium Time – Displays hours and minutes followed by AM or PM. Access uses the separator specified in the Time setting in your Windows regional settings. i.e. 9:23 AM.
- Short Time – Displays only hours and minutes. Access uses the separator specified in the Time setting in your Windows regional settings. i.e. 9:23.
-
Other popular (not all inclusive) field properties that appear based on certain data types include:
-
-
- Decimal Places – Specifies the number of decimal places to use when displaying numbers.
- Input Mask – Controls how
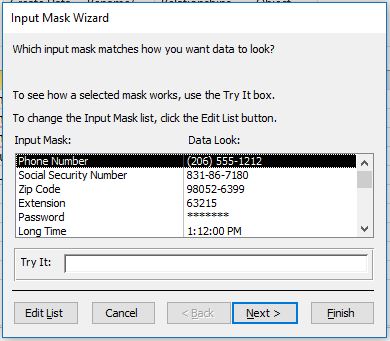 data is entered and is useful when text or date entries should follow a certain format. Access has several predefined masks. To open the Input Mask Wizard, click the ellipses (…) at the end of the Input Mask field. Popular existing input masks include the Phone Number and Zip Code masks. Typically, clicking Next to accept the default options throughout the wizard will create the most common input masks. Custom masks can be created by clicking the Edit List button. Mask characters include the digits 0 and 9. A 0 placeholder means that a digit is required, whereas a 9 means that a digit is optional. For example, the last four characters of a Zip Code are often optional, so the mask would display as 00000-9999.
 - Caption – The label text that is displayed for this field by default in forms, reports, and queries. If this property is empty, the name of the field is used. Any text string is allowed.
- Default Value – Automatically assigns the specified value to this field when a new record is added. Popular with State or Country fields for data entry in regional uses.
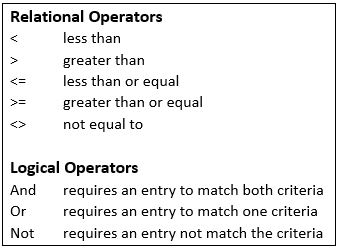
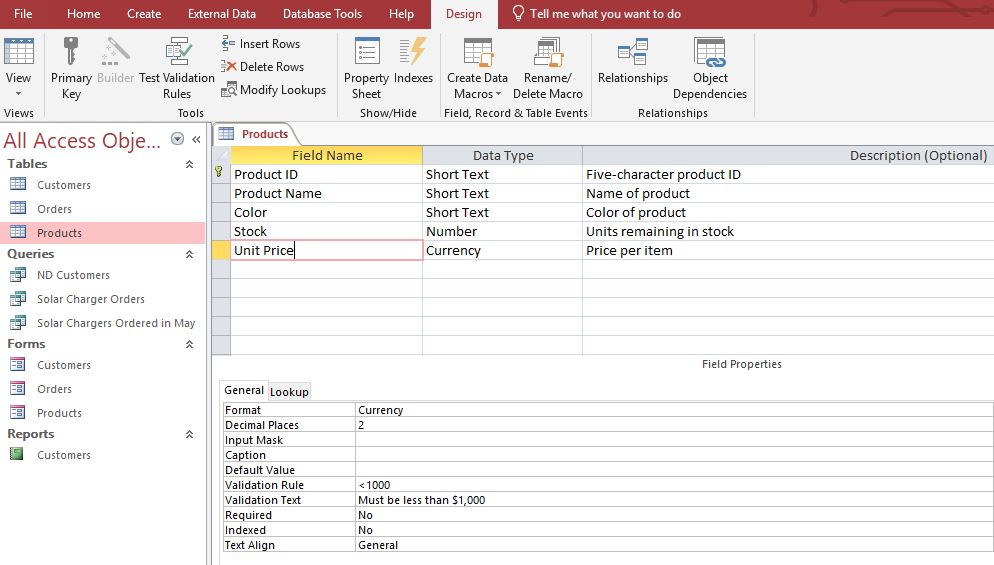
- Validation Rule – Helps ensure accurate data through creation of an expression criterion that must be true whenever the value is added or changed in the field. Validation rules are popular for numeric and date entries, and are formed with one or more relational operators and/or logical operators. A typical rule in an Order Entry table/form might require the Quantity be at least one. The rule in the Quantity field could be >=1.
- Validation Text – If an entry breaks the rule, it is cleared from the entry box and the Validation Text is displayed in a dialog box. Highly recommended to be used in conjunction with the Validation Rule so the data entry person knows why their entry is not acceptable.
- Required – Specifies if data must be entered or not. Choice is Yes or No. Default is No.
- Indexed – Specifies whether the field has an index. There are three available values: Yes (No duplicates) – Creates a unique index; Yes (Duplicates OK) – Creates a non-unique index; No – Removes any index on the field. If users often search a table in Access or sort its records by a particular field, users can speed up these operations by creating an index for the field. Access uses indexes in a table as people use an index in a book: to find data, Access looks up the location of the data in the index. In some instances, such as for a primary key, Access automatically creates an index. At other times, it may be necessary to create an index manually.
-
Primary and Foreign Keys
Fields that are part of a table relationship are called keys. A key usually consists of one field, but may consist of more than one field. There are two kinds of keys:
-
-
- Primary key – To ensure that no two records in a table are identical, one field in each table is designated the primary key. A primary key consists of one or more fields that uniquely identify each record that you store in the table. Often, there is a unique identifier, such as an ID number (Employee ID, Customer ID, etc), a serial number, or a social security number that serves as the primary key. Always choose a primary key whose value will not change. A key icon appears next to the name of the primary key field. AutoNumber data type fields make good primary keys.
- Foreign key – A table can also have one or more foreign keys. A foreign key contains values that correspond to values in the primary key of another table. For example, you might have an Orders table in which each order has a customer ID number that corresponds to a record in a Customers table. The customer ID field is a foreign key of the Orders table.
-
Table Relationships
Access is a relational database management system. In a relational database, users divide information into separate, subject-based tables. Keeping data separated in related tables produces the following benefits:
-
-
- Consistency – Because each item of data is recorded only once, in one table, there is less opportunity for ambiguity or inconsistency. For example, storing a customer’s name only once in a table about customers versus storing it repeatedly (and potentially inconsistently) in a table that contains order data.
- Efficiency – Recording data in only one place results in less disk space used. Additionally, smaller tables tend to provide data more quickly than larger tables. Finally, not using separate tables for separate subjects will introduce null values (the absence of data) and redundancy into the tables, both of which can waste space and impede performance
- Comprehensibility – The design of a database is easier to understand if the subjects are properly separated into tables.
-
In relational database terms, a relationship is a situation where multiple tables can contain related data that is linked by a common field. A relationship consists of a parent table and a child table. The child table references the parent table by having a field that matches a field in the parent table. The child’s field is the foreign key, whereas the parent’s field is the primary key. In a relationship, any data entered into the child’s foreign key field must match a value from the parent’s primary key field. By ensuring that the foreign key’s data matches data in the primary key, Access ensures that all records in the child table will have an associated record in the parent table. There are three types of relationships:
-
-
- One-to-One – A row in table A can have only one matching row in table B, and vice versa. i.e. A baseball player can have only one Jersey Number.
- One-to-Many – A row in table A can have many matching rows in table B, but a row in table B can have only one matching row in table A. i.e. A baseball player can have many games played.
- Many-to-Many – A row in table A can have many matching rows in table B, and vice versa. This is achieved through the use of a third table (commonly called a junction table) that contains lookup data for both tables. Multiple players can play multiple games.
-
Determining the relationships between tables helps ensure that the right tables and columns exist. When a one-to-one or one-to-many relationship exists, the tables involved need to share a common column or columns. When a many-to-many relationship exists, a third table is needed to represent the relationship.
Entering and Editing Records
Entering records directly into Datasheet View is probably the most intuitive way to enter data into a database. In Access, this is common because many Access databases are considered single-user databases. With multi-users databases, data integrity policies would discourage most users from having editing rights directly to the tables. Therefore, in these databases, the more common method for entering and editing records in a database would be via a form. Nonetheless, entering records directly into Datasheet View has some advantages, including:
-
-
- Users can look at their data in columns and rows in a datasheet without using any special formatting.
- When a user opens a table in Datasheet View it resembles an Microsoft Excel worksheet, and the user can paste or add data in one or multiple fields. Data can be copy and pasted from a Word table or Excel worksheet into Access.
- Printing a table’s datasheet in Portrait or Landscape orientation. Use Print Preview to change the orientation and margins before printing. Output can also be sent to a PDF file.
- Users don’t need to explicitly save their data. Access commits user’s changes in the table when they move their cursor in the same row towards a new field, or if they move their cursor towards another row.
- Sorting and filtering data is very similar to Microsoft Excel.
-
 Access allows users to sort data in Datasheet View one iteration at a time in either Ascending or Descending order. Ascending order is also referred to as alphabetical order when the sort is based on a text field, chronological order when the field is a date/time data type or numerical order when the data type of the field is Number. Sorting a datasheet does not affect the order that the records are displayed in a form.
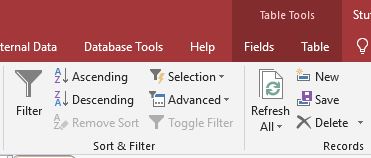
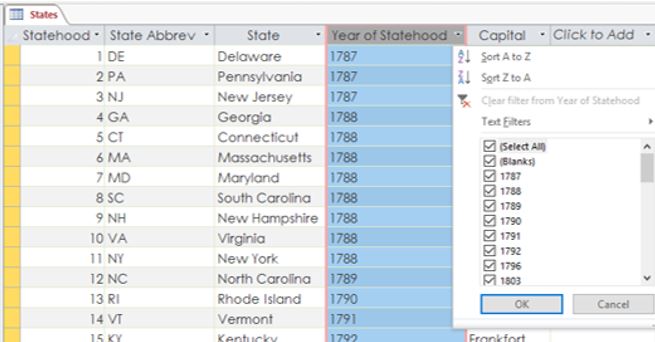
Displaying records based on specified criteria is called filtering. When a filter is applied, records that do not meet the specified criteria are hidden from view until the filter is removed. To filter records based on the data in a field, click in the field to base the filter on and then click on the Filter button on the ribbon or click the drop-down triangle to display a menu similar to the graphic below.
To remove a filter, clear the check boxes, and click OK or click the Filter ![]() button again or click the Advanced button on the ribbon and choose Clear All Filters.
button again or click the Advanced button on the ribbon and choose Clear All Filters.
Most databases contains hundreds, if not thousands, of records. Therefore, when a table becomes so large that the records and data do not fit in the datasheet window without scrolling, the Find feature becomes very practical.
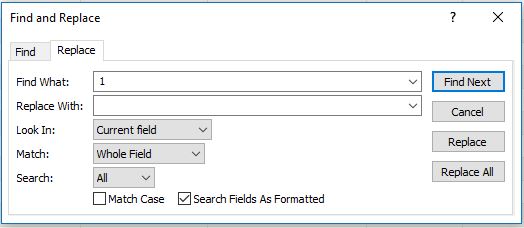
In Datasheet view, use the Find command, from the Home tab, to quickly locate specific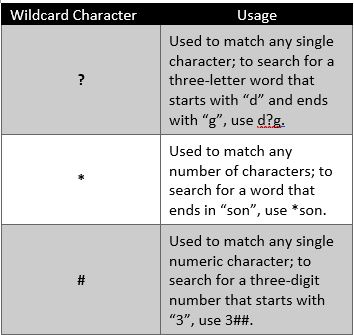 records using all or part of a field value entered in the Find What: field. If in the States table above, if the user entered the value North in the Find What field, Access would find two records for North Carolina and North Dakota, but only if the Match: value was changed from Whole Field to Any Part of Field or Start of Field. Using wildcard characters can be extremely helpful if the user does not know the exact spelling of the value they are looking for. A wildcard character can replace a single character or multiple characters, which can be both text and numbers. Clicking the Replace tab will allow the user to replace the data in the Find What: field with the data entered in the Replace With: field. This could be very useful when updating name changes, such as when Kentucky Fried Chicken changed their name to KFC in 1991.
Creating Forms
A form is a database object that offers an alternative interface to a table beyond the Datasheet view of the table. Forms can improve data entry proficiency by rearranging the order and tab sequence of fields within a table. Forms can also be designed to hide certain fields from appearing. For example, a credit limit or credit card number field might only be accessible from the table Datasheet view to limit the access to sensitive data from users who do not have rights to view or edit tables. In Access, users have the option of creating a blank form from scratch, using the Form Wizard, or having Access automatically create a form from a table or query.
A basic form can be easily created by using the Form tool. Simply select the table (or query) in the Navigation Pane that the form should be based off of, and then click Create > Form (from the Forms group). all the fields from the underlying data source are placed on the form. If Access finds a single table that has a one-to-many relationship with the table or query that you used to create the form, Access adds a datasheet to the form that is based on the related table or query.
A split form can be created by clicking More Forms from Create tab, and then choosing Split Form. A split form displays two views of the data simultaneously — a Form view and a Datasheet view. Working with split forms provides the benefits of both kinds of forms in a single form. For example, a user can use the datasheet portion of the form to quickly locate a record, and then use the form portion to view or edit the record.
To be more selective about what fields appear on your form, use the Form Wizard. This multi-step process allows the user to define how the data is grouped and sorted, and in some instances, fields from multiple tables/queries can be added to the same form. Once a form is created, use the different views to modify the forms design or populate the forms with data. Forms have three views:
-
-
- Form view – shows the data in the form. This is the view to use to enter or change data. Record controls at the bottom of the form are used to display specific records and add a new record (the right arrow with the yellow star). The form’s design properties cannot be changed in this view.

- Layout view – shows the form and the data in a visual layout. This is the view that opens when a form is initially created. Some of the form design properties, such as field fonts and column widths, can be changed in this view. However, the data cannot be changed in this view. Notice the Form Layout Tools contextual tabs!

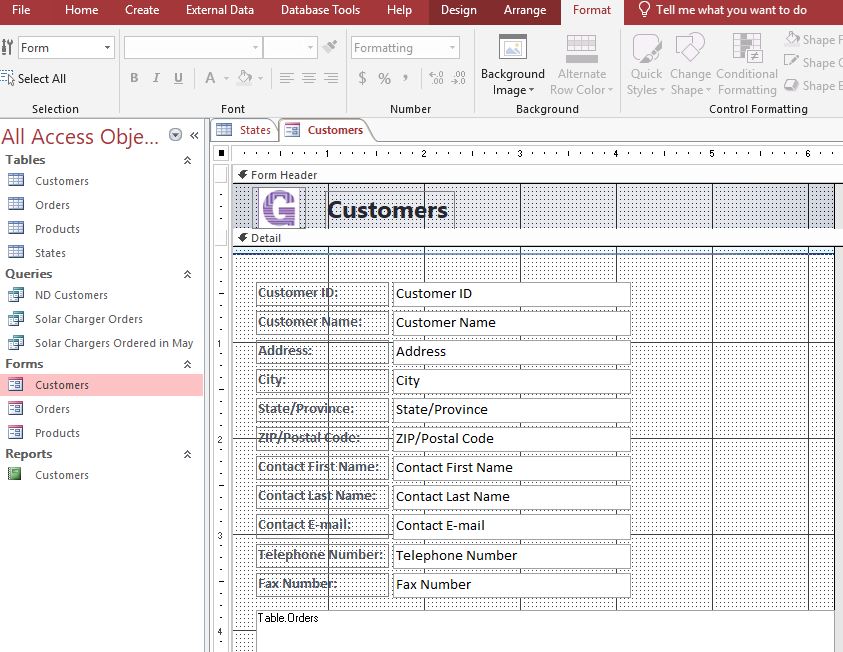
- Design view – shows the form design, but not the data. Any aspect of the form’s design can be changed in this view, but the data cannot be changed. The Design, Arrange and Format contextual tabs appear for this view too. The Design tab allows the user to modify the color, fonts or theme of the form. A logo, title and/or date/time field can also be added to the form. Form controls (buttons, text boxes, combo boxes, etc) can also be added. The Arrange tab is used for modifying the order and position of the fields on the form. The Format tab allows the user to modify the style of the form including the fonts and a background image can be added.
- Form view – shows the data in the form. This is the view to use to enter or change data. Record controls at the bottom of the form are used to display specific records and add a new record (the right arrow with the yellow star). The form’s design properties cannot be changed in this view.
-
A user can switch between views as often as desired while customizing the form. Switching views can be done by using the View button on the Ribbon, or the three icons at the bottom right of the Access window. NOTE: If a field in a table has been modified after the form is created, the existing form does not automatically update. The form can be modified, but sometimes it is easier to delete the existing form and recreate it based off of the new table settings.
