
PowerPoint Chapter 2:
Enhancing Presentations
- Adding slide transitions
- Apply animations to slide content
- Adding and modifying audio
- Adding and modifying video
- Inserting and modifying hyperlinks
- Utilizing templates and slide masters
- Employing proofing tools
- Saving files in alternative file formats
Adding Slide Transitions
No one wants to watch a PowerPoint presentation that is neither interesting or entertaining. Without certain design elements, many audience members will consider PowerPoint to be boring. In fact, some audiences sarcastically suffer “Death by PowerPoint” when the presenter and presentation are not stimulating. Don’t be like Dwight Schrute of “The Office”, and start a fake fire to get your co-workers’ attention, because you don’t know how to create a great PowerPoint presentation! One way to add appeal to your presentation is to use multimedia elements.
Motion and multimedia can evoke emotion in the audience, and can be applied in a variety of ways. Slide transitions are the visual and audio effects that occur when the presentation moves from one slide to the next while in slide show view. By default, no transitions exist in a newly created presentation. However, applying transitions can be easy and effective.
Users can control the speed, add sound, and customize the properties of transition effects. When used effectively, transitions can add a professional feel to a presentation. However, inconsistent and inappropriate transitions can distract from the purpose of the presentation, so careful consideration should be taken to ensure that a transition effect complements the goals of the presentation. While transitions can be applied to individual slides, consistency across all slides is considered a “best practice”.
Applying a transition can be accomplished by clicking a slide thumbnail in the left pane, and then clicking the Transitions tab on the ribbon. This is the slide that will appear after
 the transition. The user can click on any of the transition icons to see a preview of how the visual and audio effects will display during slide show view. Clicking the More button will
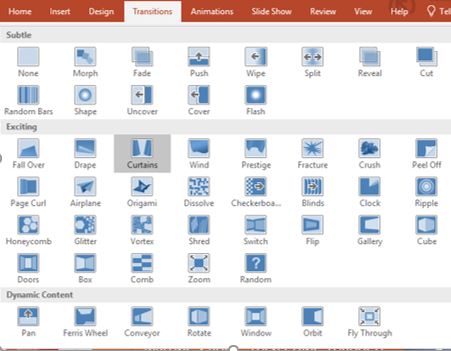
display a gallery of transition choices. There are three categories of transition types: Subtle, Exciting, and Dynamic Content. While simplistic, Subtle transitions are popular because they are effective. Their effectiveness is partly due to their lack of distraction. Exciting transitions and Dynamic Content, which use more complex animations, can be overkill if not used in moderation. Any slide transition usage needs to remember the purpose of the presentation, and not distract from that objective.
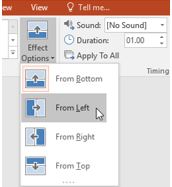
To customize the look of a transition, users can utilize the Effect Options command to change the direction of a specific transition. These options will vary depending on the selected transition. To remove a transition, apply the None option to a slide.
After a transition is selected, enter a time in seconds in the Duration field. This controls how fast the transition occurs; a larger number makes it go slower. From the Sound drop-down menu, a sound effect can be added. Caution! – sound effects can quickly become annoying if not used sparingly, and many of these affects are a little cheesy! Under the Advance Slide label, choose either or both of the On Mouse Click or After checkboxes to determine how to trigger the transition effects. The On Mouse Click option is popular for presentations with a live speaker in control of the presentation’s pace. The After combo field is necessary for self-running presentations, and presentations that need to be conducted in a specific time-frame. Precise duration’s of time (usually in second-equivalents) can be specified for each slide using the After-combo field.
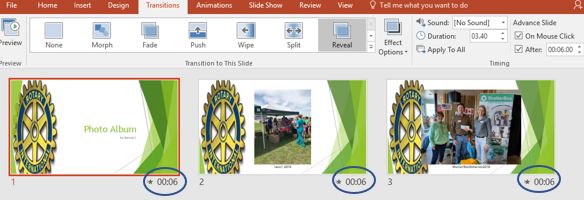
To apply the same transition and settings to every slide, click Apply to All to maintain consistency. Otherwise, select different slides and repeat this process to apply a different transition to each. The specific timings for each slide are best displayed in Slide Sorter view. Note: clicking the Apply to All option will override any existing transition settings already defined on other slides.
Apply Animations to Slide Content
Animations refer to the movement of objects and text on a slide during slide show view. Animations can help make a PowerPoint presentation more dynamic, more memorable, and more interesting. Animations affect the individual objects on a slide, including bullets, text, and graphics. Each effect can be timed to appear on a slide, in a specific sequence, using either Entrance, Emphasis and/or Exit effects. Entrance animation effects occur as the object initially appears on a slide, whereas an exit animation effects transpire as the object leaves the slide. Entrance animation is very popular for introducing bulleted text one bullet at a time, which prevents viewers from advancing their attention beyond the current topic. Emphasis animation occurs after the object has displayed on the slide. It can be useful to draw attention to a specific object on a busy slide by adding motion or highlights.

To apply an animation, select an object on a slide, and then choose an animation icon from the Animations tab. In the photo below, a callout shape was added, formatted and filled with text, before a Float In entrance animation effect was applied.
Additional animations can be added to text or objects by clicking the Add Animation button in the Advanced Animation group. If an attempt is made to add an animation without first clicking “Add Animation” it will replace the existing animation instead of adding to it. This step can be repeated multiple times to add as many animations to an object as desired.
Clicking the Animation Pane, located in the Advanced Animation group of the Animations pane, is a useful tool for organizing multiple animations on the same slide. The Animation Pane lists the objects on a slide that have animation applied. It can be used to reorder the animation sequence and choose options for the animations. Effect Options can be applied to change the direction of the animation. To adjust the order of the animated objects, select an option in the Sequence category in the Effect Options gallery. The By Paragraph Sequence is very popular with bulleted text paragraphs. Notice that numbers are assigned to each element to help identify the order each occurs on the slide. 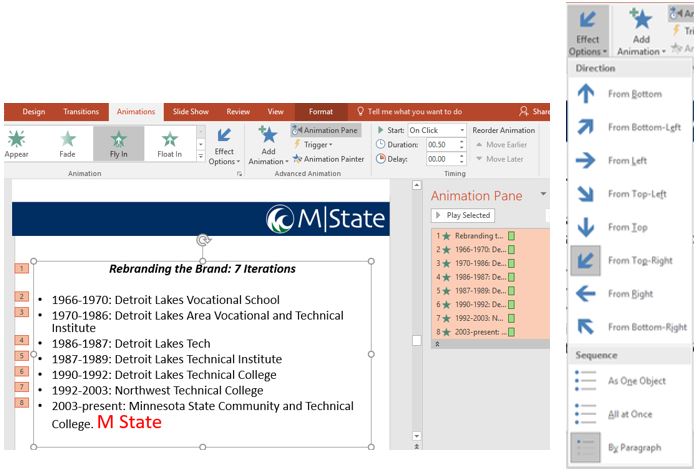
Transitions and animations have many settings, with opportunities to apply multiple actions to a single slide. To maintain a professional design, it is important to maintain consistency with transitions, animations, and other multimedia, including audio and visual effects.
Adding and Modifying Audio
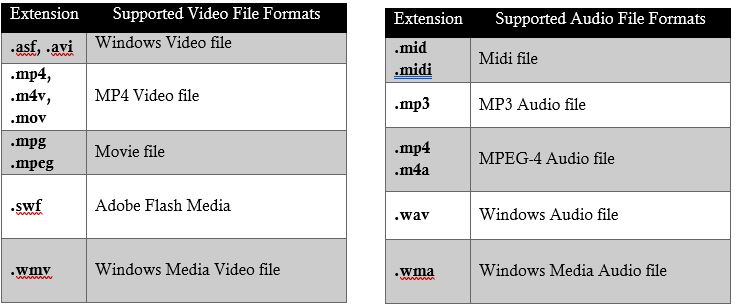
An audio file can be added to a slide and played during a slide show. Audio files can be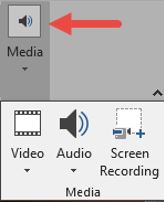 music, voice narration, or sound bites. To record and hear any audio, the computer must be equipped with a sound card, microphone, and speakers. Typical audio file formats include .mp4, .mp3, .wav, and .wma files. To insert a multimedia file (audio, video or screenshot), click the Media button on the Insert tab. When a sound file is inserted, a sound icon
![]() is added to the slide and the Audio Tools contextual tab appears to provide options to format how the audio plays on a slide.
is added to the slide and the Audio Tools contextual tab appears to provide options to format how the audio plays on a slide.

After the audio file is inserted, and a sound icon appears on a slide, several formatting decisions should be addressed regarding how the audio sounds during playback. The
 sound can be previewed by clicking the Play/Pause button in the Audio Control Bar. The Audio Timeline can be dragged to the left or right to advance the audio to the desired start location. If hiding the icon from displaying on screen during Slide Show View is desired, clear the Hide During Show checkbox in the Audio Options group. If the audio file is hidden during playback, the Start drop-down list selection should be set to Automatically, since the On Click option is only available if the icon is visible so it can be clicked. The Play Across Slides option is great is the file is long enough to play as background music for many slides. This is a popular choice to complement photo albums.
Adding and Modifying Video
Video is even more engaging than video because it adds visual appeal in addition to audio sensory stimulation. An appropriate video can provide a lasting memory for the audience, and provide compelling evidence to influence and educate. Videos offer a lot of upside, but they require also require a lot of resources and careful consideration. The overall length of the presentation needs to be considered when deciding to utilize videos with a slide presentation. Videos tend to be lengthy and the presentation should stay focused and on time. Additionally, video file sizes are enormous. Therefore, storage and portability are often major issues to consider if embedding videos into a presentation.
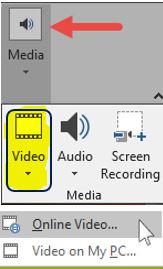
There are a couple of ways to add video to a PowerPoint presentation. You can add a video from your hard drive, embed one from YouTube, or simply linking an image to the video’s location. Inserting a video is very a similar process to inserting an audio file. When clicking the Video drop-down list, decide between inserting a Video on My PC… or Online Video… Either option will open a dialog window to allow the user to navigate to the location of the video file. Like audio files, many media files are available to download royalty-free from online sites like freemusicarchive.org or videvo.net.
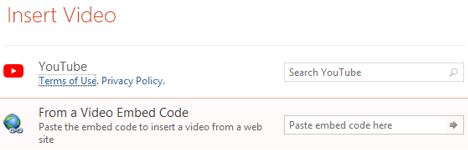
To insert a link to a YouTube site, or embed a YouTube video code, choose the Online Video… option. The link to YouTube option will require a strong Internet connection during playback, however this will control the size of the PowerPoint file.
Once inserted, ensure that the video is moved and resized to be legible for the audience during playback. With the video object selected, a new contextual Video Tools tab will appear with Formatting and Playback options. The Playback tab offers many ways to customize the impact of the video.

The first, and most important decision, is to decide whether the video should play Automatically once the slide appears or until a mouse click triggers the playback. A lot of time can be taken to trim and adjust the fade of a video, which can be useful to ensure a snippet of a video plays instead of the entire video file, which can often be too lengthy. There is no denying the impact of videos in today’s multimedia rich world. Nonetheless, careful planning and design is necessary to ensure that the investment of time and resources are worthwhile for use in a PowerPoint presentation. Some common video and audio file formats are listed below.
Inserting and Modifying Hyperlinks
Hyperlinks make a presentation dynamic by allowing connections to other slides, documents and/or web pages. A hyperlink is an object which when clicked, jumps to another location in the current file or opens another file, or address on the web. Hyperlinks have two parts: the address (of the web page, e-mail address or file location), and the display text (or graphic image). For example, the text: M State, could be linked to the web site www.minnesota.edu. Likewise, the logo ![]() can also be linked to www.minnesota.edu. To insert a hyperlink, right-click the selected text and choose Hyperlink… from the shortcut menu, or select the text and click the
can also be linked to www.minnesota.edu. To insert a hyperlink, right-click the selected text and choose Hyperlink… from the shortcut menu, or select the text and click the ![]() button on the Insert tab.
button on the Insert tab.
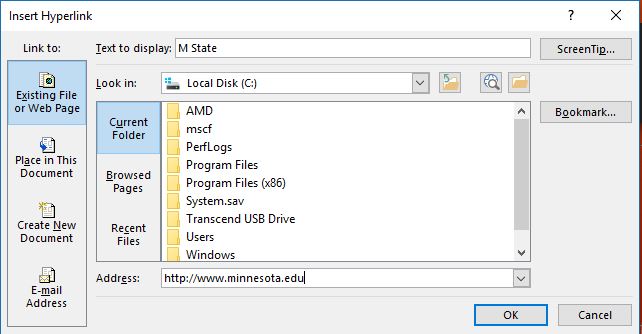
Select a type of link from the Link to sidebar, and then type a label in the Text to display field. A link could open a file on from the Current Folder, a recently Browsed Page from the Internet or a Recent File that was opened on your computer. For web pages, type a URL in the Address: box, or for an E-mail Address, type the e-mail syntax into the E-mail address field. Choose the Place in This Document option to redirect PowerPoint to a designated slide when the link is clicked. For all options, use the ScreenTip… button to add text that displays on-screen when the cursor hovers over the hyperlink. Make sure to test the inserted links by using Slide Show view and clicking each link.
Utilizing Templates & Slide Masters
Consistency is an important quality to maintain a marketing brand. Corporate presentations should maintain consistency when utilizing certain PowerPoint functionality, particularly features like transitions, themes, fonts, etc. Two ways to maintain consistency in a PowerPoint presentation is to use templates or slide masters. A PowerPoint template is a replica of a slide that is saved as a .potx file. A template usually contains consistent layouts, fonts, colors, designs and even related content. Templates are a popular starting point for creating new presentations, in part because they save time, and maintain consistency. However, don’t be afraid to change designs add additional slides to these templates to make the presentation your own. Many organizations create an organization template that maintains the branding of the organization when employees create corporate presentations. Microsoft has hundreds of free downloadable PowerPoint and other Office templates available on Office.com. Existing and custom-created personal template files are typically found on your hard drive at:
C:\User\<UserName>\AppData\Roaming\Microsoft\Templates.
A slide master is the template that applies to all slides in a presentation. When all slides need to contain the same fonts, font sizes, and images (such as logos); a user can make those universal changes in one place—the Slide Master, and they’ll be applied to all the slides. To open Slide Master view, on the View tab, select Slide Master. The left pane will

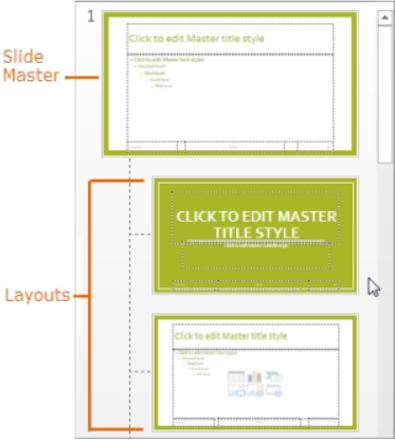
display thumbnails of the slide master and of all the slide master layouts. Hovering the pointer over a slide layout displays the layout name and indicates which slide in the presentation utilize that layout. The top icon in the left pane will display the slide master. Any modifications (formatting or added logos) to the slide master will apply to all slides in the presentation. Formatting applied to a slide layout master only affects slides that use that specific layout. To return to the normal slide view, click the Close Master View button on the Slide Master tab.
Employing Proofing Tools

In today’s social media/texting communication environment, punctuation, spelling and grammar have begun to lose its luster. While this cavalier attitude might be acceptable for personal communications, professional communication still demands proper attention to details. Why is it such a big deal to proofread a PowerPoint presentation? Well, if you make an error in a Word document, one or perhaps a couple of people will notice. However, a presentation is usually given to a large audience, so any spelling, grammar or punctuation error will be magnified by multiples.
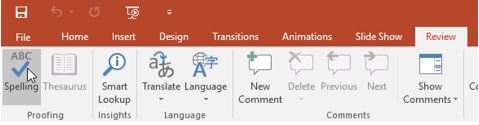
PowerPoint provides users with several proofing features – including the Spelling and Grammar tool – that can help create professional, error-free presentations. From the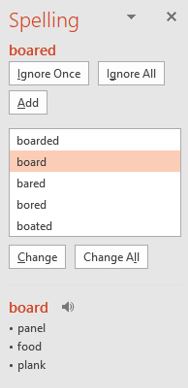 Review tab, clicking the Spelling button will open the Spelling pane to the right of the slide pane. For each error in the presentation, PowerPoint will offer one or more suggestions, which can be ignored or selected by clicking the Change button. The Spell Checker only recognizes misspelled and unknown words, not misused words, so proofreading a presentation is still important. The Thesaurus is a fun tool for suggesting synonyms for over-used words. Reusing the same words too often reduces the readability and professionalism of a presentation, so try out the Thesaurus! It is also a great resource for solving crossword puzzles!
Saving Files in Alternative File Formats
The default file extension for a PowerPoint file is .pptx. Various alternative formats exist depending on how the file needs to be saved. The biggest factor will be the audience’s needs. In special circumstances, when it is necessary to share sensitive or legal information with others, it may be prudent to save the presentation file in a fixed layout 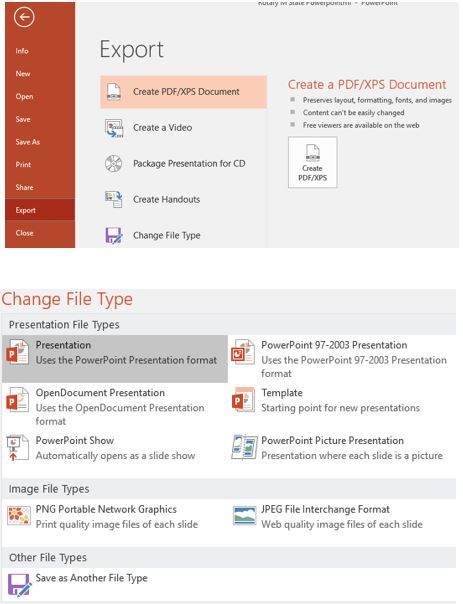 format that locks the file from being edited. The PDF and XPS formats are two popular fixed layout formats. From the File tab on the ribbon, click Export and choose the Create PDF/XPS Document button to open the Publish as PDF or XPS dialog window. Publishing a file in a fixed layout format requires appropriate viewer software, such as Adobe Reader, which opens PDF files. Adobe Reader is a free program downloadable from Adobe’s web site. If the audience does not have access to a computer with PowerPoint installed, saving the file as a video or PDF format could be an easy solution. Other file formats are available from the Export window by clicking the Change File Type option. Alternative formats include a PowerPoint Show, or an Image File type which can be optimized for hard-copy printouts or web sites.
Practice 7: The Solar System – Part 6
- Open the file Our Planets.pptx.
- Press the F12 key and save the file as Our Planets – FINAL.pptx.
- Via the slide sorter view, rearrange the slides in order closest to furthest from the sun.
- Apply the Vortex slide transition to all slides in the presentation.
- Add the From Bottom Effect Option and a 5:00 (second) duration to Apply to All slides.
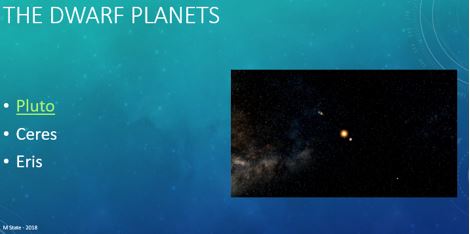
- At the end of the presentation, add a new Title and Content slide with the following text:
- Title: The Dwarf Planets
- Content: (each as its own paragraph)
- Pluto
- Ceres
- Eris
- Change the font size of the title text to 44pt and the three paragraphs to 32pt.
- Apply the Zoom animation scheme (By Paragraph) to the three paragraphs.
- Change the slide layout to Two Content and in the new placeholder, click the Insert Video icon, and add the SolarSystemVid file from the Course Data Files. Ensure that the video starts automatically.
- On the first slide, insert the audio file The Cavern from the Course Data Files. Ensure the audio starts automatically, and does not appear during playback, but does play across all slides.
- Add a hyperlink to the Pluto text on the last slide to the web site: theplanets.org/pluto/.
- Save the file, then save a copy in PDF format.
