
Word Chapter 1: Developing Documents
- Exploring the Word Window
- Entering and editing text
- o Paragraph and line spacing
- o Automatic features
- Spelling and grammar checking
- Selecting text
- Cut, copy and paste
- Finding and replacing text
- Creating bulleted and numbered lists
- Inserting symbols
- Inserting and modifying graphics
- Utilizing WordArt and SmartArt
- Inserting and modifying hyperlinks
Exploring the Word Window
Get to know the elements of the Microsoft Word window!
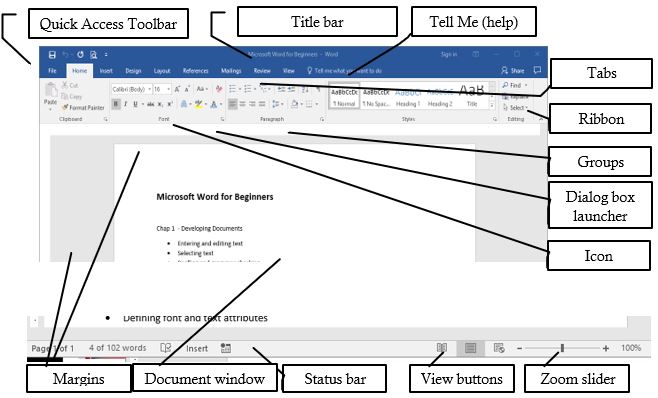
- The Quick Access toolbar contains one-click buttons for saving, undoing, redoing, and print previewing a document. You can easily modify this toolbar to add your most frequently used commands. Just click the down-arrow on the right edge to customize this toolbar!
- The title bar displays the name of current document, and the program. A new document will default with a temporary file name, such as Document1 until you save the file with a different name. The Minimize, Maximize and Exit buttons appear on the right edge of the title bar.
- The Tell Me tool is a new way to get assistance with specific tasks in Word. When the user starts typing, Word suggests commands that are related to your keyword(s). The tool is context sensitive, and integrated into your current document versus opening a separate window. Therefore, if you type insert picture into the field, and click the resulting command, Word will open the Insert Picture dialog window without explaining the navigation instructions.
- The Ribbon interface is a set of toolbars at the top of the window in Office programs designed to help you quickly find the commands that you need to complete a task. The ribbon displays a combination of icons and tabs. Commands are grouped under multiple tabs. Some commands are so extensive that they need additional windows to display their entire functionality. The dialog box launcher icon will open these windows. Contextual tabs will appear only when the user needs them, such as when a picture is selected, or a table is inserted.
Entering and Editing Text
Microsoft Word is a word processor software application used to create, modify, and share documents. When Word is started, the user has the option of modifying a pre-developed template or creating a blank document. Users begin by entering data at the existing insertion point identified by the I-beam pointer (cursor). As the user types text into the document, Word will word-wrap the data when encountering the right margin, and continue the text on the following line. The user only needs to press [Enter] when it is desired to start a new paragraph or insert a blank line.
Line spacing is the space between each line in a paragraph. By default, the line spacing within a paragraph in Word is 1.15 lines, and the end of a paragraph is followed by a blank line. While the default spacing may be appropriate for some documents, other situations might require different settings. For example, this paragraph is using 1.5 line spacing, which can be adjusted by clicking the option encircled below in the Paragraph group from the Home tab. Other popular line spacing options include double and triple-spacing.

Line spacing is a popular option to adjust for various documents. However, paragraph spacing is less well-known. Adjusting the spacing before and after paragraphs creates necessary white space to the document more readable. Go to Page Layout and
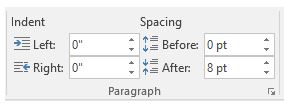
under Spacing, click the up or down arrows to adjust the distance before or after the paragraph. Spacing is measured in points. You can also type a number directly. This document is currently using 8pt of paragraph spacing After each paragraph.
While entering text, users encounter many automatic features as they type, which include:
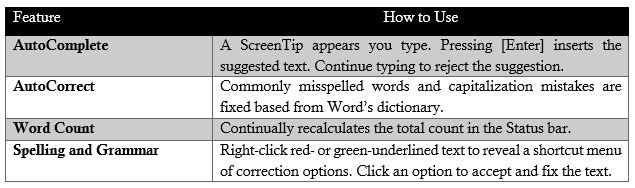
Spelling and Grammar
In addition to the automatic spelling and grammar functionality, a user can manually check their document, and utilize extra functionality. To manually check the document for spelling and grammatical errors, the user can use the commands found under the
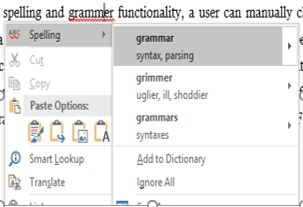
Review tab. The keyboard shortcut to invoke this command is the [F7] key. In addition to the Spelling & Grammar check, the user can also utilize the Thesaurus and Word Count features to improve readability and accuracy. The thesaurus offers a collection of synonyms that can replace words that are used too often. It is a great tool for solving crossword puzzles! The Word Count is also automatically updated on the status bar.

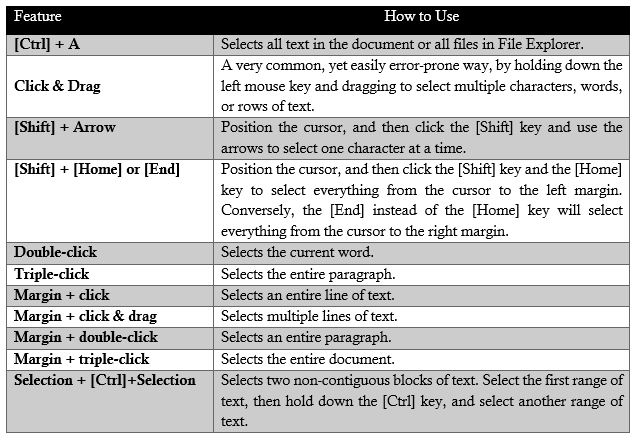
Selecting Text
Aside from entering text, selecting text is probably the most common task for most Word users. Almost every task begins by selecting something. Perhaps that’s why there are so many ways to select text? The following list is not comprehensive.
Cut, Copy & Paste
Editing a document often requires moving and duplicating text from one location to another. The process of moving text is commonly referred to as cut and paste. When data (text, files, graphics, etc.) is cut, it is removed from the document and placed into
temporary memory in the Clipboard. The Cut process can be performed via the scissors icon on the ribbon, using the right-click shortcut menu or using the keyboard equivalent [Ctrl] + X. To paste the recently cut data, position the cursor in the desired location, and then choose Paste from the ribbon, shortcut menu, Paste Options screen tip, or the [Ctrl] + V keyboard shortcut.
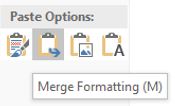
The Copy process can be performed to create duplicate data via the Copy icon on the ribbon, using the right-click shortcut menu or using the keyboard equivalent [Ctrl] + C. The paste process is the same regardless if the prior process is the Cut or Copy option. The paste process offers the paste options menu to allow the user to Keep the Source formatting, Merge the formatting from the source into current document, Keep the Text Only, or paste a picture of the selected data, instead of text. Data can be copied or moved within a document, between multiple documents or between multiple programs. This is a great example of how Microsoft Office is a suite of software applications that use common features to integrate data from one software application to another.
Saving Files
Once a document has been created, it should be saved as a file for future retrieval. The process of saving a Word document requires two essential elements: giving the document a filename, and defining the location where the file will be stored. The save process can be initiated by clicking the Save icon on the Quick Access toolbar, choosing Save or Save As from the File menu or using the keyboard equivalents, [Ctrl + S] for Save or [F12] for Save As. The filename should be a unique, yet identifiable description of the file’s contents. The filename extension (.docx) is automatically added to filenames in Word. Once saved, the title bar will update with the new file name. The location of the file should also be given careful consideration. The user will likely choose between saving the file to the hard drive of the computer they are using, or using cloud-storage to make the file more easily accessible from multiple devices. The Save command < will overwrite the existing file, while the Save As command will allow the user to change the filename or file location.
Practice 1: The Solar System – Part 1
- Open the data file The Solar System.docx from the course data files.
- Correct the spelling errors by using the Spelling & Grammar tool from the Review tab. (Word should find four errors that need fixing)
- Select the two paragraphs of text at the top of page 2 starting with The Asteroid Belt and concluding with ice and metal.
- Choose the Cut command using the shortcut menu (right-click).
- Move the cursor to the blank paragraph before the paragraph starting with the text: The Outer Planets.
- Paste the data using the keyboard equivalent. [Ctrl] + V
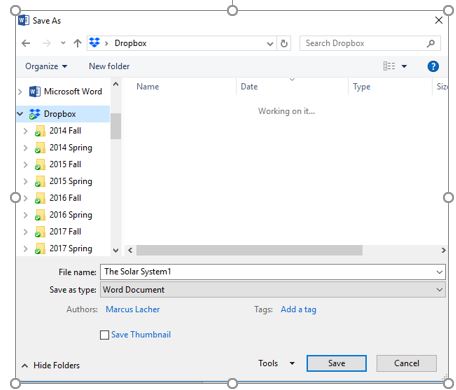
Use the [F12] keyboard equivalent to save the file with a new name (add the digit 1 after System) to your computer’s hard drive.
Finding and Replacing Text
A document can be automatically searched for a specific character, word or phrase. Choosing the Find command on the Home tab will open the Navigation pane where search text can be entered. Matches will be displayed in the pane and highlighted in the document.
Similarly, the Find and Replace feature allows users to make mass edits to a document. For example, a user might want to substitute the words teacher with trainer throughout a long document. Using the Replace command found in the Editing group of the Home tab, a user can choose to find and review or replace each occurrence individually or replace all occurrences in one step.
The Advanced Find features are similar to the Find and Replace Search Options. To make the search more specific, Word allows users to define criteria, such as Match case or Find whole words only. These options will narrow the scope of returned results. For example, with the Match case check box selected, the text Mark will not be found if the word mark is entered as the search criteria. Conversely, the use of Wildcard characters will increase the search results. An asterisk character will allow any characters to be substituted. Therefore, check* will find checks, checked or checking.
Creating Bulleted and Numbered Lists
Formatting a list with bullets or numbers can help to organize the logic of a document. In a bulleted list, each item is a separate paragraph formatted with a hanging indent, a bullet (), and a tab. The bullet character can be formatted to represent other symbols, such as check marks, squares or other symbols from the bullet library or custom-defined new bullets. Formatting a list with bullets adds emphasis, but not priority. Each bulleted item is considered of equal importance, such as a grocery list. Conversely, a numbered list shows a priority or sequence. A typical recipe helps illustrate this difference:
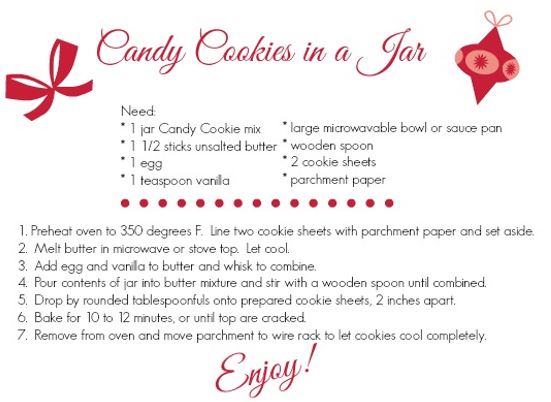
The ingredients and supplies are listed using bullets, because there is no distinction in their priority. However, the instructions utilize a numbered list, because the sequence is crucial to the process.

To create a bulleted or numbered list, first select the paragraphs of text, and the select the appropriate option from the Home tab on the ribbon. Click the Increase Indent or Decrease Indent commands from the Home tab to format the list appropriately. To remove the bullets or numbering, place your cursor in the list and re-click the Bullets or Numbering command.
Inserting Symbols
Unique characters that don’t exist on your computer keyboard can be inserted into your document by selecting the Ω Symbol option from the Insert ribbon. Special characters such as the degree (º) or trademark (™) symbols can easily be inserted from the Symbol dialog window. Other popular symbols include graphics, shapes, and foreign language characters, such as the (é) used in the word résumé, which is a different word than resume.

In the Symbol dialog window, different sets of symbols will appear when different Fonts or Subsets are selected from their respective list arrows. The Webdings or Wingdings fonts offer a variety of graphics that can be inserted into paragraphs or as bullet shapes.
Inserting and Modifying Graphics
It is said that a picture is worth a thousand words. This could be because graphic images make a document more interesting. You can insert photos from your computer or the web, edit them, compress them, resize and re-position them. Word offers a
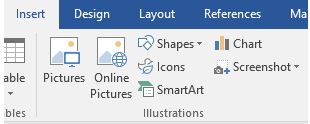
variety of graphics (from the Illustrations group of the Insert ribbon) that can be inserted into documents to add pizzazz to an otherwise dry document.
A word-processing application differs from a text editor in part due to its ability to perform basic graphic design functionality. As shown in this textbook, the author has inserted graphic screenshots via the Pictures button on the Insert tab. Pictures and Online Pictures only differ by where the source files reside. The Pictures option will allow you to insert local pictures that reside on your local device. Conversely, Online Pictures allows
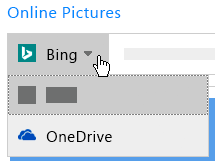
the user to insert images from the Internet using Microsoft’s Bing search engine or OneDrive, provided you have a OneDrive account set up. When inserting graphics obtained from the Internet, keep in mind that using someone else’s work without their permission is not only wrong but also may be illegal. US Copyright laws control how a copyrighted work can be used. Consider either using public domain images, which are free to use, or images distributed under a Creative Common license, which generally are free, as long as you provide attribution to the owner. 
Most of the images inserted via the Pictures and Online Pictures features are likely to be photos. Nonetheless, other common graphics include clip art, scanned artwork, and shapes. Clip art differs from photos when the images consist of simple illustrations. This results in flexible file formats and small file sizes, which explained the appeal to early desktop publishers. However, increased computing resources have marginalized the

benefits of clip art, and the rich quality of photos have diminished their demand. The once popular clip art option is hidden behind the Online Pictures feature. The keyword that is entered into the search box will, by default, retrieve photos, clip art, and other images. However, the filter
![]()
option, which appears once the original results appear, can further restrict the results to only clip art images, or other image types, specific sizes. layouts or colors.
A complete array of built-in shapes can be inserted to complement existing graphics. Popular shapes include lines, rectangles and flow chart symbols. Once a shape is selected, the user needs to draw it on a blank area of the document. Once inserted, the shape, like any other graphic object, can be resized and re-positioned. To move the image, hover the mouse over the image until the pointer is the four arrows, then click

and drag to your desired position. To resize a graphic, select the image and drag a corner sizing handle to resize it proportionately. The top/bottom or side handles allow the user to resize the graphic disproportionately. The rotate icon allows the user to rotate the object up to ± 360º.

Once the graphic is selected, a new contextual tab called the Picture Tools tab will appear on the ribbon. This tab will allow the user to make a plethora of corrections and adjustments to the graphic. Picture styles, effects, layouts, and the image size are common edits to the defaulting graphic. To resize an image disproportionately, click the launcher icon in the bottom right corner of the Size group to open the Layout dialog window. Now unmark the Lock Aspect Ratio checkbox.


Perhaps the most common feature used in document layout considerations is the Wrap Text feature. By default, when pictures are inserted into a document, their layout is set to In Line with Text. This leaves a lot of unnecessary white space to the right of the
image. To wrap text around a picture, select the picture, and then select a wrapping option (as shown in the image to the right of this paragraph). Popular options include Tight or Square.
Utilizing WordArt and SmartArt
Another desktop publishing tool that adds pizzazz to a drab document is the use of WordArt or SmartArt. WordArt is a drawing object with special effects that change the appearance of text by formatting special shapes, patterns and orientations. WordArt can be used to add color, outlines and 3-D effects to regular text. Common usage is titles for papers, posters or other marketing materials. Click the WordArt button in the Text group of the Insert tab. After selecting an initial WordArt style, a placeholder box will appear and await your input of text.

Once inserted, a contextual tab offers numerous to change the effects of the WordArt object. Additional formatting options available include change the text fill, outline or text effects of the WordArt object. The Text Effects offer some exciting ways to rotate and transform the text. The best way to learn about these features is to experiment with them!
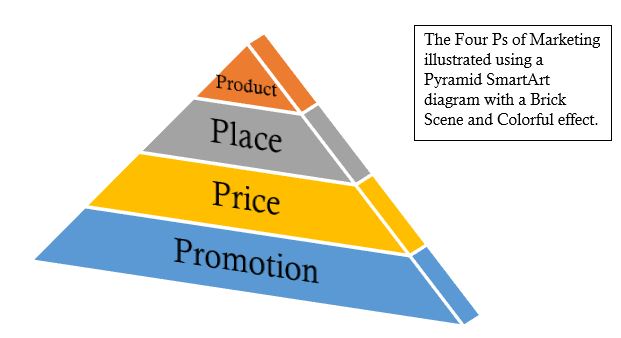
SmartArt are diagrams that illustrate concepts and show relationships between elements. Think of SmartArt as pre-made drawing canvases that you can insert into your document and then customize as you see fit. There are a variety of styles to choose from, which you can use to illustrate many different types of ideas. Simply pick an arrangement, such as a list, process, cycle, etc. Insert the SmartArt via the Illustrations group on the Insert tab, which opens the SmartArt dialog window.
After choosing a layout, a SmartArt placeholder will appear. In a SmartArt graphic, elements are represented by shapes. Each shape can have text applied, be resized and re-positioned. You can even add, delete, promote and demote shapes via the text pane or the contextual tab.
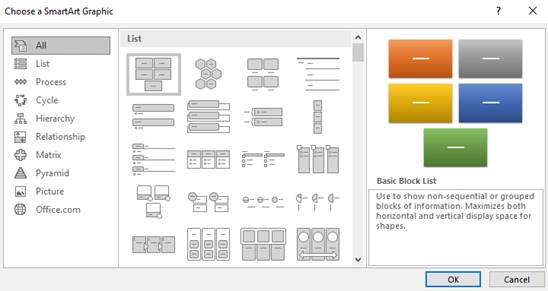
A SmartArt graphic can be formatted and edited using options on the contextual SmartArt Tools Design and Format tabs. The Design tab allows the user to pick from numerous layouts, styles and colors. The Format tab provides choices for shape styles and WordArt options. SmartArt can be utilized throughout the Microsoft Office suite of applications. Again, the best way to learn about these options is to experiment!
Inserting and Modifying Hyperlinks
A hyperlink, often referred to simply as a link, is text or a graphic that, once clicked, “jumps” to a different location in the file or to a different software program. Software programs include e-mail applications, web pages or an external file, often created in Microsoft Office programs like Excel or PowerPoint. There are a few ways to insert a link into your document. Depending on how you want the link to appear, you can use Word’s automatic link formatting or convert the text or graphic into a link. The fastest way to create a link in a document is to press ENTER or the SPACEBAR after you type the address of an existing webpage, such as www.minnesota.edu. Word automatically converts the address into a link. The same result occurs if the user were to enter an e-mail address, such as marcus.lacher@minnesota.edu. Hyperlinks have two parts: the address (URL) of the web page and the display text. In the two previous examples, the URL matches the display text, however it is possible to create a link to any word, combination of words, or an object, such as a picture or shape.
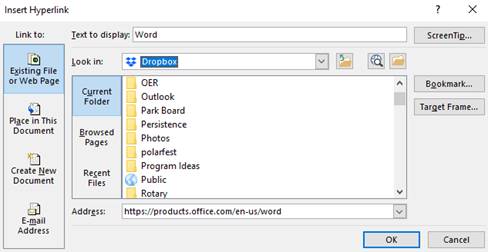
To create a link on a specific word or object to a web page, start by selecting the word(s) or object, and then click the Link button in the Links group of the Insert tab to open the Insert Hyperlink window. In the illustration below, a link is being defined to go to Microsoft’s website for the Word program. The text “Word” appears as the Text to display so that once the link is created, this text will appear with the hyperlink attributes, which are typically blue and underlined. The Address field contains the URL to the specific web page destination that will open in the current device’s default browser application. The Insert Hyperlink window fields will change significantly if the Link to: open on the left side is changed from Existing File or Web Page to another option. To follow a hyperlink in Word, hold the Ctrl key and click the linked text or object.
Borders and Shading
Borders add interest and emphasis to your document. Borders make attractive frames for text, pictures, tables, or entire pages. You can customize borders to complement your document by experimenting with Word’s built-in styles. To add a border to text, select the text. On the Home tab, click the small down arrow next to the Borders button, and choose an option OR choose the Borders and Shading option to open the Borders and Shading dialog window.
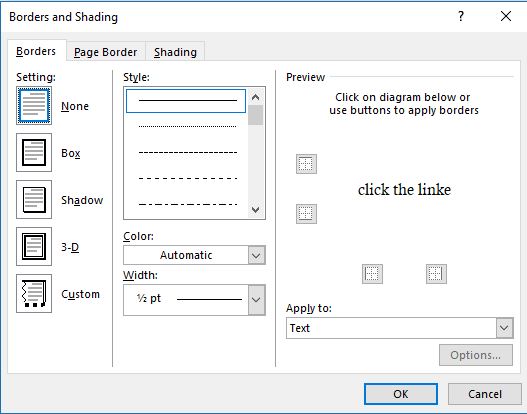
Make sure the Apply to box is set to Text, which adds a border around lines of text, or Paragraph, which creates a border that outlines the paragraph. Also make sure that a choice, like Box, is selected under the Setting option.
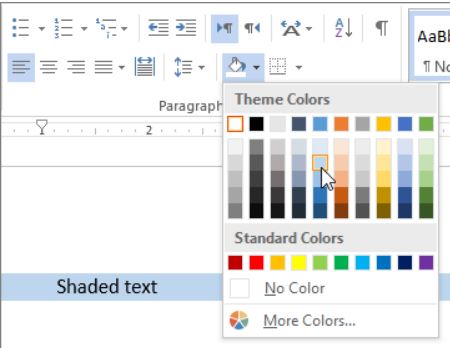
Shading is the color or artistic design you use as background for a paragraph. By shading words or paragraphs in Word, you can create visual interest in a document. The Highlight command offers a more limited color selection, which you can use when you review or edit a document to highlight specific text. The shading fill, style, and color can be defined from the Shading tab of the Borders and Shading window. To apply shading to a part of a document, select the data, then click the arrow next to Shading, and under Theme Colors, click the color you want to shade your selection.
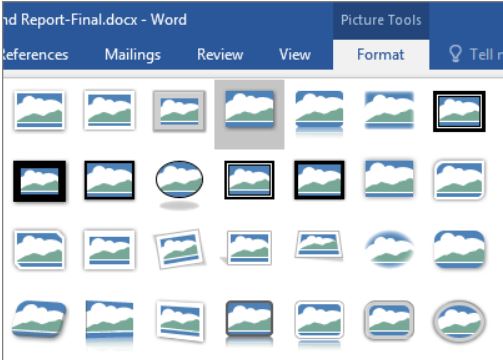
Borders can also be added to pictures. Just select the picture, then choose a pre-formatted border from the Picture Styles gallery off of the Picture Tools Format tab.
To remove the paragraph borders and/or shading, choose the None option in the Borders and Shading window. In the Shading tab choose the No Color item in the Fill section, and choose the Clear style in the Patterns section.
Practice 2: The Solar System – Part 2
- Open the recently edited data file The Solar System1.docx from your data files.
- Find and Replace all occurrences of the word “mainly” with the word “primarily”. (Word should find three results that need changing)
- Select the four paragraphs of text starting with Mercury and concluding with Mars. Create a bulleted list. Repeat these steps using the paragraphs starting with Jupiter through Neptune.
- In the paragraph following The Sun, replace 9000 degrees with 9000° using the symbol. (Character code 00B0) Repeat this step in the Venus paragraph by replacing 465 degrees with 465°.

- Insert an Online Picture of the sun in the blank paragraph above The Inner Planets. Resize the photo to be 1” x 2”. (Don’t forget to unmark the Lock Aspect Ratio checkbox in the Layout window)
- Apply the Square Wrap Text format to the picture, and position the image to the right margin.
- Apply WordArt to the text “The Solar System” using the Orange, Accent 2 fill. Apply the Top and Bottom Wrap Text format to the WordArt.
- Apply a hyperlink to the text Mars to a web page using the URL: http://nineplanets.org/mars
- Use the [F12] keyboard equivalent to save the file with a new name (add the digit 2 after System) to your computer’s hard drive.
