
6 Unit Two, Part Two: Pro Tools Recording Software and Mixing a Session
Pro Tools recording software is a digital audio workstation or DAW. It is the industry standard for modern recording. However, many other DAWs can be installed at prices ranging from free to hundreds of dollars. Pro Tools features some advantages in how expansive it is along with how professional its audio sounds. There are other DAWs that are easier to learn and there are some DAWs that are made for specific audio purposes. For this course, however, we will study Pro Tools exclusively and use it for our recording projects. We generally feel that if a student can learn how to use Pro Tools, that knowledge will translate to all other DAWS.
Again and again, no matter what equipment you have in front of you to record audio, if you use our three pillars of good production, it will result in the best possible managed sound.
Here is a link to the Pro Tools reference manual Avid Pro Tools Reference Manual. It can be intimidating, to say the least, trying to understand these very detailed instructions from start to finish. My suggestion is to first watch some introductory videos and then take the manual one step at a time.
Video Link Introduction to Pro Tools (Everything You Need to Know to Get Started)
Once students become familiar with creating tracks and basic recording procedures, then it is time to use the various methods of sound management that have been discussed earlier. Microphone placement, mixing strategies, adding effects or other processors; all those ideas can be employed here.
As a project nears its finish, consider the principals of creative approach such as contrast, balance, flow, etc… This will help give your sound management an overall signature to your work. Pro Tools features endless possibilities on what it can do for your recordings and audio creations. But it also requires the most training to learn how to use it.
Digital Audio Workstation
A digital audio workstation (DAW) is an electronic device or application software used for recording, editing and producing audio files. DAWs come in a wide variety of configurations from a single software program on a laptop, to an integrated stand-alone unit, all the way to a highly complex configuration of numerous components controlled by a central computer. Regardless of configuration, modern DAWs have a central interface that allows the user to alter and mix multiple recordings and tracks into a final produced piece.
DAWs are used for producing and recording music, songs, speech, radio, television, soundtracks, podcasts, sound effects and nearly any other situation where complex recorded audio is needed
DAW can simply refer to the software itself, but traditionally, a computer-based DAW has four basic components: a computer, a sound card or other audio interface, audio editing software, and at least one user input device for adding or modifying data. This could be as simple as a mouse and keyboard or as sophisticated as a piano-style MIDI controller keyboard or automated audio control surface for mixing track volumes.
The computer acts as a host for the sound card, while the software provides the interface and functionality for audio editing. The sound card typically converts analog audio signals into digital form, and digital back to analog audio when playing it back; it may also assist in further processing of the audio. The software controls all related hardware components and provides a user interface to allow for recording, editing, and playback.
Computer-based DAWs have extensive recording, editing, and playback capabilities (and some also have video-related features). For example, they can provide a practically limitless number of tracks to record on, polyphony, and virtual synthesizers or sample-based instruments to use for recording music. DAWs can also provide a wide variety of effects, such as reverb, to enhance or change the sounds themselves.
Simple smartphone-based DAWs, called mobile audio workstation (MAWs), are used (for example) by journalists for recording and editing on location.
As software systems, DAWs are designed with many user interfaces, but generally, they are based on a multitrack tape recorder metaphor, making it easier for recording engineers and musicians already familiar with using tape recorders to become familiar with the new systems. Therefore, computer-based DAWs tend to have a standard layout that includes transport controls (play, rewind, record, etc.), track controls and a mixer. A waveform display is another common feature.
Single-track DAWs display only one (mono or stereo form) track at a time. Multitrack DAWs support operations on multiple tracks at once. Like a mixing console, each track typically has controls that allow the user to adjust the gain, equalization and stereo panning of the sound on each track. In a traditional recording studio additional rackmount processing gear is physically plugged into the audio signal path to add reverb, compression, etc. However, a DAW can also route in software or use audio plug-ins (for example, a VST plugin) to process the sound on a track.
Perhaps the most significant feature available from a DAW that is not available in analog recording is the ability to undo a previous action, using a command similar to that of the undo function in word processing software. Undo makes it much easier to avoid accidentally permanently erasing or recording over a previous recording. If a mistake or unwanted change is made, the undo command is used to conveniently revert the changed data to a previous state. Cut, Copy, Paste, and Undo are familiar and common computer commands and they are usually available in DAWs in some form. More common functions include the modifications of several factors concerning a sound. These include wave shape, pitch, tempo, and filtering.
Commonly DAWs feature some form of mix automation using procedural line segment-based or curve-based interactive graphs. The lines and curves of the automation graph are joined by or comprise adjustable points. By creating and adjusting multiple points along a waveform or control events, the user can specify parameters of the output over time (e.g., volume or pan). Automation data may also be directly derived from human gestures recorded by a control surface or MIDI controller.
MIDI recording, editing, and playback is increasingly incorporated into modern DAWs of all types, as is synchronization with other audio or video tools.
Behind the Speakers Pro Tools Quick Start Guide
Creating a New Track
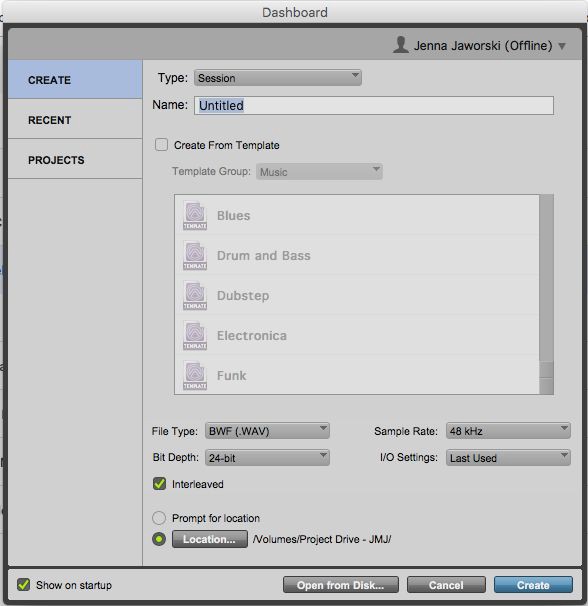
My go-to settings for sample rate and bit depth are 44.1 kHz and 24-bit. ‘Location’ specifies where your session will be saved to.
Edit Window
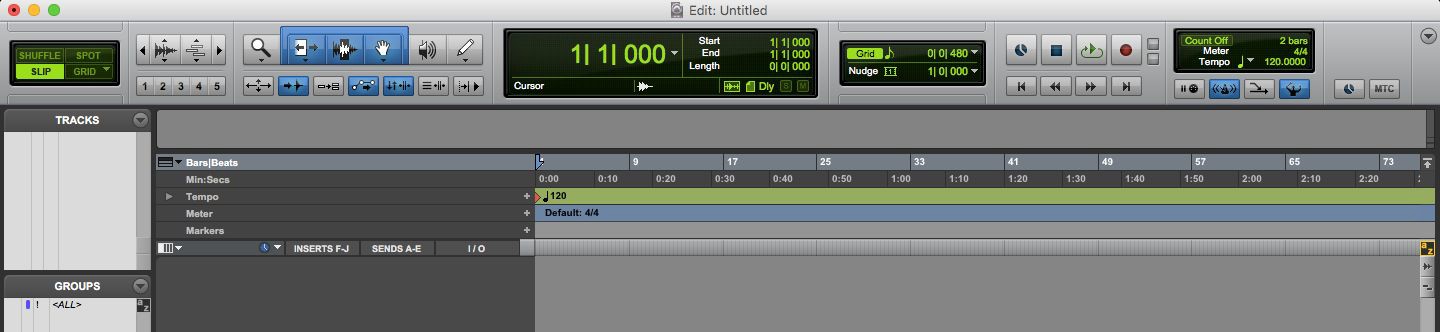
Tools
 123456
- The Zoom Tool – lets you zoom in on tracks.
- The Trim Tool – to edit/cut the ends of audio clips.
- The Selector Tool – to highlight specific parts of an audio clip.
- The Grab Tool – to select full audio clips.
Select the bar above 2 – 4 to enable the ‘Smart Tool’.
- The Scrubber Tool – emulates scrubbing through tape.
- The Pencil Tool – for drawing automation.

- The box to the left of ‘Bars/Beats’ provides the option to view the timeline in various measurements – bars and beats, minutes and seconds, samples, or timecode for film.
- To add a marker to the timeline (ex: Intro, Chorus, Verse), click the ‘+’ button.
Adding a New Track
Go to ‘Track’ -> ‘New’ or use the shortcut Command + Shift + N.

A mono track uses one audio track, a stereo track uses two.

A mono track in blue, a stereo track in green.
- An audio track contains audio clips
- An aux track doesn’t contain its own audio, but it can have audio sent to it.
- A master fader controls the volume of the entire session.
Mix Window
Inserts/Sends Section
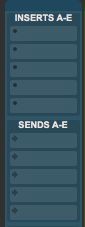 Inserts – Where you can add plugins on a track.
Sends – Used to send a copy of a track to another place in your DAW. Often used for adding reverb and delay.

I/O Section
 The top box is the input selection.
The bottom box is the output selection.
Bottom Section
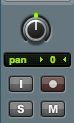 Pan knob
I = Input monitoring
Red Circle Button = Record-enable S = SoloM = Mute
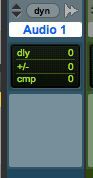 The section with “Audio 1” is the track name (double-click to rename).
This square is the comments section (you can add notes about a track here).
Playback Engine
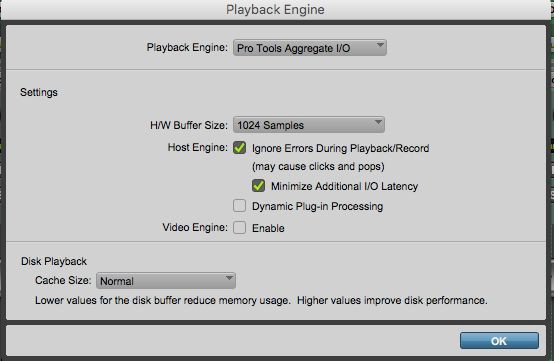 Go to ‘Setup’ -> ‘Playback Engine’.
Under Playback Engine, select your audio interface.
For ‘H/W Buffer Size’, smaller values are better when recording. When mixing, larger sample sizes are fine.
Creating a Click Track
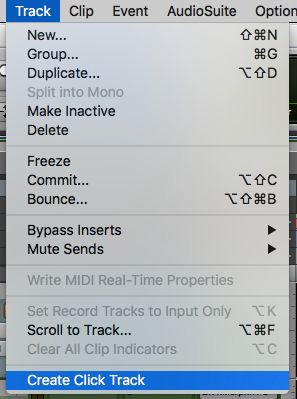 From the top menu, select ‘Track’ -> ‘Create Click Track’.
Open the Transport by selecting Window -> Transport. You can change the tempo within the box on the far right.
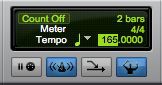
Highlight the current tempo, type in your desired tempo, then hit enter. You may need to press the blue conductor button to turn off the conductor track first.
Basic Audio Editing
Separating Clips – Either click to specify one spot, or highlight to choose two spots at once, then do one of the following:
- Right-click at the desired spot, then choose ‘Separate’
- Command + E
 ‘Edit’ -> ‘Separate Clip’
Moving Clips – Click on and hold the desired clip, then drag it across the timeline.
Trimming Clips – To the right or left of the clip, the mouse will change into a [ or ]
- When this appears, click and drag the track to trim
Fading Clips – Select the box above tools 2 – 4 to enable the ‘Smart Tool’. When the mouse changes to a square with a diagonal line through it, you can click and drag a track to add a fade.
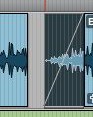
Double click on this fade to change its shape.

Getting Ready to Mix Checklist
Have you:
Finalized the arrangement?
Comp’d all tracks?
Tuned all vocals?
Time-aligned drums and other tracks?
Crossfaded all edits and checked for clicks and pops?
Deleted unused or muted tracks?
Printed virtual instrument tracks to audio?
Ordered and grouped tracks in a logical way?
Labeled all tracks?
Color-coded tracks and clips?
Added markers for song sections?
Cleaned up unwanted noise on each track?
Optimized gain staging, so you’re not clipping individual tracks or your master bus?
Bouncing Your Mix
Make sure the part of the timeline you want bounced is highlighted. Make sure nothing is muted/solo’ed.
Go to ‘File’ -> ‘Bounce to’ -> Disk.
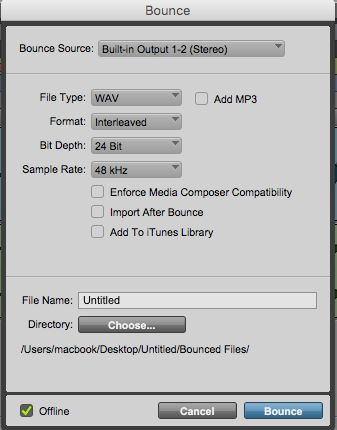 Recommended Settings
Format: Interleaved
Bit Depth and Sample Rate – typically 44.1 kHz, 24-bit
Uncheck ‘Import After Bounce’ Check ‘Offline’ at bottom of window
Shortcuts
- Command + S – Save
- Command + Shift + N – New track
- Command + Shift + I – Import Audio
- Option + Shift + I – Import Session Data
- Command + Z – Undo
- Command + M – Mute selected clip
- Command + G – Create a group for the selected tracks
- Command + = – Quickly flip between the Edit and Mix Windows
- Command + E – Separate clip
- Highlight a section + E – The selected clip will fill the screen
- Hitting E again will return it to normal view
![]() Jason Moss, Behind the Speakers
Jason Moss, Behind the Speakers
Mixing Audio
In sound recording and reproduction, audio mixing is the process of optimizing and combining multitrack recordings into a final mono, stereo or surround sound product. In the process of combining the separate tracks, their relative levels (i.e. volumes) are adjusted and balanced and various processes such as equalization and compression are commonly applied to individual tracks, groups of tracks, and the overall mix. In stereo and surround sound mixing, the placement of the tracks within the stereo (or surround) field are adjusted and balanced.
Audio mixing techniques largely depend on music genres and the quality of sound recordings involved. The process is generally carried out by a mixing engineer, though sometimes the record producer or recording artist may assist. After mixing, a mastering engineer prepares the final product for production.
Audio mixing may be performed on a mixing console or in a digital audio workstation.
Digital audio workstations (DAW) can perform many mixing features in addition to other processing. An audio control surface gives a DAW the same user interface as a mixing console. The distinction between a large console and a DAW equipped with a control surface is that a digital console will typically consist of dedicated digital signal processors for each channel. DAWs can dynamically assign resources like digital audio signal processing power, but may run out if too many signal processes are in simultaneous use. This overload can often be solved by increasing the capacity of the DAW.
Outboard audio processing units (analog) and software-based audio plug-ins (digital) are used for each track or group to perform various processing techniques. These processes, such as equalization, compression, sidechaining, stereo imaging, and saturation are used to make each element as audible and sonically appealing as possible. The mix engineer also will use such techniques to balance the “space” of the final audio wave; removing unnecessary frequencies and volume spikes to minimize the interference or “clashing” between each element.
Processes that affect signal volume or level
Faders – The process of attenuating (lowering) the level of a signal. This is by far the most basic audio process, appearing on virtually every effect unit and mixer. Utilizing controlled fades is the most basic step of audio mixing, allowing more volume for prominent elements and less for secondary elements.
Boost – The process of adding volume to a signal. Boosting is done using extremely slight amounts of amplification, enough to raise a signal without pushing it over the limit of a pre-amplified signal. Some volume control units may feature the ability to both boost and attenuate a signal.
Panning – The process of altering the balance of an audio signal between the left and right channels of a stereo signal. The pan of a signal may be modified via a simple two-way pan control or an “auto panner” that continuously modulates and changes the pan of a signal. Panning is often used in the mixing process to “arrange” the track elements, simulating the placement of live bands.
Compressors – The process of reducing the dynamic range or difference between loudest and quietest parts of a signal. This is done with automatically controlled fader, which will reduce the signal volume after a user-adjustable threshold is hit. The ratio of reduction to gain above the threshold is often also controllable, as well as the time it takes for reduction to activate (attack) or release. Most compressors will also apply a boost after the gain reduction is replied to compensate for the quieter signal. Compression has many uses in the mixing process, from evening out vocal volume to enhancing drums.
Limiters – Limiting is essentially an extremely harsh form of compression- instead of applying gentle reduction to audio above the threshold, limiters forcibly “flatten” it down, allowing no signal above the threshold. Many limiting units also have built-in compressors that reduce the amount of audio actually passing the threshold. Many limiters also use digital algorithms to “soften” the harsh sound of limited audio, morphing the wave instead of completely decapitating it (by removing part of the waveform entirely, intense distortion and vastly altered tones can occur.) Softer limiters are used with generous amounts of compression to create a more consistently loud track with less volume fluctuation, and harder limiters can be used as distortion effects or emergency safeties to protect large speaker systems from blowing out. Many analog amplifiers are fitted with their own basic limiters to prevent the high-voltage circuitry from overloading and blowing out.
Dynamic expansion — Dynamic expansion is essentially compression with an inverted threshold- any signal below a certain threshold is dynamically reduced while signals above the threshold remain untouched. Expansion is most commonly used to give volume to certain elements of recordings- e.g. the bass and snare drums of a drum recording.
Noise gating – When a signal drops below a set threshold, a gate will reduce gain until the output signal is forced below a certain level, and continue to hold the gain at that level until the input rises above the threshold.
Processes that affect frequencies
The frequency response of a signal represents the amount (volume) of every frequency in the human hearing range, consisting of (on average) frequencies from 20 Hz to 20,000 Hz (20 kHz.) There are a variety of processes commonly used to edit frequency response in various ways.
Equalization – Equalization is a broad term for any device that can alter parts of a signal frequency response. Some EQs use a grid of faders or knobs which can be arranged to shape each frequency, whereas others use bands that can target and subsequently boost or cut selectable series of frequencies.
Filters – Filters are used to eliminate certain frequencies from the output. Filters strip off part of the audio spectrum. There are various types of filters. A high-pass filter (low-cut) is used to remove excessive room noise at low frequencies. A low-pass filter (high-cut) is used to help isolate a low-frequency instrument playing in a studio along with others. And a band-pass filter is a combination of high- and low-pass filters, also known as a telephone filter (because a sound lacking in high and low frequencies resembles the quality of sound over a telephone).
Processes That Affect Time
Reverbs – Reverbs are used to simulate acoustic reflections in a real room, adding a sense of space and depth to otherwise “dry” recordings. Another use is to distinguish among auditory objects; all sound having one reverberant character will be categorized together by human hearing in a process called auditory streaming. This is an important technique in creating the illusion of layered sound from in front of the speaker to behind it. Before the advent of electronic reverb and echo processing, physical means were used to generate the effects. An echo chamber, a large reverberant room, could be equipped with a speaker and microphones. Signals were then sent to the speaker and the reverberation generated in the room was picked up by the two microphones.
