
3 Unit One, Part Three: Speakers, Cables, and Microphone Stands
First things first, the technical aspects of audio speakers/headphones and cables are matters of personal and equipment safety. Serious attention should be paid to safety issues such as hearing damage, electrical shock, and falls – to name a few. Equipment and software can also be damaged by not using the proper cables or power cords. Please read all manuals and safety instructions before experimenting with this aspect of audio production.
Audio cables come in all sorts of lengths and gauges, each with its own style of connector end and specific use. Read and watch the links below to get your head around the dozens of different cables an audio producer will need to recognize. Become familiar with balanced/unbalanced cables and end connectors.
A lot of audio producers, including myself, are resigned to owning a big box of random cords, cables, and adapters, probably all tangled together and not labeled. However, for the best/safest use of equipment in a studio or around a stage, the most used cables like XLRs, 1/4″ instrument cables, headphone adapters, and USB adapters, should be wrapped up neatly, and placed in an accessible place. Consider labeling your cables clearly and include length. Many audio production spaces use dim lighting during performances, and you may need to grab a specific type and length of cable in the dark. For example, the theater on our campus keeps all their cables separated and organized on eye-level hooks along a labeled storage room wall. A small arena I once worked at as a weekend roadie kept all their miles of cables wrapped in large lettered gig boxes that could be safely wheeled across the building quickly to where they were needed. Even at my small home desk studio, my guitar cords and my two most used XLR cables are always wrapped up and hung from an unused music stand. Though mine is not the best system in terms of organization, it does keep them at arm’s length and out of the way.
For live events and for recording, installing the right speakers for the job can really enhance audio production (method). I’ve found that sometimes really expensive or really large/loud monitor speakers do not translate outside the studio. Often a mid-priced or even archaic set of old school stereo speakers give the truest representation of what will be heard on any system.
When choosing what kind of speakers you want to use consider the following:
How loud do they need to be, and do I have the proper power to run them?
Are the speakers in acoustic position (this is covered in a later part of the manual)?
Do the speakers fit the space?
Are they applicable to all the situations needed?
How many speakers are required for the situation?
For example, installing huge 1000 watt speakers for a small studio space might not be the most efficient use of the area or be needed to go that loud. Additionally, plans to use only two powered p.a. speakers for a live event in a gymnasium might not be loud enough for the band to hear themselves.
Try to fit the size, loudness, style, and number of speakers to the situation. Understanding that will help an audio producer make better technical and creative choices.
One thing I’ve learned over the years is that if my job requires me to listen, I need to get a set of monitor speakers and headphones I’m not constantly fighting with. My personal workstation is small, so I chose smaller monitor speakers. I also needed speakers that could connect from one piece of recording gear (laptop) to an older reel to reel eight-track. And, though I like loud, I have people living in the house with me, so I chose some characteristics of clarity over volume. The money I saved allowed me to upgrade on headphones. And even then, I didn’t have to go over budget. Since I work a lot from this permanent audio workstation, I didn’t need the sturdiest cans or wireless earbuds. My home set-up has the proper speakers for the space, a nice set of noise-cancelling headphones, and I stayed under budget (method). I’ve included materials below to understand speakers and cables better.
A Beginners Guide to Hi-Fi Speakers–Video
How to Set Up a PA System (live band) Video
Audio Cables
Audio Cables (balanced and unbalanced) Landr
Speakers
A loudspeaker is an electroacoustic transducer; a device which converts an electrical audio signal into a corresponding sound. The most widely used type of speaker is the dynamic speaker. The sound source (e.g., a sound recording or a microphone) must be amplified or strengthened with an audio power amplifier before the signal is sent to the speaker.
The dynamic speaker was invented in 1925 by Edward W. Kellogg and Chester W. The dynamic speaker operates on the same basic principle as a dynamic microphone, but in reverse, to produce sound from an electrical signal. When an alternating current electrical audio signal is applied to its voice coil, a coil of wire suspended in a circular gap between the poles of a permanent magnet, the coil is forced to move rapidly back and forth due to Faraday’s law of induction, which causes a diaphragm (usually conically shaped) attached to the coil to move back and forth, pushing on the air to create sound waves. Besides this most common method, there are several alternative technologies that can be used to convert an electrical signal into sound.
Speakers are typically housed in a speaker enclosure or speaker cabinet which is often a rectangular box made of wood or sometimes plastic. The enclosure’s materials and design play an important role in the quality of the sound. The enclosure generally must be as stiff and non-resonant as practically possible. Where high fidelity reproduction of sound is required, multiple loudspeaker transducers are often mounted in the same enclosure, each reproducing a part of the audible frequency range (picture at right). In this case, the individual speakers may be referred to as drivers and the entire unit is called a loudspeaker. Drivers made for reproducing high audio frequencies are called tweeters, those for middle frequencies are called mid-range drivers and those for low frequencies are called woofers. Extremely low frequencies (16Hz-~100Hz) may be reproduced by separate subwoofers.
Smaller loudspeakers are found in devices such as radios, televisions, portable audio players, computers, and electronic musical instruments. Larger loudspeaker systems are used for music, sound reinforcement in theatres and concert halls, and in public address systems.

Loudspeaker for home use with three types of dynamic drivers
- Mid-range driver
- Tweeter
- Woofers
The hole below the lowest woofer is a port for a bass reflex system.
Driver design: dynamic loudspeakers

Cutaway view of a dynamic loudspeaker for the bass register.
- Magnet
- Voice coil
- Suspension
- Diaphragm

Cutaway view of a dynamic midrange speaker.
- Magnet
- Cooler (sometimes present)
- Voice coil
- Suspension
- Diaphragm

Cutaway view of a dynamic tweeter with acoustic lens and a dome-shaped membrane.
- Magnet
- Voice coil
- Diaphragm
- Suspension
The most common type of driver, commonly called a dynamic loudspeaker, uses a lightweight diaphragm, or cone, connected to a rigid basket, or frame, via a flexible suspension, commonly called a spider, that constrains a voice coil to move axially through a cylindrical magnetic gap. A protective cap glued in the cone’s center prevents dust, especially iron filings, from entering the gap. When an electrical signal is applied to the voice coil, a magnetic field is created by the electric current in the voice coil, making it a variable electromagnet. The coil and the driver’s magnetic system interact, generating a mechanical force that causes the coil (and thus, the attached cone) to move back and forth, accelerating and reproducing sound under the control of the applied electrical signal coming from the amplifier. The following is a description of the individual components of this type of loudspeaker.
Wiring connections

Two-way binding posts on a loudspeaker, connected using banana plugs.

A 4-ohm loudspeaker with two pairs of binding posts capable of accepting bi-wiring after the removal of two metal straps.
Most home hi-fi loudspeakers use two wiring points to connect to the source of the signal (for example, to the audio amplifier or receiver). To accept the wire connection, the loudspeaker enclosure may have binding posts, spring clips, or a panel-mount jack. If the wires for a pair of speakers are not connected with respect to the proper electrical polarity (the + and − connections on the speaker and amplifier should be connected + to + and − to −; speaker cable is almost always marked so that one conductor of a pair can be distinguished from the other, even if it has run under or behind things in its run from amplifier to speaker location), the loudspeakers are said to be “out of phase” or more properly “out of polarity.” Given identical signals, motion in one cone is in the opposite direction of the other. This typically causes monophonic material in a stereo recording to be canceled out, reduced in level, and made more difficult to localize, all due to destructive interference of the sound waves. The cancellation effect is most noticeable at frequencies where the loudspeakers are separated by a quarter wavelength or less; low frequencies are affected the most. This type of miswiring error does not damage speakers, but is not optimal for listening.
With sound reinforcement system, PA system and instrument amplifier speaker enclosures, cables and some type of jack or connector are typically used. Lower- and mid-priced sound system and instrument speaker cabinets often use 1/4″ speaker cable jacks. Higher-priced and higher powered sound system cabinets and instrument speaker cabinets often use Speakon connectors. Speakon connectors are considered to be safer for high wattage amplifiers, because the connector is designed so that human users cannot touch the connectors.
Wireless speakers

HP Roar Wireless Speaker
Wireless speakers are very similar to traditional (wired) loudspeakers, but they receive audio signals using radio frequency (RF) waves rather than over audio cables. There is normally an amplifier integrated in the speaker’s cabinet because the RF waves alone are not enough to drive the speaker. This integration of amplifier and loudspeaker is known as an active loudspeaker. Manufacturers of these loudspeakers design them to be as lightweight as possible while producing the maximum amount of audio output efficiency.
Wireless speakers still need power, so require a nearby AC power outlet, or possibly batteries. Only the wire to the amplifier is eliminated.
Specifications

Specifications label on a loudspeaker
Speaker specifications generally include:
- Speaker or driver type (individual units only) – Full-range, woofer, tweeter, or mid-range.
- Size of individual drivers. For cone drivers, the quoted size is generally the outside diameter of the basket. However, it may less commonly also be the diameter of the cone surround, measured apex to apex, or the distance from the center of one mounting hole to its opposite. Voice-coil diameter may also be specified. If the loudspeaker has a compression horn driver, the diameter of the horn throat may be given.
- Rated Power – Nominal (or even continuous) power, and peak (or maximum short-term) power a loudspeaker can handle (i.e., maximum input power before destroying the loudspeaker; it is never the sound output the loudspeaker produces). A driver may be damaged at much less than its rated power if driven past its mechanical limits at lower frequencies.[43] Tweeters can also be damaged by amplifier clipping (amplifier circuits produce large amounts of energy at high frequencies in such cases) or by music or sine wave input at high frequencies. Each of these situations might pass more energy to a tweeter than it can survive without damage.[44] In some jurisdictions, power handling has a legal meaning allowing comparisons between loudspeakers under consideration. Elsewhere, the variety of meanings for power handling capacity can be quite confusing.
- Impedance – typically 4 Ω (ohms), 8 Ω, etc.
- Baffle or enclosure type (enclosed systems only) – Sealed, bass reflex, etc.
- Number of drivers (complete speaker systems only) – two-way, three-way, etc.
- Class of loudspeaker:[46]
- Class 1: maximum SPL 110-119 dB, the type of loudspeaker used for reproducing a person speaking in a small space or for background music; mainly used as fill speakers for Class 2 or Class 3 speakers; typically small 4″ or 5″ woofers and dome tweeters
- Class 2: maximum SPL 120-129 dB, the type of medium power-capable loudspeaker used for reinforcement in small to medium spaces or as fill speakers for Class 3 or Class 4 speakers; typically 5″ to 8″ woofers and dome tweeters
- Class 3: maximum SPL 130-139 dB, high power-capable loudspeakers used in main systems in small to medium spaces; also used as fill speakers for class 4 speakers; typically 6.5″ to 12″ woofers and 2″ or 3″ compression drivers for high frequencies
- Class 4: maximum SPL 140 dB and higher, very high power-capable loudspeakers used as mains in medium to large spaces (or for fill speakers for these medium to large spaces); 10″ to 15″ woofers and 3″ compression drivers
and optionally:
- Crossover frequency(ies) (multi-driver systems only) – The nominal frequency boundaries of the division between drivers.
- Frequency response – The measured, or specified, output over a specified range of frequencies for a constant input level varied across those frequencies. It sometimes includes a variance limit, such as within “± 2.5 dB.”
- Thiele/Small parameters (individual drivers only) – these include the driver’s Fs (resonance frequency), Qts (a driver’s Q; more or less, its damping factor at resonant frequency), Vas (the equivalent air compliance volume of the driver), etc.
- Sensitivity – The sound pressure level produced by a loudspeaker in a non-reverberant environment, often specified in dB and measured at 1 meter with an input of 1 watt (2.83 rms volts into 8 Ω), typically at one or more specified frequencies. Manufacturers often use this rating in marketing material.
- Maximum sound pressure level – The highest output the loudspeaker can manage, short of damage or not exceeding a particular distortion level. Manufacturers often use this rating in marketing material—commonly without reference to frequency range or distortion level.
Microphone Stands

A microphone stand is a free-standing mount for a microphone. It allows the microphone to be positioned in the studio, on stage or on location without requiring a person to hold it.
The most basic microphone stand is a straight stand. It uses a dome-shaped round metal base, or a tripod base, into which is threaded a post for mounting the microphone (most commonly a 5/8-27 threaded hole). This post may be made up of two or more telescoping tubes that fit inside each other, allowing for quick height adjustment. The mechanism for adjusting the height is called the clutch.[1]
There are various versions of the straight stand known as the “desk stand” (short version of straight stand) and heavy duty microphone stand (heavier base and larger tubes) to handle heavy microphones.[2] The tubes used on the straight stand usually have a shiny chrome plating to resist scratching, but may also be finished in a matte black.
A very popular updated version of the straight stand uses the “folding tripod base stand”, instead of the round, domed metal base. This folding base allows for easier packing of the stand when moving from location to location and reduces the weight of the stand. However, to compensate for the lack of weight at the base while still maintaining stability, the three “feet” of the tripod must extend out beyond the radius of a round base. The trade-off is that these “feet” may become a trip-hazard on a dark stage.
A number of accessories make microphone stands more useful. Most of these are designed to get the microphone closer to the user without placing the upright portion of the stand directly in front of the performer.
A “boom arm” attaches to the top of the stand so the microphone can move in the horizontal plane. A guitar player, for example, might use this to place the microphone directly in front of his mouth without having the upright portion of the stand in the way of the guitar. It also lets musicians have the microphone closer to the sound source when floor space is at a premium. This can be particularly useful when placing microphones on a drum stand when the microphone stands must compete for space with things like cymbal stands. Boom arms are offered both in fixed length and adjustable (telescoping) lengths.
Another handy device for adjusting microphone placement is a flexible goose neck tube. Made of a spiral-wound core of steel, goosenecks are made in various lengths and finishes and provide the ability to make minute changes in microphone position.
Microphones typically attach to the stand via a detachable microphone holder screwed to the end of the boom.
Various male/female adapters are available to connect dissimilar sizes. Note: A compatible ¼″ 20 tpi UNC is common in photography tripods
-

Desktop microphone stand
-

Shure model S36 desktop microphone stand
-

Microphone stand with folding tripod base, boom arm, and shock mount.
Shock Mount Microphone Clips
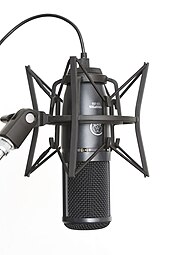
Shock Mounts
Shock mounts for microphones can provide basic protection from damage, but their prime use is to isolate microphones from mechanically transmitted noise. This can originate as floor vibrations transmitted through a floor stand, or as “finger” and other handling noise on boom poles. All microphones behave to some extent as accelerometers, with the most sensitive axis being perpendicular to the diaphragm. Additionally, some microphones contain internal elements such as vacuum tubes and transformers which can be inherently microphonic. These are often cushioned by resilient internal methods, in addition to the employment of external isolation mounts.


