
3 Reading Textbooks
One thing students say about college is that there is a lot more reading—and they actually have to do it if they hope to do well in their classes. This chapter focuses on reading textbooks since most first-year college students have traditional textbooks for their introductory classes. The next chapter will provide you with strategies for reading other things– like articles, novels and non-fiction books such as autobiographies.
Learning Objectives
In this chapter, you will learn:
- How to read textbooks effectively using the idea of the “warm up,” “work out,” and “cool down”
- How to use textbook features to make decisions about main ideas and notetaking
- Different notetaking styles– graphic organizers and matrix notes
- Tips on how to read scholarly articles
Why Take Notes?
While you are reading, you can’t simply run your eyes over the words and expect to retain anything anymore than you can expect to sit quietly in the corner at a choir rehearsal and learn the songs. While you read, you need to interact with the material so you can remember it. This means you need a notetaking system of some kind.
Students will often tell me they don’t need to take notes. They usually give one of the following reasons: “I don’t need to take notes since I have a really good memory.” “Taking notes takes too much time.” Or “I never needed to take notes in high school and I don’t want to start now.”
Students usually want to read and take notes as quickly as possible— and they make decisions about notetaking based mostly on their desire to get through reading quickly instead of effectively. This is maybe one of the only areas of their lives in which getting through things quickly matters more than doing a good job.
Imagine a student saying to a coach, “Oh, those drills? I don’t need to do them. I’m in really great shape, so I’ll skip them and leave 20 minutes early, okay?”
While it is understandable that you want to move through material quickly, you also want to be successful on exams and assignments. Otherwise, you just wasted any time you did spend studying. Think of it like this: if you are trying to grow a garden in a drought, you need to understand that, drought or no, your garden needs a certain amount of water to grow. If you underwater it to save water (which is understandable) and your plants die or produce such poor fruit it is hardly worth eating, you wasted all the water you DID use. You may as well have not watered it at all since the end result was the same. In our gardening analogy, water is the scarce resource, but in your life, time probably is. But your studies are like the garden—if you don’t devote enough time to them, you may as well devote none since the end result will be the same.
The purpose of this chapter is to help you develop a notetaking system that will help you be as efficient and effective as possible.
Think about It . . . Electronic Textbooks
Electronic textbooks are appealing because they are cheaper than paper books. Sometimes, they are free. Saving money is great but so is academic success. It may be more difficult to take notes on electronic texts. It is easier to lose your place, and harder to notice how chapters are organized.
Some students say, “I can’t take notes. My books are all online.” Just because your books are online, that doesn’t mean you don’t need a notetaking system. Below are solutions:
Solution 1: Print the book. The great news with paper books is that, as long as you don’t lose them, they are accessible whether or not you have WiFi or your computer battery is low. Usually, there is an option to get a printed book. Your instructor, someone at the bookstore or maybe even your campus librarian can help you figure out how to buy a printed copy. You might also consider printing it a chapter at a time.
Even if you decide not to print your book, you might print certain pages. For example, print pages that list learning objectives, review questions, important diagrams or helpful explanations. You can three-hold punch these pages and clip them into your notebook alongside your own notes.
Solution 2: Find an electronic notetaking system. There are ways to take notes online on your electronic books. Some of them are free. See if your campus recommends any.
Solution 3: Take paper notes. Just because you are reading an electronic book, that doesn’t mean you can’t simply use a notebook and pen like you would with a paper book.
Warm Up, Work Out, Cool Down
 If you have ever played sports, danced, sung in a choir or acted in a play, you have probably noticed that practices and rehearsals follow a pattern—first you warm up to get your muscles, brain voice, etc. ready for that rehearsal or practice. Next, you work out—which means practicing the things you need to do during the game, concert, or play. Finally, you cool down—you evaluate your rehearsal or practice.
Guess what? Reading college-level material follows the same structure practices and rehearsals do, but there are two important differences:
1) You do not have a coach or a director to make sure you understand what you read or are taking notes on the right stuff.
2) Studying is not public the way rehearsals and practices are. When you study, no one can look at you and know what you are thinking, if you understand the material or are making the best choices to prepare for the test. In sports and music, your choices are out in the open—everyone can hear it when you sing the song correctly, and everyone can tell if you make the basket or hit a home run. If you cannot do these things, your coach or director can hear or see what you are doing wrong and correct you.
Because studying is not visible the way other activities are, it is harder to know if you are doing things correctly. That is why this book is so important! You have to learn to be your own coach. Just like a coach can sometimes challenge players and say things players don’t want to hear, you need to challenge yourself—and be honest about how well your studying is working.
The chart below explains the purpose of warming up, working out and cooling down when you read, and the rest of the chapter is going to give you tips for making sure you have a quality warm up, work out and cool down.
Warm Up, Work Out, Cool Down Explained
Warm Up |
Your brain remembers information better if it warms up. You warm up your brain by paging through the chapter you are about to read. Look at pictures, read bolded words. Go to the end and read the review questions. Read chapter objectives and headings. Your goal is to get a sense of what you will learn when you read the chapter. |
Work Out |
The purpose of the workout is to understand what you read. This requires you to have a notetaking system and a process for figuring out what is really important. In reading, the workout has three distinct parts– pre-reading just the section of the textbook you hope to read during that homework session, taking notes on that section of the textbook, then reviewing that section of the textbook before moving on. |
Cool Down |
When you cool down you do three things:
|
Warm up-Prereading
Earlier in this chapter, you learned that when you study, you should have a warm up, a work out and a cool down. In the next pages, each stage of the reading process (The warm up, the workout and the cooldown) is discussed along with suggestions about how to do it.
Warm Up Using Textbook Features
One important thing you may never have been told is that reading habits that are great for novels and short stories are of little help when you read a textbook. For example, you may have been told all your life that you need to read books from beginning to end—no jumping around! No skipping to the end! While this is great advice for reading novels and short stories, it isn’t good advice for reading textbooks. Instead, to read a textbook successfully, you flip from the beginning of the chapter to the end often.
But stop and think for a minute how different novels are from textbooks. Novels rarely have pictures. They almost never have headings. You won’t find bolded words, graphics or charts that were created to explain concepts. Since novels and textbooks are so different, it makes sense you would have different strategies for reading them.
Textbooks are full of Textbook Features, which are there to help you get a clear idea of what the chapter will be about and what concepts you will need to understand by the time you are done reading. However, many students rarely, if ever, use those textbook features. Below is a list of features with suggestions about how to use them when you warm up:
- Learning Objectives– At the beginning of each chapter, and sometimes, the beginning of each chapter section, there is a list of things you will be able to do or questions you will be able to answer by the time you are done reading the chapter. Read these carefully since they tell you what you need to be able to do or know when you are done with the chapter.
- Headings and Subheadings– Textbooks make heavy use of headings and subheadings. Page through the entire chapter and read all the headings. Often headings will be in the form of a question. For example, a Psychology textbook heading might say, “How Does Plasticity Help Us Adapt?” Then you know that, by the time you finish reading the section, you need to be able to explain how plasticity can help you adapt. If headings aren’t in the form of questions, you can always make them into questions. If the heading was, “Plasticity Helps Us Adapt” you can simply add “How Does” and a question mark.
- Pictures and graphics– Page through the chapter and looks at pictures, charts, etc. They will give you a good idea what concepts the chapter will cover. Graphics often break down important processes you need to understand. Charts will compare and contrast two or more people, places, concepts or events, or pull out important facts for emphasis.
- Bolded Words– Read bolded words and their definitions. Even though you won’t always remember the words or understand the definitions during the warmup this habit helps you. When you begin to read the chapter, and you come to bolded word, your brain remembers that you already saw it. Your brain will spend less energy trying to learn the word, which means you will have more energy left over for learning important concepts.
- Review Materials– Most textbooks have review activities, questions, problems, vocabulary words or sample test questions. Read those before you read the chapter. Of course, you are unlikely to be able to answer questions or solve problems if you haven’t read the chapter. Here is why doing this is worthwhile: when you read review materials , you will 1) get some of the new terms and ideas into your head so they are a little bit familiar when you read the chapter. 2) be able to make important decisions about what to focus on when you study. If you notice that review questions focus on understanding a process, then you know that you should focus on understanding that process. If you notice that review questions focus on comparing two concepts, then you know to pay attention to similarities and differences between those concepts.
Pre-reading should take 15 to 20 minutes, depending on the length of the chapter.
Think About . . .Why Pre-Read?
If you are thinking, “Doing all this pre-reading stuff just makes reading take longer. I just need to read,” think again.
Pre-reading can help you read faster. Why? Pre-reading helps you figure out where the chapter is “going”—it helps you answer questions like:
- “What are important things I will learn?”
- “What important terms and concepts do I need to know?”
- “What will I be able to do after I read this chapter?”
Knowing the answers to these questions before you read helps you make good choices about what to focus on and what to take notes on.
Work Out: Reading
Once you’ve done your pre-reading, you are ready to read. Many students think reading is like watching TV—you sit there and let the words and images wash over you. You have probably heard that old saying, “Tell me and I forget. Teach me and I may remember. Involve me and I learn.” The problem many students have is they aren’t really sure what it means to be involved with reading. What does that look like? What should they do?
A good reading workout has four distinct steps.
Step 1: Break the reading up by chapter section and decide how many sections you can read during that homework session.
Step 2: Read the headings and subheadings for just the sections you will read that day and use those headings to determine that chapter section’s purpose.
Step 3: Decide on a notetaking style
Step 4: Review the section before moving on to the next section.
Each step will be described in this chapter.
Step 1 of the Work Out: Break up the Reading by Chapter Section
In chapter 2 of this book, you learned about the body rules. One body rule is that it is hard to focus for more than 20 minutes at a time. Another body rule is that people can learn between 5-9 concepts at a sitting before getting overloaded. Breaking the chapter up into smaller sections and reading a little each day as opposed to trying to read an entire 35-page chapter in one sitting is the best way to make progress in your reading while also keeping the body rules in mind.
However, breaking up a chapter is more complicated than it seems. You might think, “If I have to read a 35 page chapter in 5 days, I’ll just read 7 pages a day.” Good thinking– but consider the structure of the textbook before you just divide up the chapter based on the number of pages you have to read. Instead, it is best to divide up the chapter into sections. So what is a textbook section?
Textbook Chapter Anatomy
Most Textbooks are organized in the following way:
Introductory material
In the first pages of most textbooks, you will see all or some the following:
- A statement of Purpose: Most textbook chapters open with an introductory paragraph that contains a purpose sentence. Purpose sentences say something like, “The purpose of this chapter is . . . . .” or “By the time you are done reading this chapter, you will understand . . . . . . “
- Chapter Objectives: Textbook chapters often begin with a bullet list, a side bar, or a shaded box that names the major points the chapter will cover. See the example from an Open Source Economics Textbook:
Chapter Objectives
In this chapter, you will learn about:
- What is Economics, and Why Is It Important?
- Microeconomics and Macroeconomics
- How Economists Use Theories and Models to Understand Economic Issues
- How Economies Can be Organized: An Overview of Economic Systems
“Chapter Objectives” by Michael McIlhon CC BY 2.0
- A list of Chapter sections. Many textbooks, in addition to or instead of objectives, will list the titles of the sections of the chapter. See example below. This chapter has four sections. Notice that the author has also listed the review features at the end of the chapter.
Welcome to Economics!
Introduction
1.1 What Is Economics, and Why Is It Important?
1.2 Microeconomics and Macroeconomics
1.3 How Economists Use Theories and models to Understand Economic Issues
1.4 How to Organize Economies: An Overview of Economic Systems
Key Terms
Key Concepts and Summary
Self-Check Question
Review Questions
Critical Thinking Questions
“Chapter Objectives” by Michael McIlhon CC BY 2.0
Body Material
Textbook Section Structure: Once you get past the introduction of the chapter, you begin to read the sections. One important structural feature many students overlook is how the textbook authors use headings and subheadings. In most chapters, each section begins with a bold, large heading. Subpoints are marked with smaller subheadings, and sometimes subheadings are broken down into sub-sub headings. Some textbook authors use different colors, bolding or changes in font so it is clear where one textbook section begins and ends. Pay attention to how your textbook is structured so you know what headings, subheadings, and sub-subheadings look like.
Mini Objectives for the sections: It is common for textbook authors to have a short list of questions or statements at the beginning of a section so you can see what the goals are of just that section. See example:
Learning Objectives
By the end of this section, you will be able to:
- Contrast traditional economies, command economies, and market enconomies
- Explain gross domestic product (GDP)
- Assess the importance and effects of globalization
Review Material
Most textbooks have some kind of review material. You will see some or all of the following:
- Lists of words you should know
- Problems you should be able to do
- Scenarios (short stories) that use the ideas you learned in the chapter along with questions about them
- Open-ended questions
- Multiple choice questions
Set a Schedule
To set a reading schedule, do this:
- Read the introduction
- Determine how many sections your textbook chapter has
- For now– ignore the review material
- Divide the number of sections up into a reasonable reading schedule, but make every effort to complete an entire section at a time. For example, if the chapter has 5 sections, and section 1 is only 2 pages while the other sections are much longer, maybe read sections 1 and 2 on Monday, Section 2 on Tuesday, etc.
Step 2 of the Work Out: Use Headings to Determine a Chapter Section’s Purpose
Have you ever taught a friend or sibling how to play a game? You explain all the rules and talk through how scoring works. But none of that matters if you don’t make it clear how the rules fit into the point of the game. If you start your explanation with a statement like, “The major goal of this game is to score as many points as you can.” Or “The major goal of this game is to be the first one to [Fill in the blank]” then it is always easier for people to understand the rules.
Many students see reading as collecting facts—they write down definitions, dates, and the names of important people and places. But they miss the big picture. For example, if you read about early Italian astronomer Galileo, you will learn that he lived between 1564 and 1642 and he was the first to use a telescope to see that Jupiter had four moons. Those are important facts, but the big picture is that Galileo was considered one of the first modern scientists who found evidence that the sun is the center of our solar system.
When you can figure out what the objective of the reading is, you have discovered its purpose. Here are common purposes for reading:
- Compare/ contrast two or more people, places or events
- Define an important concept or term
- Explain the steps in a process
- Explain how someone or something caused something or a series of somethings to happen
- Explain the history of something
- Provide examples of a concept
- A combination of these things
- Other
Let’s say you are in Astronomy and you are reading a chapter section that has the following subheading: “Active Earth: Atmosphere, Oceans and Surface.” If you stop to analyze that heading, you can get good ideas about how to organize your notes, and what it important. See example below:
Heading: Active Earth: Atmosphere, Oceans and Surface
Step 1: Read the heading in Parts and think about it by considering what you know from your life and what you are learning in class.
Parts of the Heading |
A Student’s Analysis |
Active Earth: |
I know “active” means “doing something” or maybe “changing.” I guess I’m probably going to read about how the Earth does things, or changes. |
Atmosphere, Oceans and Surface |
I read these words and guess this chapter section will talk about changes and activities happening in the atmosphere, oceans and surface. I know about storms, tides, earthquakes, tsunamis, etc. I remember in class our instructor saying something about how we were going to learn about tides.
|
The Student’s Conclusions |
I wonder if this chapter section’s purpose is to “provide examples of a concept”– in this case, the concept is “active Earth” and the examples will be how the atmosphere is active, the oceans are active and the surface is active. Another possible purpose for this section might be to “explain how something causes something else.” Maybe I will learn what causes the tides or storms.
Maybe I should divide my notes into three sections– one for “atmosphere,” one for “oceans” and another for “surface.” As I read, I can pay attention to how each of these parts of Earth are active and make sure I write that down. |
Step 3 of the Workout: Decide on a Type of Notes
If you don’t have a notetaking system of some kind, that is the reading equivalent of sitting quietly during choir rehearsal, watching your teammates practice, or exercising by watching YouTube clips of other people exercising. It doesn’t work. To read well, get involved. Getting involved means having a notetaking system. There are many notetaking strategies out there. A teacher or a tutor may have said something to you like, “You need to use notetaking style XYZ. It is the best one.” Don’t listen to that. There are a number of different notetaking styles you can choose from that are all good, and you will learn two of them here in this chapter.
However, there are two things that really matter when you take notes.
- Your notes should have four types of information that can be easily spotted by anyone who looks at them
- Your notes should reflect the purpose of the chapter section you are reading.
The Four Types of Information Good Notes Always Have
The most common problem students have with notetaking is they write down the terms, copy the definitions, leave a neat line space, then copy the next term and definition. Usually, the definitions are copied word for word out of the book. If I take a student’s notebook from them and read them one of the terms and ask them to explain how those terms are related, most students say, “I don’t know. Let me see my notes.” Students often expect college exams to focus on definitions– so that is what they write down. College exams rarely focus on definitions, so copying them down is rarely a good use of time.
Instead, your notes should read a bit like a story. Even if your high school aged sister or your best friend (who isn’t in your class) picked them up and read them, they should be able to figure out the main points of your notes. Below are the four different types of information that should show up in any reading notes you take:
Structure notes: These notes are very simple—they help you determine VERY QUICKLY when you took the notes and what chapter you took them on. Writing “September 15” in the upper right-hand corner of your notes is a structure note. Writing down what chapter and what section of the chapter the notes are over are also structure notes. Copy the headings down in your notebook so you can very clearly see what part of the chapter your notes came from.
Terms/Dates/ Facts Notes: These are the notes people often think of when they take notes. Terms and their definitions, important dates and facts all are terms, dates, and facts notes.
Concept Notes: These notes are harder. They require you to explain in your own words what the major points of the reading are. Concepts notes help you understand things like WHY you need to know the terms in the section. They help you understand that the facts you copied down are important because they are part of helping you understand the objective—for example, you might jot down facts about the beginning of World War I, but the important thing to know is not just the facts, but how they connect with each other to help you understand all the different people and circumstances that led to the war starting. It is an important fact that World War I started in 1914 when the Archduke Franz Ferdinand of Austria was assassinated— but concept notes would explain why the assassination of this Archduke was significant enough to cause a war. Many people have been assassinated throughout history, but their deaths don’t cause a World War. Why did this one?
Relational Notes: These notes can be difficult for students to understand at first. Relational notes make the relationship between concepts and facts clear. They can take many forms—including a single word, numbers, arrows or simple drawings.
Below are common ways to create “relational notes.”
-
-
- So, because and since = these words make it clear that something happened because of something else. For example, “It was raining so we went to a movie instead of on a walk” makes it clear what lead up to watching the movie.
- Different from, similar to, compare, contrast= These words make it clear how people, places, events, things, etc. are similar or different from one another. Understanding similarities and differences can be crucial to understanding concepts in many subjects.
- Numbers, arrows, bullet lists= You don’t need to limit yourself to words. You can also show relationships by doing things like numbering the steps in a process, such as photosynthesis. You can draw an arrow to show how one thing leads to another, or make bullet lists to make it clear that one idea has multiple parts or examples. If you were taking Astronomy and wanted to remember which planets are terrestrial, you could do this:
- Terrestrial planets
- Earth
- Mars
- Venus
- Mercury
- Terrestrial planets
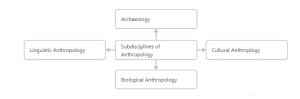
- Pictures and graphics= Sometimes graphics and picture are the best way to take notes. Here is a simple picture you could draw to remember the subdisciplines of Anthropology. In a box in the middle, write the word “Subdivisions of Anthropology.” Use lines or arrows to draw four more boxes, and in each box, write the subdiscipline. The picture makes the relationship clear. You can use more lines and arrows to branch off each box to write down important people, definitions, etc. that are important to each subdiscipline.
-
Think about It . . .How Reading A Textbook Is Like Baking Chocolate Chip Cookies
Chocolate Cookie Reading Analogy
Comparing reading a textbook to baking chocolate chip cookies may help you remember the four types of information that all good notes should have. Here’s why:
Step 1: Structure: The first thing a baker puts in the bowl is dry ingredients—flour, baking soda, salt. These ingredients are BORING, but they matter. Without them, the cookies would spread all over the pan. Notetakers write down the date the notes were taken and the chapter name before they dive into notetaking. As they go, they write section headings. Again, BORING, but it keeps their mind from spreading all over the place, wondering what the notes are about.
Step 2: Concepts and Relationships: Next, bakers put in the butter, the vanilla, the eggs. Maybe milk. These ingredients add FLAVOR—if others are around, they might steal that raw cookie dough when the baker isn’t looking. It is delicious! Concept notes are the flavor—the reason you are reading. For example, you are not reading about World War I in order to learn that the assassination of poor Archduke Franz Ferdinand started it in 1914. You are reading it to learn HOW and WHY this assassination at this particular time and place had such terrible and far-reaching consequences.
 Step 3: Terms/ Dates /Facts: The last ingredient bakers toss into the bowl is chocolate chips. Everyone thinks chocolate chips are the most important ingredient. The cookies are even named after them! But think about this: What is the ONLY ingredient you can leave out and still get cookies? The chocolate chips! Chocolate chips in reading are the definitions, facts and dates. Just like chocolate chips only matter when they are supported by eggs, flour, sugar, salt and baking soda, so facts, dates and definitions only matter then they are supported by concepts.
Taking Notes that Reflect the Structure of the Chapter Section
At the beginning of this chapter, you learned that textbook sections have overall purposes. In case you forgot them, here they are again:
- Compare/ contrast two or more people, places or events
- Define an important concept or term
- Explain the steps in a process
- Explain how someone or something caused something or a series of somethings to happen
- Explain the history of something
- Provide examples of a concept
- A combination of these things
- Other
If your notes could make it clear what the purpose of the textbook section is you would have very effective, easy to read notes that would make relationships clear. You also learned that you should stop when you get to a chapter section heading and analyze that heading so you can make guess about the sections purpose.
How can you put all this together to have effective notes? Maybe graphic organizers would be an effective way to take notes. Graphic organizersMany students think notes need to be written like paragraphs– and for some students, that works well. But many people are visual learners– the learn by seeing. Others are kinesthetic learners– they learn by doing. Graphic notes are better for these learning styles.
The challenge of taking notes like this is that you have to carefully choose a graphic that fits the structure of the paragraph or chapter section you are reading. Consider the following 6 examples of graphic notes and see if using them might make your life easier.
Graphic Notes Options
On the next pages are suggestions about how to take notes graphically—which means you put the information from a lecture, book, video, etc. into a chart or other sort of graphic. In order to choose the graphic organizer that works best for your textbook section, you have to use headings, subheadings, etc. to determine what the purpose or purposes of the section are.
Graphic Notes Style 1: Cause/ Effect Chart
One common way information is organized in chapters and chapter sections is “cause/effect.” How did one event or idea lead to another? How does a virus cause disease? How does a recession affect shopping habits? What weather conditions cause tornadoes? If the main goal of a textbook section is to help you understand how something caused something else, make that clear in your notes. Write “cause(s)” on one line and list them. On the next line, write “effect(s)” and list them. If necessary or helpful, put descriptions and definitions. On the next line, write “Why It Matters” and explain why knowing about the cause/effect relationship is important. If, in your class, there is a better statement to respond to than “Why It Matters” write that instead.
Below is a simple way to set up your notes:
Cause(s):
Effect(s):
Why It Matters:
Graphic Notes Style 2: Compare/ Contrast Charts
Sometimes, a major goal of a chapter section is to compare two or more people, places, ideas, events or processes. If so, a chart can be much easier to make sense of than a paragraph. You can use T-chart– which is basically two side-by-side columns with the name of the things you are comparing or contrasting at the head of the column. If helpful, begin your T-chart with a column with the criteria you will compare and contrast. In the columns, you can list similarities and differences. Below is an example a student might make to compare plant cells and animal cells:
| Plant Cells | Animal Cells | |
| Similarities | ||
| Differences |
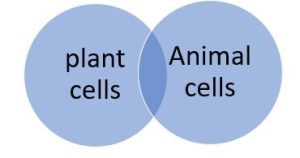
Graphic Notes Style 3: Venn Diagram
Venn diagrams allow you to compare and contrast two or more things, people, events, places, etc. You make a Venn Diagram by drawing two or more overlapping circles. In the parts of the circle that overlap, write similarities the two items you are comparing have. In the sections of the circles that don’t overlap, write down what makes each item you are comparing unique. Venn diagrams work well if you have two or three ideas to compare and contrast but are hard to use if you have more ideas.
The two overlapping circles below allow you to compare and contrast plant and animal cells. Where the circles overlap, write down what plant and animal cells have in common. Use the rest of the circles to say how plant and animals cells are different from each other.
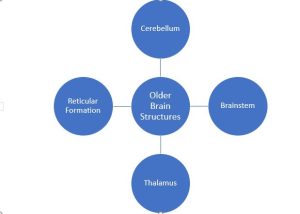
Graphic Notes Style 4: Concept Maps
Concept maps represent how ideas are related. They look like spider webs, or maybe like the suns you drew when you were a small child. Let’s say that in your textbook, your chapter title is “Revolutions.” In your chapter, you have four sections– the American Revolution, the French Revolution, the Haitian Revolution and the War for Independence in South America. To create a concept map, make a circle in the middle of your paper and write “revolutions.” Next, use lines and arrows to connect your central circle to four more circles. Write the name of each revolution in its own circle. Branch off those circles to make additional notes about each revolution– where and when did they occur? Who were the important people? Which ideas are associated with each one?
The example below is designed to help you learn older brain structures. The central circle says, “older brain structures” and the four circles around that central circle each contain the name of a part of the older brain structure– the cerebellum, the brain stem, the thalamus and the reticular formation.
Graphic Notes Style 5: Steps in a Process or Timeline
Many chapters or chapter sections are designed to help you understand steps in a process—how a cell divides, how a bill becomes a law, how a war started, how to perform CPR, calculate the slope of a line or use a graph. A process/ timeline chart can help you remember the steps in any process or the steps leading up to an event. If you would rather, you can make the timeline vertical instead of horizontal so you have more room to write notes about each step. If it helps, number the steps.
The example below, from psychology, shows the stages of psychologist Jean Piaget’s theory of cognitive development. In addition to the name of the stage and the ages of the people when they experience each stage, a students could add information about each one.
Piaget’s Theory of Cognitive Development
| Stage | Age range and major ideas |
| Sensory motor | Birth- two years old. Babies use senses to make sense of world. |
| Preoperational | About 2 to age 6 or so. Kids this age use words to represent ideas and things. |
| Concrete operational | About 7 to 11 years old. Kids in this age understand concrete events and ideas. |
| Formal operational | About 12 through adulthood. People in this age range are able to reason abstractly. |
Graphic Notes Style 6: Who/What/When/How Charts
If you are reading history, or any other subject where people are doing things, consider taking notes in a who/what/when/ how chart. To make a who/ what/when/how chart, make four columns on a piece of paper and label each one with one of “reporters” words. (Who, what, why, where and How). For example, the title of the first column could be “who.” The second could be “what.” In each column, answer the question as best you can. In the “who”: column, name all the important people you are reading about and in the “what” column explain what they are doing, etc. Who/what/ When graphs can be useful to keep track of characters in a novel, but you might also use them in other classes.
You can add or subtract columns or change the headings to fit what you are learning. For example, if you were learning about mental illnesses, a chart like this might help you if the column headings were “symptoms” and “treatments.”
If you are reading a novel or a book that isn’t a textbook, your instructor usually wants you to see connections between the ideas in the book and the ideas in the textbook or lecture. For example, if you are reading a sociology textbook chapter about attitudes toward poverty and a novel about a family who is experiencing poverty, your instructor wants you to find examples of the attitudes you are learning about in the textbook in the novel. This sort of notetaking can help you do that. You can title one of the columns “connections to textbook” or “connections to lecture.”
The example below will give you an idea of how you can set up a Who/What/When/How chart:
| Who | What | When | How | Connection to Lecture |
Matrix Notes
In order to see how notes work, you need to be able to see what the notes were taken on. Below is a link to the first chapter in an online free textbook in Anthropology. All the notes relate to pages 2-5.
Explorations (americananthro.org)
Matrix notes are the first kind of notetaking you will learn about. It is similar in many ways to Cornell Notes, but has a third column. Matrix notes make it fairly clear that you need to have all four types of notes you learned about earlier in this chapter. Here is how you would set it up:
- Turn your page so it is landscape, instead of portrait.
- Write the chapter number and title at the top of the page with the date. Include page numbers if that would be helpful.
- Make three columns. (It is helpful if the last column is wider than the first two)
- Label your first column “Structure,” the middle column “terms, facts and dates” and the last column “Concepts.”
- Use the “structure” column to write down the first heading you come to.
- Use the “terms” column to write down any important terms, definitions, words, facts or dates you come across in just the part of the textbook associated with the heading you wrote in the “structure” column.
- In the “Concepts” column, write answers to the learning objective questions. If you turned headings into question, write answers in this space. You can also draw Venn diagrams, compare/contrast charts, etc. in this space.
- When you come to the next heading, start the process again.
Below is the basic template:
| Chapter: Date: | ||
| Structure | Terms | Concepts |
| Write the heading of the chapter section here | Write terms, definitions, facts and dates here. | Write down important concepts from this section of the chapter. Answer questions from the learning objective questions, answer questions you made from the headings. Draw any of the graphic notes you learned about earlier in this chapter into this area. |
| When you come to the next subheading or heading, start the process again. | ||
Below are sample matrix notes taken over pages 2 and 3 of the Anthropology chapter. The section of the chapter is called “What is Anthropology?”
| Chapter 1 Date: 8/26/23 | ||
| Structure | Terms, Definitions, Dates and Facts | Concepts |
| WHAT IS ANTHROPOLOGY? | Anthropology is the study of humans. | People are very different– they live in diff places, have diff customs and do diff things. Why?
?’s Anthropologists ask
Anthropologists have 4 approaches:
|
There are important things to notice about these notes:
- The student wrote the chapter section heading all in caps to make it clear that this is a major heading.
- There is only one important term in this section– so there is only one term and definition to put in the “terms” column.
- There are abbreviates that make writing the notes faster (i.e. diff= different and ppl= people.)
- The student used a bullet list to show how the questions listed there are ones anthropologists regularly ask (this is an example of a relational note)
- The student used a numbered list to make it clear that there are 4 approaches to research, and those four approaches would be covered in the chapter.
Start Today . . . Set Aside Enough Time to Read
One common mistake that people make is underestimating how long something will take to do. Many textbook chapters are about 35 pages, and students often believe reading a chapter that long will take about an hour. However, reading a chapter usually takes much longer than an hour– especially if you hope to retain what you read.
Here is one way to get a much better idea how long it will take you to read a chapter of your textbook:
- Pre-read your chapter using the suggestions above (this should take about 15 minutes)
- Set your watch or phone for 10 minutes
- Begin reading like you usually do– take notes, re-read confusing things if you have to, etc.
- When your watch/ phone dings, count the number of pages you read
- Look to see how many pages the chapter is
- Use this information to figure out how long it will take you to read the chapter.
Example: Carolyn has to read a 30-page Biology chapter. She finds she can read 2.5 pages in 10 minutes. She can divide the total number of pages (30) by the number of pages she can read in 10 minutes (2.5). This gives her 12. Next, she can multiply 12 by 10 and get 120 minutes– or two hours.
Reading as a Process– not a Path
You have learned about prereading and reading, so now you need to think about how to use what you have learned to create the most effective reading process possible.
When you learned about pre-reading, you read that most people are taught that skipping ahead or looking at the end of the book or chapter is “cheating.” This is true for novels and short stories. If you skip ahead, you spoil the experience. After all, it is no fun reading a mystery novel if you know who committed the crime, or a fantasy novel if you know whether or not the characters successfully complete their quest.
But reading a textbook is a very different experience, so it requires a different approach. While you read, you go back and forth between reading (the work out) and pre-reading (the warm up).
Path vs. Process
Reading a novel is like walking along a path– you start at the beginning and put one foot in front of the other until you get to the end of the path.

Reading a textbook is a process that requires you to pre-read, read, circle back to your pre-reading, check your understanding and then repeat the process. This requires flipping back to what you already read, re-examining the learning objective, and maybe re-reading headings. See graphic below:
Textbook Reading Process
After you warm up by using the textbook features throughout the whole chapter, now you are ready to work out. Working out involves dividing the chapter up into sections and following three steps for each section:
- Pre read just the section you will read at this sitting. In other words, if your chapter has 4 sections, and you want to read the first one, pre-read just section one.
- Read the chapter section
- Review the chapter section by answering questions, looking over the chapter objectives, answering review questions, etc.
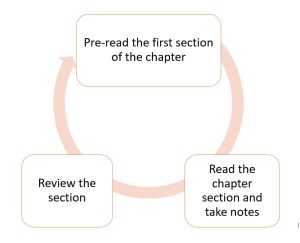
Once you have completed these three steps, you are ready to move on to the next section of the chapter.
Cool Down: After Reading
Once you finish the number of pages you would like to read in a novel you put a bookmark wherever you stopped, close the book and get up to do something else. Textbooks, as you are learning, are different. Think again of the sports practice or choir rehearsal—as a rule, before athletes, actors or musicians leave, the coach or director does something important—evaluates the practice and discusses the future.
The coach or director might say something like, “Okay, everyone, you did well on this, this and this, but we still have to work on this, that and that.” Or “Don’t forget, the bus leaves at 4:30 sharp.” A coach might talk about the upcoming opponent—for example, they might say something like, “We are going to face Team X on Thursday, and they have a very strong defense we need to be ready for, which is why we spent so much time today going over ABC . . . .”
When you study, you need to be your own coach. No one can watch you and determine if you are understanding the materials, taking notes on the right stuff and making good choices about what will be on the test. When you cool down, you have to take your role as your own coach seriously. You need to spend a few minutes evaluating your own study session, and thinking about the future—specifically, how you might be tested on what you just read.
A cool down for studying means this: spend between 5 and 15 minutes at the end of your study session to evaluate that particular study session. Let’s say you are studying Sociology from 1 pm to 3 pm. At about 2:45 or so, start your cool down. Here is what you do:
Look back over what you read between 1 and 2:45. Ask yourself questions like:
- Do I understand what I just read?
- If something is confusing to me, what am I going to do about it?
- What concepts or ideas that I read do are so important they might turn up on a test?
- Did I read anything today that will help me complete an assignment or project for this class?
- How does what I just read today connect with any other course components? (Remember, course components are anything you need to read, watch, listen to or do in order to successfully complete the course.)
Cool Down Strategies
Below are strategies you can use to have an effective cool down:
Strategy 1: Answer the Questions You Made for Yourself
When you did the work out, one strategy you learned about was turning headings into questions. Go back to the questions you wrote and see if you can answer them. Don’t just read the question and say, “Oh, yep. I can answer that!” Instead, actually do it—pretend someone comes up to you at a party and says, “How does Earth’s atmosphere differ from Mars?” Can you answer that?
Strategy 2: Use the Review Questions/ Learning Objectives in the Book
As you learned earlier, most textbooks have learning objectives at the beginning of each chapter section, and/ or review questions at the end of the section, or the end of the chapter. Use those! Before you close your books for the day, see how many you can answer (and, as mentioned before, actually ANSWER the questions! Don’t just say “Yep. I remember that!”)
Strategy 3: Come Up with Questions you Think Will Be on the Exam
You’ll learn much more about this in the chapter “Preparing for Exams.” But here is the quick explanation for now: ask yourself: “What did I read that is so important I might need to know it on an exam?” Avoid questions that simply ask you to recall facts. For example, “What year was Archduke Ferdinand assassinated?” or “Whose assassination was significant to the start of World War I?” are not questions you will likely get on a college exam.
Instead, college questions, even multiple-choice questions, are often more complex. Remember all the graphic notetaking styles you learned about in the “Work Out” section of this chapter? Use those to make college level questions. If you remember, an important point of the “Work Out” section is that noticing how a textbook section is organized gives you clues about what is really important. Often, test questions are based on the structure of the chapter section. (i.e. If the point of a textbook section is to compare and contrast terrestrial planets with Jovian plants, then it is a decent bet that, on the test you will get asked a question or two about those differences and similarities.)
Summing it Up
Below is a chart that steps through the warm up, work out and cool down and breaks it down by steps.
WARM UP |
Pre-Read the Entire chapter by
Goal: To get a good sense of what concepts and terms you will have to know, and what you will have to do with them– i.e. will you need to understand the steps in a process? Understand the differences between two or more things?
|
WORK OUT |
Read the First Chapter Section
Step 1: Pre-read just the first section of the chapter by doing the following:
Goal: To get the best sense possible of what you will learn in just that section, and to pick a notetaking style that will help you remember the concepts. Step 2: Read the chapter section and take notes. Make sure your notes contain all the types of notes: structure notes; term, definition, date and fact notes; concept notes and relational notes. Goal: To take notes that contain the important information.
|
COOL DOWN |
Review the section before you move on the next one by:
Goal: To make sure you the best understand you can have of this section of chapter before moving on the next section of the chapter, and to make a plan to resolve any confusion you have. |
Start Today . . . . Answering Learning Objective Questions and Review Questions
How do you know when you know something? There are several “levels” of knowledge. The most basic level of knowledge is simply remembering a fact such as the year something happened or the parts of a molecule. Knowing a fact doesn’t mean you understand something, and most college exams don’t focus on fact recall. To be ready for a college exam, you want to know that you know something. What does that mean?
In college, most exams require you to apply knowledge that you have learned to a unique situation, or they require you to understand concepts. One good way to see if you can do that is to try this:
- Imagine you are responsible for helping a student is not in your class understand why what you just read is important.
- Close your book and start explaining.
- Pay attention to how that goes– do you find yourself saying “ummm . . . what was that again?” or “I can’t quite remember . . . . .” or are you able to comfortably explain what you read without feeling like the concepts are just out of reach?
- If you find that you are stumbling over your words, struggling to explain important concepts and forgetting steps in a process, etc. then look back over the chapter section and try again.
- Look over the chapter section to see if there are any important ideas you forgot to add. If so, try again.
- Repeat this process as part of your cool down.
Headings, review questions, lists of learning objectives, bolded words, pictures, graphics or charts that are there to help you more clearly understand concepts.
charts and/ or simple drawing that are used instead of or in addition to words and sentences to make a concept clear or show how two or more people, ideas, events, concepts, etc. relate to each other.
